
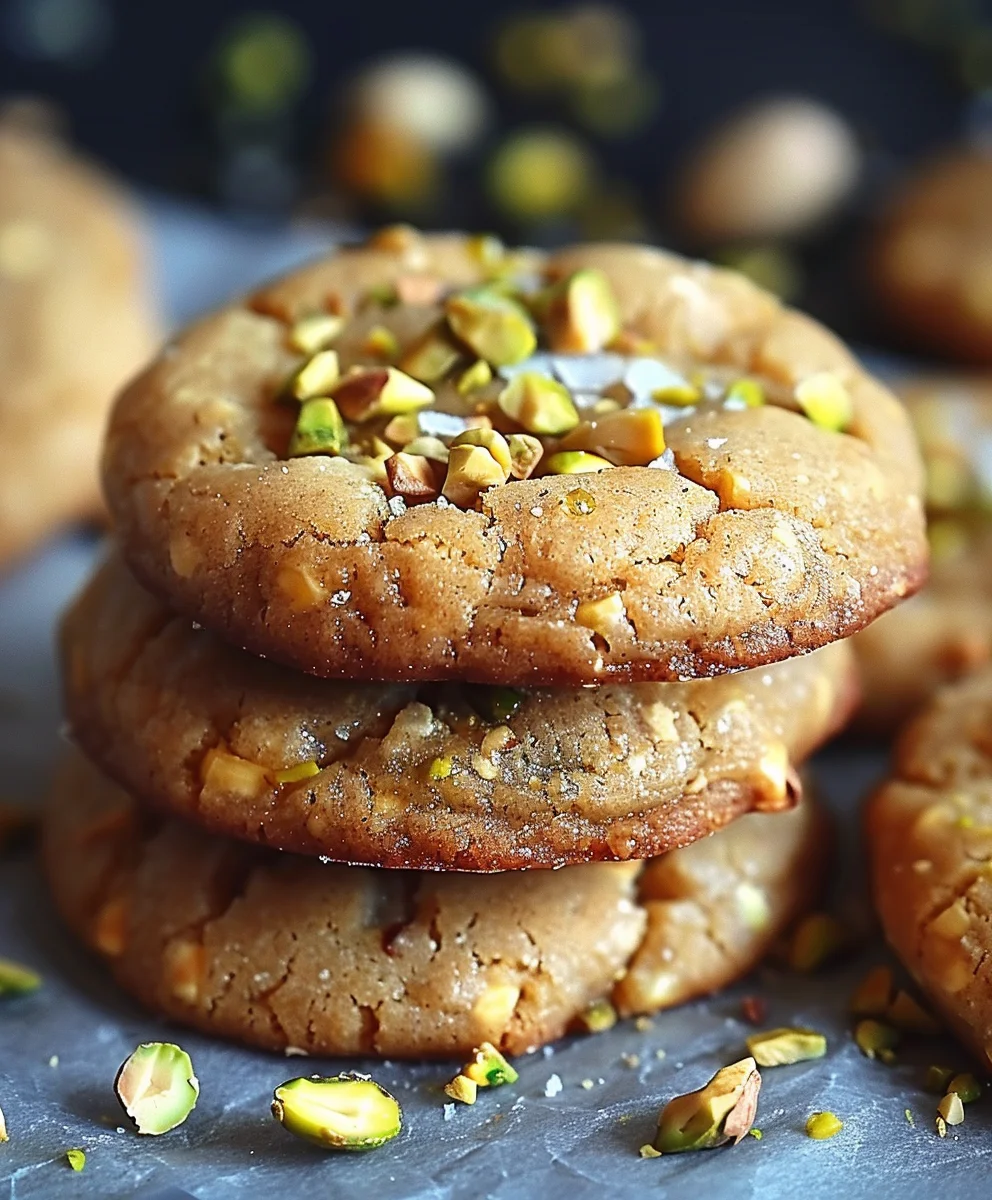
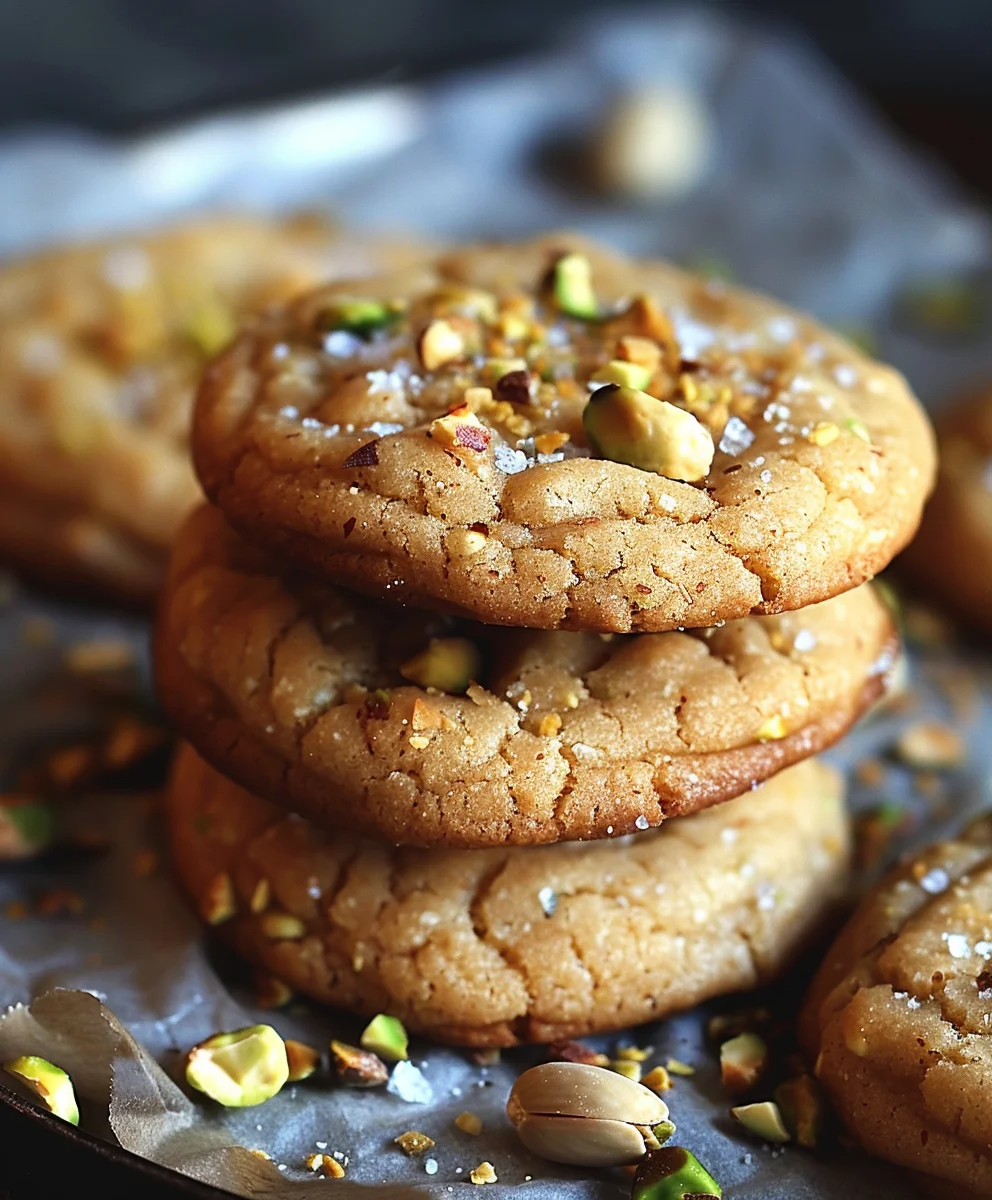
Salted Honey Pistachio Cookies are more than just a sweet treat; they are a delightful culinary journey waiting to be discovered. Imagine a cookie that expertly marries the rich, golden sweetness of honey with the distinct, slightly earthy crunch of vibrant green pistachios, all beautifully enhanced by a delicate whisper of sea salt. It’s a symphony of flavors and textures that promises to captivate your palate from the very first bite.
While the cookie itself has a globally beloved history, the individual ingredients of honey and pistachios boast ancient and fascinating origins. Pistachios, often referred to as “green gold,” have been cultivated in the Middle East for thousands of years, revered for their distinctive flavor and nutritional value. Honey, nature’s oldest sweetener, has been cherished across cultures since antiquity, adding a timeless warmth and unparalleled depth to any creation. Bringing these two ingredients together in a cookie form creates a truly unique and sophisticated offering.
Why You’ll Fall in Love with These Cookies
I am absolutely thrilled to share this recipe, as I’ve found that people adore these cookies not only for their innovative and elegant flavor profile but also for their utterly irresistible texture – a perfect harmony of chewy, tender centers and delicately crisp edges. They offer a refreshing departure from your everyday cookie, making them an ideal choice whether you’re looking to impress guests at a special gathering or simply seeking a moment of personal indulgence. The subtle hint of salt truly elevates every sweet and nutty note, ensuring each bite of these incredible Salted Honey Pistachio Cookies is a memorable experience.

Ingredients:
- 2 ½ cups (300g) All-Purpose Flour: I always make sure to use unbleached all-purpose flour for the best texture in my cookies. This amount ensures a perfect balance, giving the cookies structure without making them tough. Measuring accurately is key here; I usually spoon the flour into the measuring cup and level it off with a straight edge to avoid packing too much in.
- 1 teaspoon Baking Soda: This is our leavening agent, providing that lovely lift and helping the cookies achieve a soft, slightly chewy interior. Make sure your baking soda is fresh, as old baking soda can lose its potency and result in flat, dense cookies.
- ½ teaspoon Fine Sea Salt: A crucial ingredient to balance the sweetness and enhance all the other flavors. Don’t skip this! It truly brings out the richness of the butter, honey, and pistachios.
- 1 cup (226g) Unsalted Butter: This needs to be at room temperature, which is incredibly important for creaming properly with the sugars. I usually take it out of the fridge an hour or two before I plan to bake. If it’s too cold, it won’t cream well; too warm, and your dough might be greasy. Look for butter that yields slightly to gentle pressure.
- ¾ cup (150g) Granulated Sugar: This provides sweetness and contributes to the spread and crispness of the cookie edges. It works in harmony with the brown sugar for a balanced sweetness.
- ½ cup (100g) Packed Light Brown Sugar: The brown sugar adds moisture, chewiness, and a lovely caramel-like depth of flavor. Make sure it’s fresh and soft; if yours is hard, a trick is to put it in an airtight container with a slice of apple or a piece of bread overnight to soften it up.
- 2 large Eggs: Again, these should be at room temperature. Room temperature eggs emulsify better with the creamed butter and sugar, creating a smoother, more uniform dough. They act as a binder, holding all our delightful ingredients together.
- 1 tablespoon Pure Vanilla Extract: Use the best quality vanilla you can find; it makes a noticeable difference in the overall flavor profile of these cookies. The warm, aromatic notes of vanilla complement the honey and pistachios beautifully.
- ¼ cup (60ml) Honey (for the dough): I love using a good quality, local honey here. It adds a unique, floral sweetness and a lovely chewiness to the cookie itself, not just the glaze. Its distinctive flavor is central to our “Salted Honey Pistachio Cookies” identity.
- 1 cup (120g) Shelled Pistachios, roughly chopped (for the dough): Look for unsalted, shelled pistachios. The vibrant green color is not just pretty, but their unique earthy, slightly sweet flavor pairs perfectly with honey. Roughly chopping them ensures you get lovely bites of pistachio throughout the cookie.
- ½ cup (60g) Shelled Pistachios, finely chopped (for topping/glaze): These are for decorating and adding that final textural crunch. Finely chopping them helps them adhere better to the glaze and makes for a more elegant finish.
- 2 tablespoons Flaky Sea Salt (for topping): This is the salted part of our Salted Honey Pistachio Cookies! A sprinkle of flaky sea salt on top right after they come out of the oven or even after the glaze adds a delightful crunch and a burst of salty contrast that elevates every sweet bite. Don’t underestimate its power.
For the Honey Glaze:
- 1 cup (120g) Powdered Sugar (Confectioners’ Sugar): This provides the base for our smooth, sweet glaze. Sift it if it’s lumpy to ensure a silky texture.
- 2 tablespoons Honey: Another dose of our star ingredient! This honey will infuse the glaze with its signature flavor and provide a beautiful sheen.
- 1-2 tablespoons Milk or Cream: I usually start with one tablespoon and add more drop by drop until I reach my desired consistency – a glaze that’s thick enough to coat but thin enough to drip slightly. Whole milk or even a touch of heavy cream will give you a richer glaze.
Preparation Phase 1: Creating the Cookie Dough
This is where the magic begins, combining our carefully selected ingredients to form the foundation of our delicious cookies. Patience and precision in these steps will yield the most delightful results.
- Whisk Together Dry Ingredients: In a medium bowl, I start by whisking together the 2 ½ cups of all-purpose flour, 1 teaspoon of baking soda, and ½ teaspoon of fine sea salt. I give it a good whisk for about 30 seconds to a minute, ensuring everything is thoroughly combined and aerated. This step is important because it evenly distributes the leavening and salt throughout the flour, preventing pockets of unmixed ingredients later on. Set this bowl aside for a moment.
- Cream Butter and Sugars: In the bowl of a stand mixer fitted with the paddle attachment (or using a large bowl and a handheld electric mixer), I add the 1 cup of room temperature unsalted butter, ¾ cup of granulated sugar, and ½ cup of packed light brown sugar. I beat these together on medium-high speed for about 3 to 5 minutes. This creaming process is absolutely vital! You’re looking for the mixture to become light, fluffy, and significantly paler in color. This incorporates air into the butter, which will help our cookies become tender and slightly airy, preventing them from being dense. I often scrape down the sides of the bowl once or twice during this process to ensure everything is evenly incorporated.
- Incorporate Wet Ingredients: With the mixer on medium-low speed, I add the 2 room temperature large eggs, one at a time. I make sure each egg is fully incorporated before adding the next, scraping down the bowl as needed. This prevents the mixture from curdling and keeps the emulsification smooth. Once both eggs are in, I pour in the 1 tablespoon of pure vanilla extract and the ¼ cup of honey. I beat this on medium speed until just combined, about another minute. The mixture will look rich and glossy, and the aroma filling my kitchen is already starting to be heavenly!
- Combine Wet and Dry Mixtures: Now it’s time to bring our wet and dry ingredients together. I reduce the mixer speed to low and gradually add the whisked dry ingredients to the wet ingredients, about one-third at a time. I mix only until just combined. Do not overmix! Overmixing develops gluten in the flour, which can lead to tough, chewy cookies – and we’re aiming for tender and soft with a delightful chew. As soon as you no longer see streaks of dry flour, stop the mixer.
- Fold in Pistachios: Finally, I remove the bowl from the mixer and, using a sturdy spatula, gently fold in the 1 cup of roughly chopped pistachios. I fold them in until they are evenly distributed throughout the dough. I love seeing the flecks of green against the creamy dough; it promises a beautiful cookie!
Preparation Phase 2: Shaping and Chilling the Dough
Chilling the dough is a step I never skip for these cookies. It’s truly a game-changer for flavor development and texture. It allows the butter to firm up, preventing excessive spreading during baking, and gives the flavors time to meld beautifully.
- Divide and Shape the Dough: I divide the dough in half. On a lightly floured surface or between two sheets of parchment paper, I gently roll each half into a log, about 1 ½ to 2 inches in diameter. I try to make them as even as possible so my cookies bake uniformly. If the dough is too sticky, a little flour on my hands or the parchment helps.
- Wrap and Chill: I tightly wrap each dough log in plastic wrap. Then, I place both logs in the refrigerator for a minimum of 2 hours. Frankly, I often chill mine for 4 hours, or even overnight, because the flavor deepens so much. This chilling period is non-negotiable for these cookies. It not only prevents spreading but also allows the honey and other flavors to fully develop, resulting in a more complex and delicious cookie. You can even chill them for up to 3 days, or freeze them for longer storage (see storage tips below).
Baking the Salted Honey Pistachio Cookies
The moment of truth! Baking these cookies correctly ensures they have that perfect golden edge, soft center, and just the right amount of chew. Getting the oven temperature and timing right is key.
- Preheat Oven and Prepare Baking Sheets: About 20-30 minutes before I’m ready to bake, I preheat my oven to 375°F (190°C). I line two large baking sheets with parchment paper or silicone baking mats. This prevents sticking and helps with even baking.
- Slice the Dough: I take one log of chilled dough out of the refrigerator. Using a sharp knife, I slice the dough into ½-inch thick rounds. I find that this thickness gives the best balance of crispy edges and a soft, chewy interior. If your dough is too cold and hard to slice, let it sit at room temperature for 5-10 minutes, but don’t let it get too soft.
- Arrange on Baking Sheets: I arrange the cookie dough slices on the prepared baking sheets, leaving about 2 inches between each cookie. They will spread slightly, so giving them enough space is important to prevent them from merging into one giant cookie. I usually fit about 12 cookies per standard baking sheet.
- Bake Until Golden: I bake the cookies for 10 to 12 minutes, or until the edges are golden brown and the centers are just set but still look a little soft. Oven temperatures can vary significantly, so I always keep a close eye on them during the last few minutes. I rotate the baking sheets halfway through the baking time to ensure even browning.
- Cool on Baking Sheets, Then Transfer: Once baked, I remove the baking sheets from the oven. This next step is important: I let the cookies cool on the baking sheets for about 5 minutes. This allows them to firm up slightly before I attempt to move them. If you try to move them too soon, they might fall apart. After 5 minutes, I carefully transfer the cookies to a wire rack to cool completely. While the first batch is cooling, I repeat the slicing and baking process with the second dough log.
Finishing Touches: The Honey Glaze and Pistachio Topping
This is where we add the “honey” and “pistachio” to the “Salted Honey Pistachio Cookies” in a truly beautiful and delicious way. The glaze adds an extra layer of sweetness and moisture, while the toppings provide texture and visual appeal.
- Prepare the Honey Glaze: While the cookies are cooling, I prepare the honey glaze. In a small bowl, I whisk together the 1 cup of powdered sugar, 2 tablespoons of honey, and 1 tablespoon of milk or cream. I start with 1 tablespoon of milk, and if the glaze seems too thick to drizzle, I add another half-teaspoon or full teaspoon of milk, little by little, until it reaches a smooth, pourable but still opaque consistency. It should be thick enough to coat a spoon but thin enough to gently drizzle. Sifting the powdered sugar beforehand helps prevent lumps and ensures a super smooth glaze.
- Glaze the Cooled Cookies: Once the cookies are completely cool, I drizzle the honey glaze over them using a spoon or a whisk. I like to do a zig-zag pattern, but you can also fully coat them if you prefer a sweeter, more intense honey flavor. I try to work fairly quickly before the glaze starts to set.
- Add Pistachio and Sea Salt Topping: Immediately after glazing each cookie (while the glaze is still wet), I sprinkle the finely chopped pistachios (the ½ cup reserved for topping) and a pinch of flaky sea salt (the 2 tablespoons reserved for topping) over the top. The wet glaze acts as an adhesive, ensuring the beautiful green pistachios and glistening salt flakes stick perfectly. The contrast of the salty crunch with the sweet, soft cookie is truly sublime.
- Allow Glaze to Set: I let the glazed and topped cookies sit on the wire rack for at least 30 minutes, or until the glaze has fully set. This prevents stickiness and makes them easier to handle and store.
Serving and Storage Tips
To ensure you enjoy these Salted Honey Pistachio Cookies at their very best, here are my recommendations for serving and keeping them fresh.
- Serving Fresh: These cookies are absolutely divine when enjoyed fresh, especially once the glaze has set. The textures – soft and chewy cookie, creamy glaze, crunchy pistachios, and flaky sea salt – are at their peak. I love serving them with a cup of tea or coffee, or simply as a delightful snack on their own.
- Aromatic Experience: Before taking a bite, I always encourage people to take a moment to appreciate the wonderful aroma. The blend of honey, vanilla, and roasted pistachios is truly inviting and adds to the overall enjoyment of these special treats.
- Storing Baked Cookies: Once the glaze has fully set, I store the cooled cookies in an airtight container at room temperature for up to 3-4 days. To maintain their freshness and prevent them from drying out, I sometimes place a slice of bread or a half an apple in the container with them – it helps keep them soft, though this is less necessary with the glaze.
- Freezing Baked Cookies: If you want to keep them longer, you can freeze the baked and fully cooled cookies (without the glaze and toppings for best results, or with the glaze fully set if you must). Wrap them tightly in plastic wrap individually, then place them in a freezer-safe bag or container for up to 2-3 months. Thaw them at room temperature before glazing and topping, or simply letting them come to room temperature if already glazed.
- Freezing Dough Logs: This is a fantastic make-ahead tip! You can freeze the tightly wrapped dough logs for up to 3 months. When you’re ready to bake, simply slice the frozen dough and bake as directed, adding a minute or two to the baking time. This means you can have warm, freshly baked Salted Honey Pistachio Cookies whenever the craving strikes!
- Gifting: These cookies make a wonderful homemade gift. Once the glaze is set, I stack them in a nice box or tin, perhaps with some tissue paper, and they are always a hit. The unique flavor profile and beautiful presentation truly impress.
Conclusion:
And there you have it, my friends! We’ve reached the delicious culmination of our baking journey. I truly hope you’ve enjoyed exploring this recipe with me, and I’m beyond excited for you to experience the magic that happens when you bring these flavors to life in your own kitchen. If you’ve been on the fence about trying a new cookie recipe, let me assure you, this is the one to jump into with both feet. These aren’t just any cookies; they are an experience, a symphony of textures and tastes that will leave a lasting impression on anyone lucky enough to take a bite.
Why are these Salted Honey Pistachio Cookies an absolute must-try? It boils down to their unparalleled balance and sophisticated simplicity. Imagine a cookie that offers a delightful chewiness, yielding to a tender, almost cake-like interior, all while boasting slightly crispy, golden edges. Now, infuse that perfect texture with the golden, floral sweetness of honey, the earthy, vibrant crunch of pistachios, and the bright, contrasting sparkle of sea salt. It’s a combination that hits every note – sweet, savory, nutty, and utterly comforting. They manage to feel incredibly gourmet, like something you’d find in a high-end bakery, yet they are remarkably straightforward to prepare, proving that extraordinary results don’t always require extraordinary effort. I promise you, the aroma alone as they bake will be enough to win you over, filling your home with a scent that’s warm, inviting, and utterly irresistible. They truly stand apart from your everyday chocolate chip or oatmeal cookie, offering a unique profile that’s both familiar and wonderfully novel.
Serving Suggestions to Elevate Your Experience:
While these cookies are absolutely divine straight from the cooling rack, still warm and slightly gooey, there are so many delightful ways to enjoy them. For a truly indulgent treat, serve them warm with a scoop of premium vanilla bean ice cream, allowing the cookie’s warmth to gently melt the ice cream, creating a spoonful of pure bliss. They also make an exquisite companion to your morning coffee or an afternoon cup of Earl Grey tea, their sweetness and crunch providing the perfect counterpoint to your brew. Consider crumbling a few over a bowl of Greek yogurt with fresh berries for a decadent breakfast or dessert. For a more sophisticated presentation when entertaining, arrange them artfully on a platter, perhaps dusted with a touch of powdered sugar or a delicate drizzle of melted white chocolate.
Exciting Variations to Spark Your Creativity:
One of the joys of baking is the freedom to experiment, and this recipe offers a fantastic canvas for your culinary imagination. While the classic combination of honey and pistachio is hard to beat, don’t hesitate to play around! You could swap out the pistachios for other nuts like toasted almonds, pecans, or even walnuts for a different nutty dimension. For those who adore a chocolatey twist, a handful of white chocolate chips or finely chopped dark chocolate would be a welcome addition, creating an even richer flavor profile. A hint of orange or lemon zest, added to the dough, could brighten the entire cookie, lending a lovely citrusy perfume. For an extra touch of glamour, consider a light honey glaze drizzled over the cooled cookies, or even making them into mini cookie sandwiches with a creamy honey-infused cream cheese frosting. These cookies also make truly thoughtful homemade gifts; imagine wrapping a beautifully stacked tower of them in cellophane, tied with a pretty ribbon – a gift from the heart that’s guaranteed to be appreciated.
Your Turn to Bake and Share!
Now, it’s your turn! I genuinely encourage you to grab your apron, preheat your oven, and embark on this delightful baking adventure. Don’t be shy – these Salted Honey Pistachio Cookies are waiting to become your new favorite. There’s something incredibly satisfying about creating something so delicious from scratch, and I promise you the compliments will roll in. Once you’ve baked them, I would absolutely love to hear about your experience! Did you stick to the recipe, or did you try one of the variations? What did your friends and family think? Please, share your photos, your triumphs, and any clever twists you came up with. Your feedback and creativity inspire me and our entire baking community. So go ahead, bake a batch, make some memories, and spread the joy of these truly exceptional cookies. Happy baking!
Salted Honey Pistachio Cookies
Experience a delightful culinary journey with these Chewy Salted Honey Pistachio Cookies. They expertly marry the rich sweetness of honey with the earthy crunch of pistachios, enhanced by a whisper of sea salt for a symphony of flavors and textures.
Ingredients
-
1 cup unsalted butter, browned and cooled
-
½ cup light brown sugar
-
¼ cup granulated sugar
-
½ cup honey
-
1 large egg
-
1 tbsp vanilla extract
-
1 tsp coarse sea salt
-
1 tsp baking soda
-
2½ cups all-purpose flour
-
1 cup chopped roasted pistachios
-
1 cup white chocolate chips (optional)
-
Flaked sea salt for garnish (optional)
Instructions
-
Step 1
Brown Butter: In a light-colored saucepan, melt 1 cup unsalted butter over medium heat. Continue cooking, stirring, until golden brown flecks appear and it smells nutty (5-7 mins). Transfer to a heatproof bowl to cool. -
Step 2
Combine Dry Ingredients: Whisk together 2½ cups all-purpose flour, 1 tsp baking soda, and 1 tsp coarse sea salt in a medium bowl. -
Step 3
Cream Butter & Sugars: In a stand mixer, cream the cooled browned butter with ½ cup light brown sugar and ¼ cup granulated sugar for 3-5 minutes until light and fluffy. Scrape down the bowl. -
Step 4
Add Wet Ingredients: Beat in ½ cup honey, 1 large egg, and 1 tbsp vanilla extract until just combined (about 1 minute). -
Step 5
Mix Wet & Dry: Gradually add the dry ingredients to the wet mixture on low speed, mixing only until just combined. Avoid overmixing. -
Step 6
Fold in Additions: Gently fold in 1 cup chopped roasted pistachios and 1 cup white chocolate chips (if using) until evenly distributed. -
Step 7
Shape & Chill Dough: Divide dough in half. Roll each half into a 1½-2 inch log. Wrap tightly in plastic wrap and refrigerate for a minimum of 2 hours, or up to 3 days. -
Step 8
Preheat Oven & Prepare: Preheat oven to 375°F (190°C). Line two large baking sheets with parchment paper. -
Step 9
Slice & Arrange: Slice chilled dough logs into ½-inch thick rounds. Arrange cookies 2 inches apart on prepared baking sheets. -
Step 10
Bake Cookies: Bake for 10-12 minutes, or until edges are golden brown and centers are just set. Rotate sheets halfway through. -
Step 11
Cool & Garnish: Let cool on baking sheets for 5 minutes, then transfer to a wire rack to cool completely. For an optional touch, sprinkle with flaked sea salt for garnish while still warm. Repeat with remaining dough.
Important Information
Nutrition Facts (Per Serving)
It is important to consider this information as approximate and not to use it as definitive health advice.
Allergy Information
Please check ingredients for potential allergens and consult a health professional if in doubt.
Leave a Comment