
Caramel Apple Cider Float Recipe is not just a drink; it’s a celebration of autumn in a glass, a delightful concoction that promises to transport your taste buds straight to a cozy orchard on a crisp fall day. Imagine the comforting warmth of spiced apple cider, elevated by a luscious swirl of buttery caramel, all crowned with a generous scoop of creamy vanilla ice cream and a fizzy apple soda top-off. While the classic soda float has charmed generations with its simple pleasure and soda fountain nostalgia, our seasonal take embraces the harvest, transforming a beloved treat into an unforgettable fall indulgence. I find that people absolutely adore this dish not only for its harmonious blend of sweet, tangy, and creamy textures but also for its undeniable visual appeal, making it a showstopper. It’s the perfect, effortless dessert or festive beverage for holiday gatherings, a cozy evening by the fire, or simply a special treat to welcome the cooler weather. This unique Caramel Apple Cider Float Recipe truly captures the essence of fall, offering a comforting yet exciting twist on a cherished classic.

Ingredients:
- High-Quality Apple Cider: 4-6 cups, well-chilled. I always recommend seeking out a fresh-pressed, unfiltered apple cider for the best flavor experience. The quality of your cider truly shines through in this Caramel Apple Cider Float Recipe, so don’t skimp here! Look for ciders with a robust apple flavor, perhaps with a hint of spice already infused if you like.
- Premium Vanilla Bean Ice Cream: 4-6 generous scoops, approximately 1 pint to 1.5 quarts, depending on how many floats you’re making and how big you like your scoops! I find that a really creamy, full-fat vanilla bean ice cream with visible specks of vanilla provides the perfect counterpoint to the tartness of the cider and the sweetness of the caramel. Its rich texture also holds up beautifully in the float.
- Homemade or High-Quality Store-Bought Caramel Sauce: 1/2 cup, plus extra for drizzling and garnishing. While store-bought caramel can be convenient, making your own truly elevates this float to a gourmet level. I’ll include instructions for a simple homemade caramel if you’re feeling ambitious! If buying, choose a thick, rich caramel sauce, ideally one made with real butter and cream.
- Optional Garnishes:
- Whipped Cream: A dollop or two per float. Freshly whipped cream adds another layer of creamy decadence.
- Cinnamon Sticks: 1 per float, for stirring and aroma.
- Thinly Sliced Apples: Granny Smith or Honeycrisp work wonderfully for their crisp texture and tartness. A few slices per float.
- A Dash of Ground Cinnamon or Apple Pie Spice: For dusting over the top.
- Extra Caramel Drizzle: Because you can never have too much caramel!
- Optional (for a “Spiked” Adult Version):
- Whiskey or Bourbon: 1-2 ounces per float, for a warm, robust kick.
- Spiced Rum: 1-2 ounces per float, for a more aromatic and sweet undertone.
Equipment You’ll Need:
- Tall glasses or mugs (pint glasses work perfectly for a full float experience).
- Ice cream scoop.
- Measuring cups and spoons.
- Small saucepan (if making homemade caramel or warming store-bought caramel).
- Whisk (for homemade caramel).
- Serving spoons or straws (wide ones work best for floats!).
Preparing Your Delicious Caramel Apple Cider Float:
Phase 1: Gathering and Prepping Your Essentials
-
Chill Your Glasses: This is a small but mighty tip for any float! About 15-20 minutes before you plan to assemble your Caramel Apple Cider Floats, place your chosen tall glasses or mugs in the freezer. A frosty glass helps to keep your ice cream from melting too quickly, ensuring you get to savor every creamy, fizzy sip. It also adds a wonderfully refreshing touch, especially if you’re enjoying these on a warmer autumn day or even as a unique summer treat.
Why Chilling Matters:
When the cold ice cream hits a chilled glass, it creates a less drastic temperature difference compared to a room-temperature glass. This slows down the melting process, giving you more time to enjoy the float’s beautiful layers and textures before it becomes a homogenous liquid.
-
Ensure Your Apple Cider is Perfectly Chilled: While some floats are made with warm beverages, for this Caramel Apple Cider Float Recipe, a well-chilled apple cider is paramount. The contrast between the icy cold cider and the creamy ice cream is what makes a float so delightful. If your cider isn’t cold enough, your ice cream will simply melt into a puddle too quickly, losing that signature float experience. I like to keep mine in the fridge for at least 4 hours, or even overnight, to guarantee it’s frosty.
Consider the Cider:
Don’t hesitate to give your apple cider a quick taste test before assembly. If you feel it needs a little extra zest or spice, you can infuse it with a cinnamon stick, a few cloves, or even a star anise for an hour or two before chilling. Just remember to strain out the spices before pouring!
-
Prepare Your Caramel Sauce (Warm if Desired): If you’re using store-bought caramel sauce, I often like to gently warm it in a small saucepan over low heat for a few minutes, or in the microwave for 15-30 seconds. This makes it wonderfully pourable and enhances its aroma. Be careful not to overheat it, as it can become too thin. If you’re going for the homemade option, now’s the time to get cooking!
The Magic of Warm Caramel:
A slightly warm caramel sauce not only flows beautifully for that aesthetic drizzle but also releases its rich, buttery aroma, adding another sensory layer to your float. However, if you prefer a thicker, more textured caramel, using it at room temperature is perfectly fine too.
-
Get Your Garnishes Ready: Wash and thinly slice your apples. Have your whipped cream ready to go (either from a can or freshly whipped). If using, have your cinnamon sticks nearby. Preparing these ahead of time ensures a smooth, quick assembly process, which is essential when dealing with melting ice cream!
Presentation is Key:
Remember, we eat with our eyes first! A beautifully garnished float looks and tastes even better. Arrange your apple slices on a small plate, ready for placement. If you’re making fresh whipped cream, now is the time to whip it to soft peaks.
Phase 2: Crafting Your Caramel Masterpiece (Optional, but oh-so-worth-it!)
While a good quality store-bought caramel works perfectly, nothing beats the rich, buttery depth of a homemade caramel sauce. If you have an extra 15-20 minutes, I highly recommend making your own for this Caramel Apple Cider Float Recipe. It adds an unparalleled layer of flavor and sophistication.
-
Gather Your Caramel Ingredients: You’ll need 1 cup granulated sugar, 1/4 cup water, 6 tablespoons unsalted butter (cut into 6 pieces), 1/2 cup heavy cream (warmed slightly in the microwave or a small saucepan), and 1/2 teaspoon flaky sea salt (optional, but highly recommended for salted caramel!).
Quality Ingredients, Superior Caramel:
Using good quality unsalted butter and heavy cream will make a noticeable difference in the final taste and texture of your caramel. The sea salt, even just a pinch, beautifully balances the sweetness and brings out the deeper notes of the caramel.
-
Start the Sugar Syrup: In a medium, heavy-bottomed saucepan, combine the granulated sugar and water. Stir gently with a wooden spoon or heatproof spatula just until the sugar is moistened. Avoid stirring too much after this point to prevent crystallization.
Patience is a Virtue:
Resist the urge to constantly stir the sugar mixture. Over-stirring can cause sugar crystals to form, leading to a grainy caramel. Let the heat do its work.
-
Cook the Sugar: Place the saucepan over medium-high heat. Allow the mixture to come to a boil without stirring. Watch it carefully as it boils, as sugar can burn very quickly. You’ll see it transition from clear to a pale yellow, then to an amber, and finally to a deep, rich amber color. This usually takes about 8-12 minutes, but cook time can vary.
The Perfect Color:
The ideal color for caramel is a deep amber, like a copper penny. This signifies rich flavor development. Don’t go too dark, or it will taste bitter, but don’t stop too early, or it will lack depth. A candy thermometer can be helpful here; aim for 340-350°F (170-175°C).
-
Add the Butter: Once the sugar reaches that beautiful deep amber color, immediately remove the saucepan from the heat. Carefully add the butter, piece by piece, while whisking constantly. The mixture will bubble up vigorously, so be cautious! Keep whisking until all the butter is fully incorporated and the mixture is smooth.
Safety First!
When adding the butter, stand back slightly as the steam and bubbling can be intense. A long-handled whisk is your friend here.
-
Whisk in the Cream: Slowly pour in the warmed heavy cream while continuing to whisk vigorously. Again, the mixture will bubble and steam. Keep whisking until the caramel is smooth and all ingredients are fully combined.
Warm Cream Prevents Splatter:
Warming the heavy cream slightly before adding it helps to temper the mixture and prevents the caramel from seizing up as dramatically. If it does seize a little, don’t panic! Just return it to very low heat and whisk gently until it smooths out again.
- Add Salt (Optional): If making salted caramel, whisk in the flaky sea salt.
-
Cool and Store: Pour the finished caramel sauce into a heatproof jar or container. Let it cool completely at room temperature. As it cools, it will thicken significantly. It can be stored in the refrigerator for up to 2-3 weeks. When ready to use for your float, gently warm it as described in step 3.
The Beauty of Homemade:
This homemade caramel sauce is incredibly versatile. It’s not just for your Caramel Apple Cider Floats; it’s also divine on ice cream, pancakes, or even straight from the spoon! Its rich, complex flavor is truly unmatched.
Phase 3: Assembling Your Dreamy Float
Now for the fun part! This is where the magic happens and your Caramel Apple Cider Float comes to life. Pay attention to the order of operations for the best float experience!
-
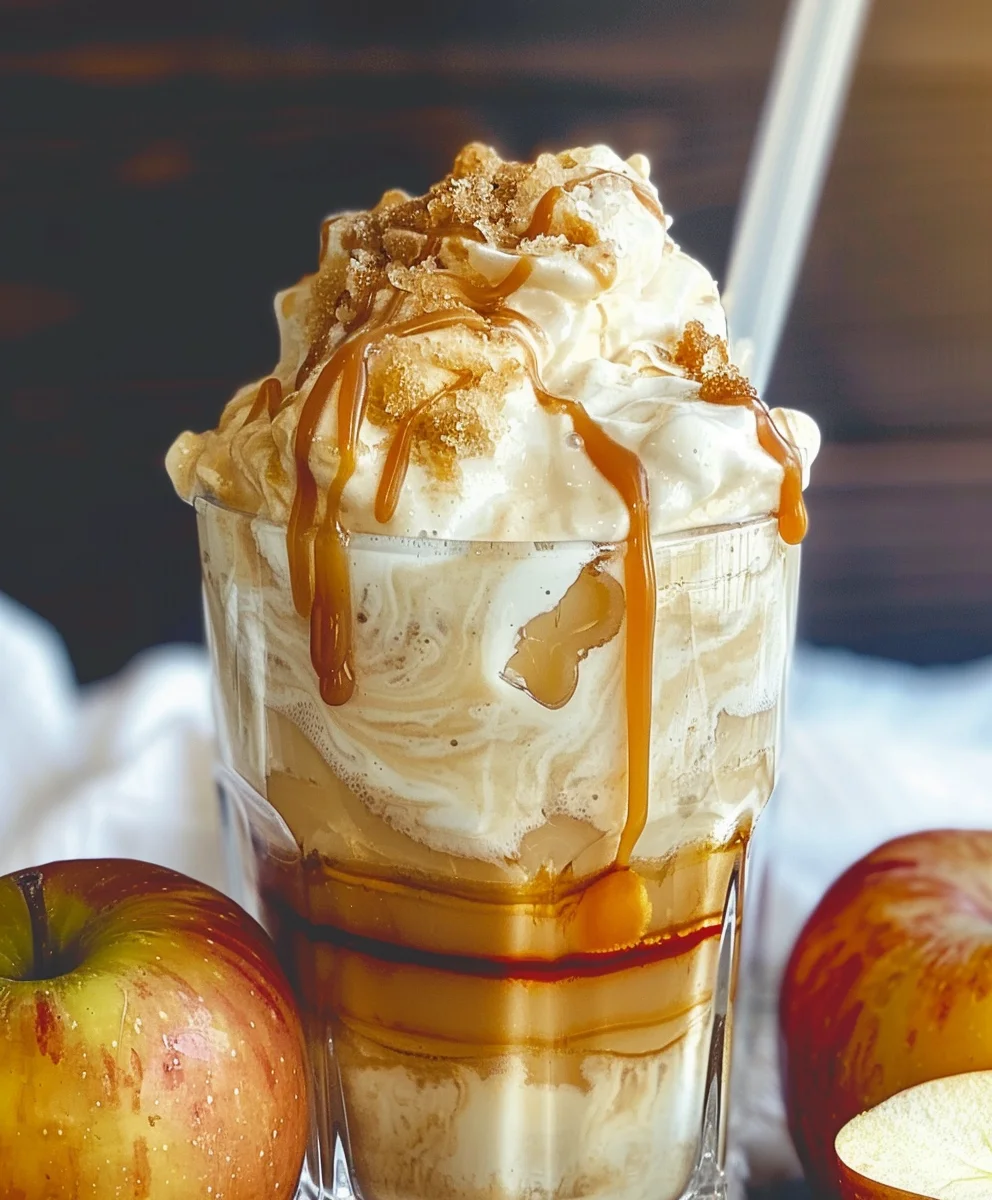
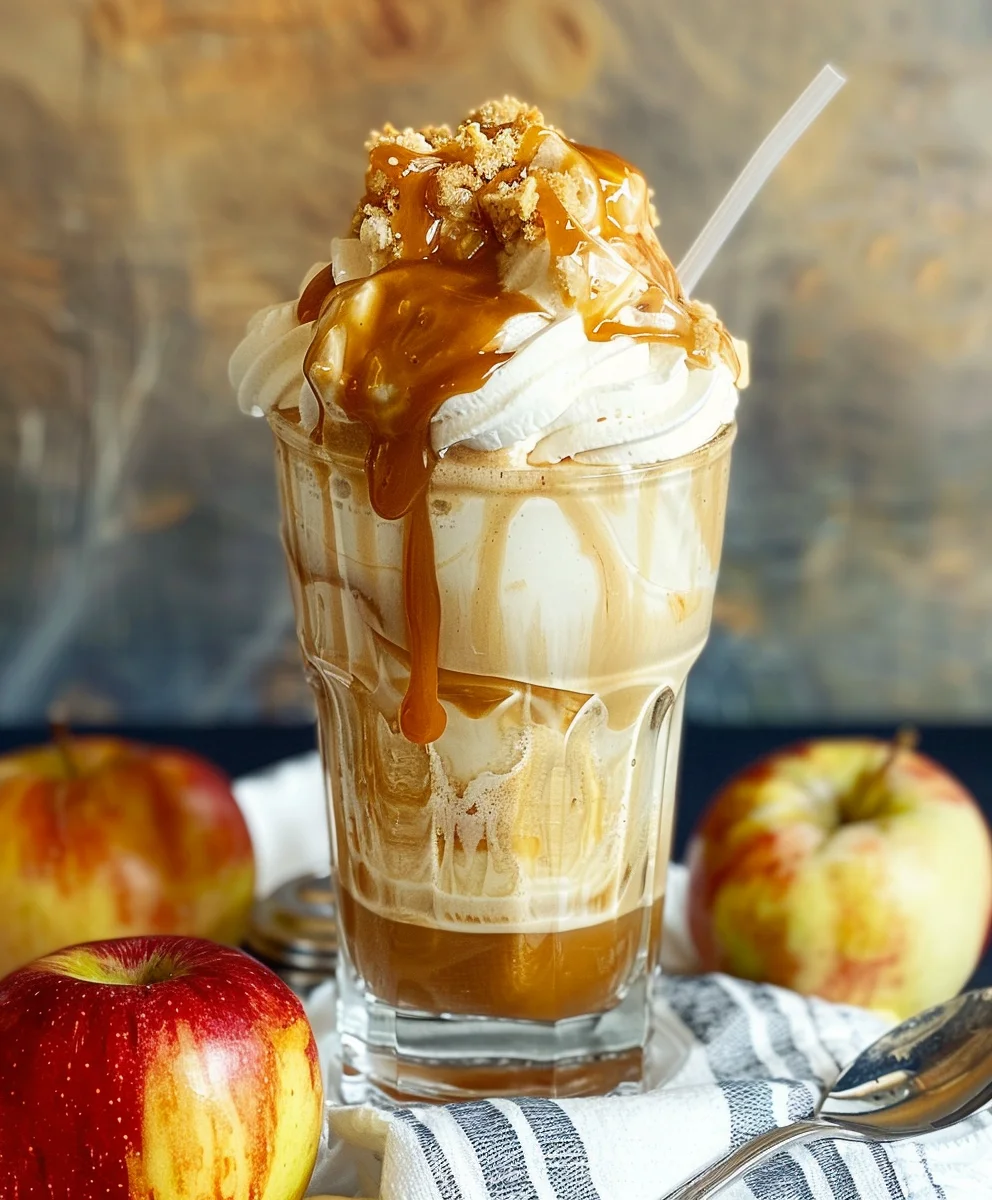
Caramel Drizzle the Glass: Take your chilled glass from the freezer. Hold your caramel sauce (warm, if desired) and drizzle it generously around the inside walls of the glass. Let it drip down in lovely streaks. This creates not only a beautiful visual but also ensures you get a delightful hint of caramel with every sip.
The Art of the Drizzle:
Don’t be shy with the caramel here! I like to spin the glass as I drizzle, creating a beautiful spiral effect. This initial layer of caramel clings to the glass, making for a truly indulgent experience from start to finish.
-
Scoop in the Ice Cream: Carefully place one or two generous scoops of premium vanilla bean ice cream into the prepared glass. I usually aim for two medium scoops, or one very large one, ensuring there’s enough room for the cider to create that delightful fizz.
The Perfect Scoop:
For perfectly round scoops, let your ice cream sit out for 5-10 minutes to soften slightly. Dip your ice cream scoop in hot water between scoops for easier release and a smoother shape. Gently place the scoops into the glass to avoid messing up your caramel drizzle.
-
Pour in the Apple Cider: Slowly and gently pour the well-chilled apple cider over and around the ice cream scoops. Pouring slowly helps to create that wonderful fizz and froth that is characteristic of a float, rather than just drowning the ice cream. Fill the glass almost to the top, leaving just a little room for garnishes.
The Fizz Factor:
The colder the cider and the slower you pour, the more foam and fizz you’ll achieve. This effervescence is part of the fun and texture of a float, so take your time with this step. Watch as the cider and ice cream magically interact, creating a beautiful, bubbly cloud.
-
Add Your Optional Alcohol (for Spiked Floats): If you’re making an adult version, now is the time to gently pour in your chosen whiskey, bourbon, or spiced rum. Do this slowly, allowing it to mingle with the cider and ice cream.
Flavor Pairing:
Whiskey or bourbon adds a smoky, warm depth that complements the apple and caramel beautifully. Spiced rum offers a sweeter, more aromatic kick, enhancing the existing autumnal spices. Experiment to find your favorite!
-
Garnish with Gusto: This is where you personalize your Caramel Apple Cider Float! Top with a generous swirl of whipped cream if desired. Drizzle more caramel sauce over the whipped cream and around the rim of the glass. Place a cinnamon stick in the float for stirring and an aromatic flourish. Garnish with a few thin apple slices, either resting on the rim or nestled into the whipped cream. A final dusting of ground cinnamon or apple pie spice adds a lovely finishing touch.
Embrace the Aesthetic:
Think about how you want your float to look! A tall, elegant cinnamon stick standing proud, apple slices fanned out, and a generous cascade of caramel – these details truly make your float special and Instagram-worthy!
-
Serve Immediately and Enjoy: Floats are best enjoyed right after assembly when the ice cream is still firm and the cider is fizzy. Hand out long spoons or wide straws for the full enjoyment experience.
Savor the Moment:
Encourage everyone to dig in right away! The beauty of a float is in its evolving textures and temperatures, from the creamy ice cream to the fizzy cider and the decadent caramel.
Tips for the Perfect Caramel Apple Cider Float:
- Temperature Control is King: I cannot stress enough how important cold ingredients are. Your cider needs to be icy cold, and your ice cream should be very firm. This ensures a slow melt and maximum fizz.
- The Right Glassware: Tall, clear glasses (like pint glasses or even large Mason jars) are ideal. They showcase the beautiful layers of your float and provide ample room for ice cream, cider, and garnishes.
- Don’t Rush the Pour: Pouring the cider slowly is key to creating that wonderful, foamy head that makes a float so visually appealing and texturally interesting.
- Caramel Consistency: If your homemade caramel is too thick, gently warm it. If store-bought, make sure it’s pourable but not so thin it runs straight to the bottom without clinging to the glass.
- Quality of Ingredients: As with any simple recipe, the better the quality of your core ingredients (cider, vanilla ice cream, and caramel), the more spectacular your final Caramel Apple Cider Float will be.
- Presentation Matters: Take a moment to drizzle the caramel artfully and arrange your garnishes. It makes the treat feel even more special.
Elevate Your Float Game: Variations & Customizations
While the classic Caramel Apple Cider Float Recipe is utterly divine on its own, here are some ideas to customize it and make it uniquely yours:
- Spiced Cider Base: For an even more autumnal vibe, gently warm your apple cider with mulling spices (cinnamon sticks, whole cloves, star anise, orange peel) before chilling it completely. Strain out the spices before assembling your float. This infuses the cider with a wonderful warmth and complexity.
- Different Ice Cream Flavors:
- Salted Caramel Ice Cream: Double down on the caramel! This creates an even richer, more indulgent float.
- Cinnamon Ice Cream: Enhances the spice notes of the apple cider.
- Butter Pecan Ice Cream: Adds a nutty, buttery depth that pairs beautifully with the caramel and apple.
- Apple Pie Ice Cream: For the ultimate apple experience, this flavor brings all the elements of a classic apple pie into your float.
- Alternative Toppings:
- Toasted Pecans or Walnuts: A sprinkle of chopped, toasted nuts adds a lovely crunch and earthy flavor.
- Mini Marshmallows: If you’re going for a campfire treat vibe.
- A Dash of Nutmeg: Freshly grated nutmeg over the top adds a pungent, warm spice note.
- Diced Candied Pecans or Caramelized Apple Bits: For extra texture and concentrated sweetness.
- Dairy-Free/Vegan Version: This Caramel Apple Cider Float is easily adaptable!
- Use a high-quality non-dairy vanilla ice cream (coconut milk or oat milk based are often very creamy).
- Ensure your apple cider is dairy-free.
- Make your own vegan caramel sauce using full-fat coconut milk or a high-quality store-bought vegan caramel.
- Top with coconut whipped cream.
- Boozy Adult Floats: As mentioned in the ingredients, a shot of whiskey, bourbon, or spiced rum truly transforms this into a sophisticated, warming adult beverage. Just add 1-2 ounces per float after the cider has been poured. The alcohol complements the apple and caramel notes beautifully.
Serving Suggestions and Occasions:
The Caramel Apple Cider Float is incredibly versatile and perfect for a variety of settings:
- Autumn Gatherings: It’s the quintessential fall dessert drink, perfect for Halloween parties, Thanksgiving dessert, or any cozy autumn evening by the fire.
- Holiday Celebrations: A unique and festive addition to Christmas parties or New Year’s Eve gatherings, especially with the optional spiced cider and a shot of spirits.
- Dessert Treat: Serve it as a decadent dessert after a casual weeknight dinner or a special meal. It’s light yet satisfyingly rich.
- Backyard BBQs & Picnics: On a surprisingly warm day, this float can be a refreshing and unexpected treat, offering a familiar flavor profile in a new form.
- Kid-Friendly Fun: Without the alcohol, it’s a huge hit with children! Let them help with the garnishing for an extra fun activity.
- Anytime Indulgence: Honestly, you don’t need a special occasion. If you’re craving something sweet, fizzy, and comforting, a Caramel Apple Cider Float fits the bill perfectly!
I genuinely hope you enjoy creating and savoring this delightful Caramel Apple Cider Float. It’s a recipe that brings together familiar, comforting flavors in a wonderfully indulgent and exciting way. Happy floating!
Conclusion:
Oh, friends, if there’s one recipe I truly implore you to try this season, it’s the one we’ve just explored. This isn’t just another drink or dessert; it’s an experience, a warm hug in a mug that perfectly captures the essence of crisp autumn days and cozy evenings. From the moment the spiced cider hits your nose, mingling with the sweet promise of caramel and vanilla, you know you’re in for something truly special. I’ve found that this particular concoction strikes the most delightful balance between the bright, tart notes of fresh apple cider and the creamy, luxurious sweetness of vanilla bean ice cream, all elevated by that signature gooey caramel drizzle. It’s comforting yet exhilarating, familiar yet excitingly new, and incredibly simple to assemble, making it a perfect treat whether you’re hosting a gathering or simply indulging in a quiet moment of self-care.
Why This Caramel Apple Cider Float Recipe is an Absolute Must-Try!
What makes this specific
Caramel Apple Cider Float Recipe
an absolute standout? It’s more than just its incredible flavor profile, though that certainly plays a huge role. It’s the enchanting interplay of temperatures – the warmth of the cider meeting the cold, slowly melting ice cream – that creates a dynamic textural and taste sensation in every single sip. Each spoonful, or gulp, delivers a symphony of sweet, spicy, and tangy notes, creating a comforting richness that truly satisfies. I genuinely believe it’s the ultimate autumnal indulgence, surpassing plain hot cider or a simple scoop of ice cream by offering an elevated, layered dessert experience. It’s incredibly versatile for various occasions too; it can be the star dessert at your fall dinner party, a delightful after-school treat for the kids (or grown-ups!), or that perfect companion for a chilly evening by the fireplace with a good book. It’s the kind of recipe that doesn’t just fill your belly but truly warms your soul, making it an essential addition to your seasonal repertoire.
Unleash Your Creativity: Serving Suggestions & Flavorful Variations
While the basic Caramel Apple Cider Float is utterly delicious on its own, I always encourage a little experimentation to truly make it your own! For an extra touch of decadence, a generous swirl of homemade whipped cream on top, dusted with a pinch of cinnamon or nutmeg, is an absolute game-changer. You could also garnish with a cinnamon stick for a beautiful aroma and visual appeal, or even some thinly sliced fresh apple for a burst of crisp texture. Feeling a little nutty? A sprinkle of chopped candied pecans or walnuts would add a wonderful crunch and another layer of flavor. For the adults, consider adding a shot of spiced rum, bourbon, or even an apple brandy to the cider before pouring, transforming it into a sophisticated, spirited cocktail. Alternatively, for those who prefer a non-dairy option, feel free to swap the regular vanilla ice cream for a high-quality vegan vanilla bean ice cream and use coconut whipped cream – it’s just as delightful! You can also play with the cider itself; try adding a star anise or a few cloves to your cider as it heats for an even deeper, more complex spice profile. Or, if you’re a chocolate lover, a drizzle of chocolate syrup alongside the caramel can create an unexpected but delicious twist. The possibilities are truly endless, allowing you to personalize every float to your exact craving.
Personalize Your Perfect Float
Don’t be afraid to think outside the box! Maybe a scoop of salted caramel ice cream instead of vanilla, or even a cinnamon swirl ice cream could be fun. Imagine a drizzle of chocolate sauce in addition to the caramel, or a sprinkle of mini chocolate chips for an extra textural delight. The beauty of this recipe lies in its adaptability. It’s a canvas for your culinary imagination, and I’ve found that even the smallest tweaks can yield surprisingly wonderful results. Perhaps try different apple varieties in your cider for a slightly different tartness, or experiment with various types of caramel sauce – maybe a bourbon caramel for an extra kick! Each modification offers a new adventure for your taste buds, ensuring that your float is uniquely yours every time.
Your Turn: Dive In and Share the Sweetness!
Now that you have all the tips and tricks, it’s your turn! I genuinely hope you’ll give this phenomenal Caramel Apple Cider Float a try very soon. It’s truly one of my favorite ways to celebrate the season, and I’m confident it will become one of yours too. Once you’ve whipped up your own perfect float, I would absolutely love to hear about your experience! Did you stick to the classic, or did you venture into some delicious variations? What were your favorite toppings or flavor combinations? Please don’t hesitate to share your thoughts, photos, and any creative twists you come up with. Tag me on social media or leave a comment below – I can’t wait to see your wonderful creations and hear how this delightful treat brightened your day. Happy sipping, and happy autumn!
Caramel Apple Cider Float
A delightful celebration of autumn in a glass, this Caramel Apple Cider Float combines the comforting warmth of spiced apple cider with a luscious swirl of buttery caramel, crowned with creamy vanilla ice cream and a fizzy top-off. It’s the perfect, effortless dessert or festive beverage for fall.
Ingredients
-
2-3 scoops vanilla Ice Cream
-
¼ Cup apple cider
-
½ Cup ginger ale
-
Caramel sauce
Instructions
-
Step 1
Chill a tall glass and apple cider. Prepare caramel sauce; warm gently if desired for better drizzling. -
Step 2
Drizzle caramel sauce generously around the inside walls of the chilled glass. -
Step 3
Carefully place 2-3 scoops of vanilla ice cream into the prepared glass. -
Step 4
Slowly pour the well-chilled apple cider over and around the ice cream, then add the ginger ale to fill the glass. -
Step 5
Garnish with a dollop of whipped cream, an extra caramel drizzle, a cinnamon stick, or thin apple slices if desired. Serve immediately and enjoy.
Important Information
Nutrition Facts (Per Serving)
It is important to consider this information as approximate and not to use it as definitive health advice.
Allergy Information
Please check ingredients for potential allergens and consult a health professional if in doubt.
Leave a Comment