
Brownie cheesecake bars: Prepare to meet your new favorite dessert! Imagine the fudgy, intense chocolate flavor of a rich brownie swirled together with the creamy, tangy goodness of a classic cheesecake. It’s a match made in dessert heaven, and trust me, you won’t be able to stop at just one. These decadent bars are surprisingly easy to make, making them perfect for everything from a casual weeknight treat to a show-stopping addition to your next party.
While the exact origins of combining brownies and cheesecake are a bit hazy, the concept itself speaks to our inherent love of contrasting textures and flavors. Brownies, a distinctly American invention, have been a beloved comfort food for over a century. Cheesecake, with its roots stretching back to ancient Greece, has evolved into countless variations across cultures. Marrying these two iconic desserts creates a symphony of sweet and tangy, dense and creamy, that’s simply irresistible.
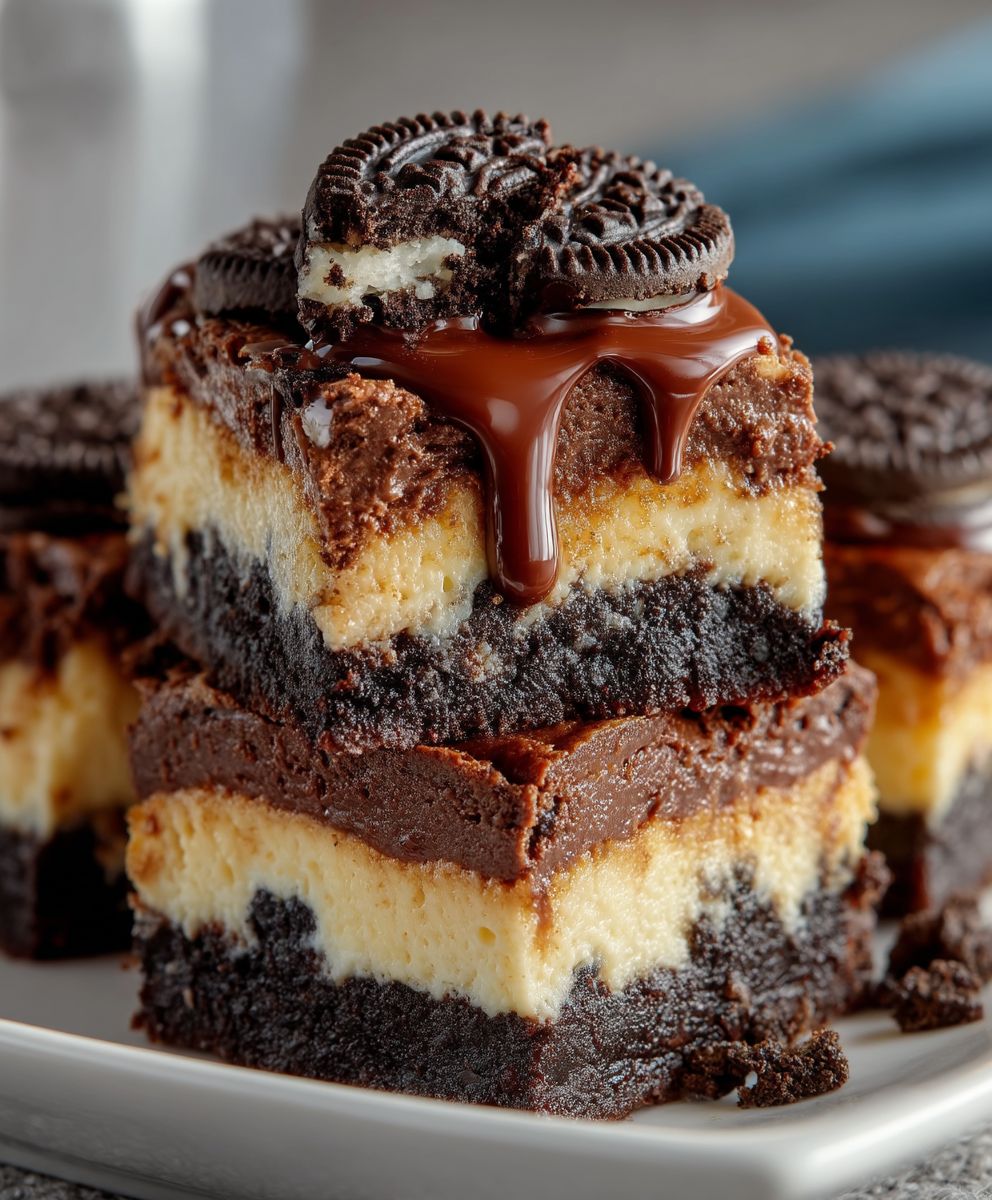
What makes brownie cheesecake bars so universally appealing? It’s the perfect balance! The fudgy brownie base provides a satisfyingly dense and chocolatey foundation, while the creamy cheesecake layer adds a touch of lightness and a delightful tang that cuts through the richness. Plus, they’re incredibly convenient. Baked in a single pan and easily sliced into bars, they’re perfect for sharing (or not!). Get ready to experience a dessert that’s both comforting and sophisticated, guaranteed to impress everyone who tries it.

Ingredients:
- For the Brownie Layer:
- 1/2 cup (1 stick) unsalted butter, melted
- 1 cup granulated sugar
- 1/2 cup unsweetened cocoa powder
- 1/4 teaspoon salt
- 1 teaspoon vanilla extract
- 2 large eggs
- 1/2 cup all-purpose flour
- 1/2 cup chocolate chips (optional)
- For the Cheesecake Layer:
- 16 ounces (2 packages) cream cheese, softened
- 1/2 cup granulated sugar
- 2 large eggs
- 1/4 cup sour cream
- 1 teaspoon vanilla extract
Preparing the Brownie Layer:
Okay, let’s start with the brownie base. This is where all the chocolatey goodness begins! I always find that melting the butter first makes everything so much easier.
- Melt the Butter: In a microwave-safe bowl, melt the butter. I usually do this in 30-second intervals, stirring in between, to prevent it from exploding. You want it completely melted but not boiling hot.
- Combine Wet Ingredients: In a large bowl, whisk together the melted butter and granulated sugar until well combined. The mixture should be smooth and glossy.
- Add Cocoa Powder and Salt: Sift in the cocoa powder and salt. This helps prevent any lumps and ensures even distribution of the cocoa flavor. Whisk until everything is well incorporated. The mixture will be quite thick at this point.
- Incorporate Vanilla and Eggs: Stir in the vanilla extract. Then, add the eggs one at a time, mixing well after each addition. Make sure each egg is fully incorporated before adding the next. This is crucial for a fudgy brownie texture.
- Add Flour: Gradually add the all-purpose flour, mixing until just combined. Be careful not to overmix, as this can lead to tough brownies. A few streaks of flour are okay at this stage.
- Add Chocolate Chips (Optional): If you’re using chocolate chips, gently fold them into the brownie batter. I love adding them for extra chocolatey bursts!
Preparing the Cheesecake Layer:
Now for the creamy, dreamy cheesecake layer! Make sure your cream cheese is properly softened – this is key to a smooth and lump-free cheesecake.
- Beat Cream Cheese and Sugar: In a large bowl, beat the softened cream cheese and granulated sugar together until smooth and creamy. I use an electric mixer for this, but you can also do it by hand if you’re feeling ambitious. Just make sure there are no lumps of cream cheese remaining.
- Add Eggs: Add the eggs one at a time, mixing well after each addition. Again, ensure each egg is fully incorporated before adding the next.
- Incorporate Sour Cream and Vanilla: Stir in the sour cream and vanilla extract until just combined. Be careful not to overmix at this stage, as overmixing can cause the cheesecake to crack during baking.
Assembling and Baking:
Alright, time to put everything together and get these bars into the oven! I like to use a square baking pan for these, but you can also use a rectangular one if that’s what you have on hand.
- Prepare the Pan: Preheat your oven to 350°F (175°C). Grease and flour an 8×8 inch baking pan. Alternatively, you can line the pan with parchment paper, leaving an overhang on the sides for easy removal. This is my preferred method!
- Pour Brownie Batter: Pour the brownie batter into the prepared pan and spread it evenly.
- Pour Cheesecake Batter: Gently pour the cheesecake batter over the brownie batter. Spread it evenly over the top.
- Create Swirls (Optional): If you want to create a marbled effect, you can use a knife or skewer to gently swirl the cheesecake batter into the brownie batter. Be careful not to overmix, as this can muddy the colors.
- Bake: Bake for 30-35 minutes, or until the cheesecake layer is set around the edges but still slightly jiggly in the center. The brownies should be set as well.
- Cool Completely: Remove the pan from the oven and let the bars cool completely in the pan. This is important, as the cheesecake will continue to set as it cools.
- Chill: Once cooled, cover the pan and chill in the refrigerator for at least 2 hours, or preferably overnight. This will make the bars easier to cut and will also enhance the flavor.
- Cut and Serve: Once chilled, lift the bars out of the pan using the parchment paper overhang (if you used it). Cut into squares and serve. I like to dust mine with a little cocoa powder or powdered sugar for a pretty presentation.
Tips and Tricks for Perfect Brownie Cheesecake Bars:
Here are a few extra tips to help you achieve brownie cheesecake bar perfection:
- Use Room Temperature Ingredients: For the cheesecake layer, using room temperature cream cheese and eggs is crucial for a smooth and lump-free batter.
- Don’t Overmix: Overmixing the brownie batter can result in tough brownies, and overmixing the cheesecake batter can cause it to crack during baking. Mix until just combined.
- Baking Time: Keep a close eye on the bars while they’re baking. The baking time may vary depending on your oven. You want the cheesecake layer to be set around the edges but still slightly jiggly in the center.
- Cooling Time: Don’t skip the cooling and chilling steps! This is essential for the cheesecake to set properly and for the bars to be easy to cut.
- Variations: Feel free to experiment with different flavors and toppings. You can add chopped nuts, caramel sauce, or even a layer of chocolate ganache on top.
- Storage: Store leftover brownie cheesecake bars in an airtight container in the refrigerator for up to 5 days.
- Prevent Cracking: To minimize the risk of the cheesecake cracking, you can try baking the bars in a water bath. Wrap the bottom of the pan in foil and place it in a larger pan. Fill the larger pan with hot water until it reaches about halfway up the sides of the baking pan. This creates a more humid environment in the oven, which can help prevent cracking.
- Cutting Cleanly: For clean cuts, use a sharp knife and wipe it clean between each slice. You can also dip the knife in hot water before each cut.
Troubleshooting:
My cheesecake layer cracked!
Don’t worry, it happens! Cracking is usually caused by overbaking or rapid temperature changes. To prevent this, make sure you don’t overbake the bars and let them cool gradually in the oven before transferring them to the refrigerator. Baking in a water bath can also help.
My brownies are too dry!
This could be due to overbaking or using too much flour. Make sure you measure the flour accurately and don’t overbake the brownies. Adding a little extra melted butter can also help.
My cheesecake layer is lumpy!
This is usually caused by using cold cream cheese. Make sure your cream cheese is properly softened before you start mixing. You can also try beating the cream cheese and sugar together for a longer period of time to ensure it’s smooth and creamy.
My brownie and cheesecake layers separated!
This is rare, but it can happen if the brownie batter is too thin or the cheesecake batter is too thick. Make sure you follow the recipe carefully and don’t overmix the batters.
Can I use a different size pan?
Yes, you can, but you’ll need to adjust the baking time accordingly. If you use a larger pan, the bars will be thinner and will bake faster. If you use a smaller pan, the bars will be thicker and will bake longer.
Can I make these ahead of time?
Absolutely! In fact, I recommend making them a day ahead of time. This allows the flavors to meld together and the cheesecake to set properly.
Can I freeze these?
Yes, you can freeze brownie cheesecake bars. Wrap them tightly in plastic wrap and then in foil. They can be stored in the freezer for up to 2 months. Thaw them in the refrigerator overnight before serving.
Conclusion:
And there you have it! These brownie cheesecake bars are truly a must-try for anyone who loves a decadent dessert. The fudgy brownie base, swirled with creamy, tangy cheesecake, creates a symphony of flavors and textures that will leave you wanting more. Seriously, these aren’t just good; they’re dangerously addictive! The combination of rich chocolate and smooth cheesecake is a classic for a reason, and this recipe elevates it to a whole new level of deliciousness.
But what makes these bars so special? It’s the perfect balance. The brownie isn’t too sweet, and the cheesecake isn’t too tart. They complement each other beautifully, creating a harmonious blend that will tantalize your taste buds. Plus, they’re surprisingly easy to make! You don’t need to be a professional baker to whip up a batch of these beauties. The recipe is straightforward and simple, making it perfect for both beginner and experienced bakers alike.
Why are these brownie cheesecake bars a must-bake? Because they’re the ultimate crowd-pleaser! Bring them to a potluck, a party, or simply enjoy them at home with your family. They’re guaranteed to be a hit!
Looking for serving suggestions? These bars are fantastic on their own, but you can also dress them up with a few simple additions. A dollop of whipped cream or a scoop of vanilla ice cream would be divine. Or, try drizzling them with chocolate sauce or caramel sauce for an extra touch of indulgence. Fresh berries, like raspberries or strawberries, would also add a pop of color and flavor.
And if you’re feeling adventurous, why not try some variations? Add a layer of chopped nuts to the brownie batter for a crunchy texture. Or, swirl in some peanut butter for a Reese’s-inspired treat. You could even add some chocolate chips to the cheesecake layer for an extra dose of chocolatey goodness. The possibilities are endless! Get creative and experiment with different flavors and textures to create your own signature brownie cheesecake bars.
Here are a few more ideas to get your creative juices flowing:
Serving and Variation Ideas:
Espresso Infusion:
Add a teaspoon of instant espresso powder to the brownie batter for a mocha twist.
Salted Caramel Swirl:
Drizzle salted caramel sauce over the cheesecake layer before baking for a sweet and salty delight.
Oreo Crumb Topping:
Sprinkle crushed Oreo cookies over the cheesecake layer before baking for a cookies and cream sensation.
Peppermint Bark Variation:
Add crushed peppermint candies to the cheesecake layer during the holidays for a festive treat.
Lemon Zest Brightness:
Add lemon zest to the cheesecake layer for a citrusy and refreshing flavor.
I truly hope you give this recipe a try. I’m confident that you’ll love it as much as I do. It’s a guaranteed winner! Once you’ve made them, I’d love to hear about your experience. Did you make any variations? What did your friends and family think? Share your photos and stories in the comments below! I can’t wait to see what you create. So, grab your ingredients, preheat your oven, and get ready to bake some seriously delicious brownie cheesecake bars. Happy baking! Remember, the secret ingredient is always love (and maybe a little extra chocolate!). Don’t forget to share your creations and let me know how much you enjoyed this brownie cheesecake bars recipe!
Brownie Cheesecake Bars: The Ultimate Decadent Dessert Recipe
Fudgy brownie base topped with a creamy cheesecake layer, swirled together for a decadent dessert bar.
Ingredients
Instructions
Recipe Notes
- Use room temperature ingredients for the cheesecake layer.
- Don’t overmix the brownie or cheesecake batter.
- Baking time may vary depending on your oven.
- Cooling and chilling are essential for the cheesecake to set properly.
- Experiment with different flavors and toppings.
- Store leftover bars in an airtight container in the refrigerator for up to 5 days.
- To minimize cracking, bake in a water bath.
- For clean cuts, use a sharp knife and wipe it clean between each slice.
- Can be made a day ahead of time.
- Can be frozen for up to 2 months.
Leave a Comment