
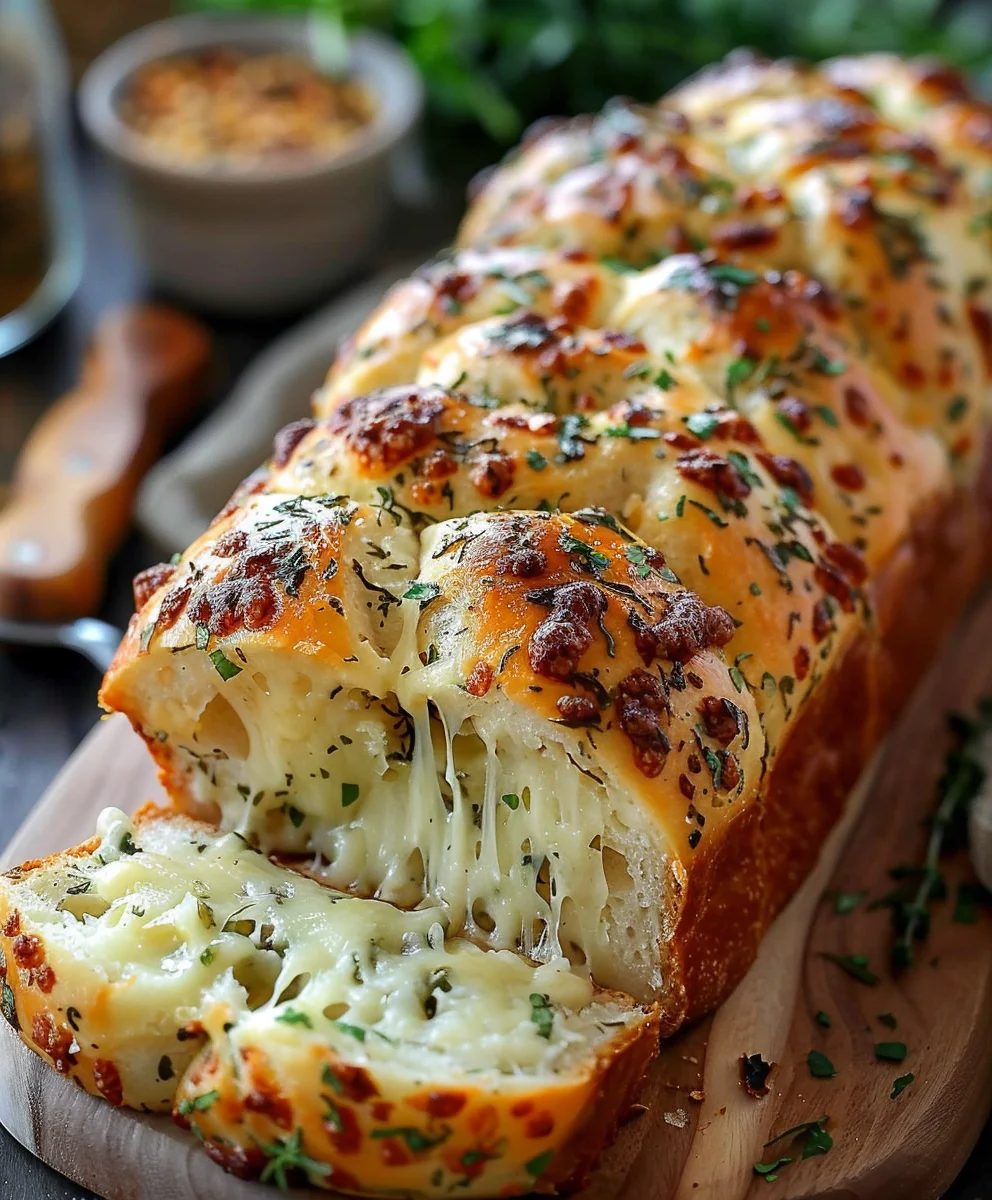
Italian Herb Cheese Bread The Ultimate Guide To Baking Perfection is more than just a recipe; it’s an invitation to fill your home with an aroma that instantly transports you to a cozy Italian kitchen. Imagine the golden-brown crust, generously studded with melted, bubbling cheese and fragrant herbs, giving way to a soft, airy interior. This isn’t just any bread; it’s a sensory experience that promises warmth and comfort with every bite. While this particular combination might be a modern culinary delight rather than a centuries-old staple, this delightful bread masterfully embodies the heart of Italian cooking – transforming simple, high-quality ingredients into something truly extraordinary. It’s a contemporary homage to the traditional Italian emphasis on communal dining and robust, comforting flavors, where exceptional bread always takes center stage.
I’ve personally witnessed how quickly this incredible bread vanishes from any gathering. Its irresistible combination of savory herbs like oregano and basil, mingling with sharp Parmesan and gooey mozzarella, creates a symphony of flavors and textures that is utterly addictive. It’s perfect for dipping into olive oil, accompanying a hearty pasta dish, or simply savored on its own as a delightful snack. I’m genuinely thrilled to share with you what I consider to be
Italian Herb Cheese Bread The Ultimate Guide To Baking Perfection
. This comprehensive guide will equip you with every tip and trick you need to achieve that perfect golden crust and tender crumb, ensuring your baking endeavors are met with resounding success and delicious results every single time.

Ingredients:
- For the Dough:
- 1 cup (240ml) warm water (105-115°F / 40-46°C)
- 2 ¼ teaspoons (7g or 1 standard packet) active dry yeast
- 1 tablespoon granulated sugar
- 3 cups (360g) all-purpose flour, plus more for dusting
- 1 teaspoon salt
- 2 tablespoons olive oil, plus more for greasing
- For the Herb Cheese Filling:
- 1 cup (113g) shredded mozzarella cheese
- ½ cup (57g) shredded provolone cheese
- ¼ cup (28g) grated Parmesan cheese
- 2 cloves garlic, minced very finely
- 2 tablespoons fresh parsley, finely chopped
- 1 tablespoon fresh basil, finely chopped
- 1 teaspoon dried oregano
- ½ teaspoon red pepper flakes (optional, for a little kick)
- For the Herb Butter Topping:
- 2 tablespoons unsalted butter, melted
- 1 clove garlic, minced
- 1 tablespoon fresh parsley, finely chopped
- 1 teaspoon fresh rosemary, finely chopped (optional, but lovely)
The Ultimate Guide To Baking Perfection: Preparing Your Italian Herb Cheese Bread Dough
Embarking on the journey to create the perfect Italian Herb Cheese Bread begins with the foundation: a soft, pliable, and flavorful dough. This phase is crucial, as the quality of your dough will dictate the final texture and rise of your bread. Pay close attention to temperatures and measurements, as they are key to activating the yeast and developing the gluten structure that makes this bread so wonderfully chewy yet tender.
-
Activating the Yeast: In a large mixing bowl, pour in your 1 cup of warm water. It’s incredibly important that the water is between 105-115°F (40-46°C). If it’s too cold, the yeast won’t activate; too hot, and you’ll kill it. Use a thermometer if you have one, or test it against your wrist – it should feel comfortably warm, like a baby’s bath. Sprinkle the 1 tablespoon of granulated sugar and the 2 ¼ teaspoons of active dry yeast over the water. Give it a gentle stir and let it sit undisturbed for 5-10 minutes. During this time, you should see the mixture become foamy and bubbly, indicating that the yeast is alive and ready to work its magic. If you don’t see this activity, your yeast might be old or the water temperature was off, and it’s best to start again with fresh yeast to ensure a good rise.
Why Yeast Activation is Critical:
This initial step isn’t just about mixing; it’s a test. A strong, active yeast bloom ensures your bread will rise beautifully, yielding a light and airy texture. Without proper activation, your bread will be dense and heavy, which is definitely not the goal for this amazing Italian Herb Cheese Bread.
- Combining Dry Ingredients: While your yeast is blooming, in a separate medium bowl, whisk together the 3 cups of all-purpose flour and 1 teaspoon of salt. This ensures the salt is evenly distributed throughout the flour, preventing pockets of overly salty or bland dough.
- Mixing the Dough: Once your yeast mixture is gloriously foamy, add the 2 tablespoons of olive oil to it. Gradually add the flour mixture to the wet ingredients, mixing with a wooden spoon or a sturdy spatula until a shaggy dough forms. It will look a bit messy and clumpy at first, but don’t worry, that’s perfectly normal. Continue to mix until most of the flour is incorporated.
-
Kneading for Perfection: Turn the shaggy dough out onto a lightly floured surface. Now comes the therapeutic part: kneading! Knead the dough for 8-10 minutes. This process develops the gluten, which is what gives bread its structure and chewiness. At first, the dough will be sticky and perhaps a bit resistant. As you knead, it will transform, becoming smooth, elastic, and much less sticky. You’ll know it’s properly kneaded when it bounces back when you gently poke it with your finger. For a true test of gluten development, perform the “windowpane test”: carefully pull off a small piece of dough and gently stretch it with your fingers. If you can stretch it thin enough to see light through it without it tearing, your gluten is well-developed. If it tears easily, keep kneading for a few more minutes.
Tips for Effective Kneading:
- Use the heel of your hand to push and stretch the dough away from you, then fold it back over.
- Avoid adding too much extra flour during kneading; a sticky dough is better than a dry one. Only add a tiny sprinkle if it’s truly unmanageable.
- Listen to the dough! It becomes smoother and more pliable as you work it.
-
First Rise (Bulk Fermentation): Lightly grease a clean large bowl with a little olive oil. Place the kneaded dough into the bowl, turning it once to coat the entire surface with oil. This prevents it from drying out. Cover the bowl tightly with plastic wrap or a clean kitchen towel. Place the bowl in a warm, draft-free spot in your kitchen. An ideal temperature is around 75-80°F (24-27°C). You can create a warm environment by placing it in a turned-off oven with just the oven light on, or near a sunny window. Let the dough rise for 1 to 1.5 hours, or until it has doubled in size. This first rise is critical for flavor development and achieving that signature airy texture.
Look for these signs: The dough should look visibly puffy, and when you gently press your finger into it, the indentation should remain. If it springs back immediately, it needs more time.
Crafting the Flavor Core: Preparing Your Herb Cheese Filling for the Italian Herb Cheese Bread
While your dough is undergoing its magical first rise, it’s the perfect time to prepare the heart of your Italian Herb Cheese Bread – the incredibly aromatic and flavorful filling. This blend of cheeses and fresh herbs is what gives our bread its irresistible character and makes it truly the ultimate guide to baking perfection.
-
Shredding and Chopping: In a medium bowl, combine the 1 cup shredded mozzarella cheese, ½ cup shredded provolone cheese, and ¼ cup grated Parmesan cheese. If you have blocks of cheese, I highly recommend shredding them yourself. Pre-shredded cheeses often contain anti-caking agents that can hinder their melting capabilities. Finely mince your 2 cloves of garlic. Fresh garlic offers a much more pungent and delightful aroma than garlic powder. Finely chop your 2 tablespoons of fresh parsley and 1 tablespoon of fresh basil. The freshness of these herbs truly elevates the flavor profile. If using the optional ½ teaspoon of red pepper flakes, add them now.
The Fresh Herb Difference:
Using fresh herbs isn’t just a suggestion; it’s a game-changer for this Italian Herb Cheese Bread. The vibrant oils and aromatics released from fresh parsley and basil contribute an unparalleled depth of flavor and a beautiful visual appeal that dried herbs simply can’t match in this quantity.
- Mixing the Filling: Gently toss all the filling ingredients together until well combined. You want an even distribution of cheese, garlic, and herbs in every bite of your bread. Set this aside, ready for when your dough has completed its first rise.
The Art of Shaping and Second Rise: Bringing Your Italian Herb Cheese Bread to Life
Now that your dough is beautifully risen and your filling is prepped, it’s time for the creative part: shaping your bread. This stage is where your Italian Herb Cheese Bread really starts to take its appealing form, destined to be the ultimate guide to baking perfection.
- Punching Down the Dough: Once your dough has doubled in size, gently punch it down. This deflates the dough, releasing the gases produced during fermentation and creating an even texture. Turn the dough out onto a lightly floured surface.
-
Rolling Out the Dough: Using a rolling pin, roll the dough into a large rectangle, approximately 18×12 inches (45×30 cm) and about ¼-inch (0.6 cm) thick. Try to keep the edges as straight as possible, as this will make rolling easier later.
Expert Tip: If the dough resists rolling and keeps springing back, let it rest for 5-10 minutes. This allows the gluten to relax, making it much easier to roll out.
- Spreading the Filling: Evenly sprinkle your entire herb cheese filling mixture over the rolled-out dough, leaving a small 1-inch (2.5 cm) border along one of the long edges. This border will help seal the log when you roll it. Make sure the cheese and herbs are distributed to all corners (except that one edge) so every slice gets a burst of flavor.
- Rolling into a Log: Starting from the long edge opposite the empty border, carefully and tightly roll the dough into a log. The tighter you roll it, the neater your spirals will be and the less likely the filling is to escape during baking. Pinch the seam closed along that 1-inch border you left, ensuring it’s sealed well. Gently tuck in the ends to create a neat log.
-
Slicing the Log: Using a sharp knife or a piece of unflavored dental floss, cut the log into 12-14 equal slices, each about 1 to 1.5 inches (2.5-3.8 cm) thick. If using dental floss, slide it under the log, cross the ends over the top, and pull to cut cleanly. This method often gives a cleaner cut than a knife, preventing the cheese from smearing.
Achieving Even Slices:
Even slices are important for consistent baking. If some are too thin, they might overbake; if too thick, they might not cook through evenly. Take your time with this step.
- Arranging in the Pan: Lightly grease a 9×13 inch (23×33 cm) baking dish or a 9-inch (23 cm) round springform pan. Arrange the sliced pieces cut-side up in the prepared dish, slightly overlapping them or leaving just a tiny space between each. They will expand as they rise and bake, filling the pan beautifully.
-
Second Rise (Proofing): Cover the baking dish loosely with plastic wrap or a clean kitchen towel. Place it back in that warm, draft-free spot. Let it rise for another 30-45 minutes, or until the bread pieces look puffy and have nearly doubled in size again. This final rise gives the bread its ultimate light texture. While it’s rising, preheat your oven.
Preheat Oven: Preheat your oven to 375°F (190°C) during the last 15-20 minutes of the second rise. A properly preheated oven is vital for an excellent oven spring, ensuring your bread reaches its full potential.
The Grand Finale: Baking Your Italian Herb Cheese Bread to Golden Perfection
The moment of truth is here! Baking is where all your hard work comes together, transforming your dough and filling into a golden-brown, aromatic Italian Herb Cheese Bread. Follow these steps carefully to achieve that perfect crust and gooey, cheesy interior, making this truly the ultimate guide to baking perfection.
- Initial Bake: Place the baking dish into the preheated 375°F (190°C) oven. Bake for 20-25 minutes. During this time, the bread will puff up even more, and the edges will start to turn a beautiful golden brown. The cheese on top might begin to bubble and lightly brown. Keep an eye on it to ensure it doesn’t brown too quickly.
- Preparing the Herb Butter Topping: While the bread is in its initial bake, melt the 2 tablespoons of unsalted butter in a small microwave-safe bowl or a small saucepan. Mince 1 clove of garlic and finely chop 1 tablespoon of fresh parsley (and 1 teaspoon fresh rosemary, if using). Add the minced garlic and chopped herbs to the melted butter. Give it a good stir. This fragrant herb butter will be brushed on the bread for an extra layer of flavor and a lovely sheen.
-
Finishing the Bake with Herb Butter: After 20-25 minutes, carefully remove the bread from the oven. If the top is browning too quickly, you can loosely tent it with aluminum foil for the remainder of the baking time. Generously brush the prepared herb butter topping over the entire surface of the bread. Return the bread to the oven and continue baking for another 10-15 minutes, or until the bread is deeply golden brown on top, the cheese is bubbly and melted, and an internal temperature reaches 200-205°F (93-96°C).
Why Tent with Foil?
Tenting with foil prevents the top from burning while allowing the interior to finish baking thoroughly. It’s a common trick for breads and casseroles that have a longer baking time but need a golden, not burnt, crust.
-
Cooling and Serving: Once baked to perfection, remove the Italian Herb Cheese Bread from the oven. Let it cool in the baking dish on a wire rack for at least 10-15 minutes before serving. This allows the cheese to set slightly and the bread to firm up, making it easier to pull apart without falling into pieces.
Serving Suggestion: This bread is absolutely divine served warm, pulled apart piece by piece. It’s fantastic as an appetizer, alongside a pasta dish, or with a hearty soup. The aroma alone will have everyone gathered in your kitchen!
-
Storage: Leftover Italian Herb Cheese Bread, though unlikely, can be stored in an airtight container at room temperature for up to 2 days, or in the refrigerator for up to 4 days. Reheat gently in the oven or microwave for the best results. A quick warm-up in a toaster oven can bring back some of that amazing crispness.
The Freshness Factor:
While delicious reheated, this bread is truly at its peak when enjoyed fresh from the oven, when the cheese is gooey and the herbs are most fragrant. Don’t hesitate to share this incredible creation right away!
Conclusion:
After diving deep into the art of creating the perfect cheesy, herby delight, I genuinely believe that this particular recipe for Italian Herb Cheese Bread The Ultimate Guide To Baking Perfection is an absolute game-changer in your kitchen. I’ve spent countless hours perfecting the balance of flavors, the ideal rise, and that utterly irresistible texture. What truly sets this bread apart is the harmonious marriage of robust Italian herbs – think fragrant oregano, aromatic basil, and a hint of earthy thyme – with the rich, gooey melt of quality cheeses. Each bite offers a delightful journey: first, the satisfying crunch of a perfectly golden crust, giving way to an incredibly soft, airy interior. Then, the explosion of savory herbs dances on your palate, followed by the comforting, stretchy embrace of warm, melted cheese. It’s not just bread; it’s an experience, a centerpiece that transforms any ordinary meal into a celebration. I promise you, the moment you pull this beauty from your oven, the intoxicating aroma alone will confirm that you’ve created something truly special. This recipe isn’t merely about baking; it’s about crafting an edible masterpiece that brings joy, warmth, and an undeniable sense of accomplishment to your home. It’s the kind of bread that disappears almost as quickly as it’s made, leaving everyone utterly satisfied and already asking for more.
Now, when it comes to enjoying this magnificent creation, the possibilities are truly endless, and honestly, that’s part of its charm.
How to Enjoy Your Italian Herb Cheese Bread: Beyond the Basic Slice!
Of course, a warm slice straight from the oven is pure bliss, especially when dipped into a good quality extra virgin olive oil infused with a dash of balsamic vinegar. But let’s think bigger! This bread is the quintessential companion to almost any Italian-inspired dish. Imagine serving thick slices alongside a hearty bowl of rich minestrone or a vibrant tomato bisque on a chilly evening. It’s absolutely divine when paired with your favorite pasta dishes, whether it’s a classic spaghetti and meatballs, a creamy fettuccine Alfredo, or a simple yet elegant pesto linguine. The savory herbs and cheese perfectly complement and absorb the sauces, enhancing every mouthful. Don’t underestimate its power to elevate a simple salad either; a fresh garden salad with a light vinaigrette suddenly becomes a gourmet experience with this bread by its side.
And for those of you who love to experiment in the kitchen, I encourage you to play around with variations.
Unleash Your Creativity: Exciting Variations to Try
Feeling adventurous? Swap out some of the mozzarella for smoked gouda or a sharp provolone to introduce new depth. For a bit of a kick, finely chop some pickled jalapeños or a few red pepper flakes into the dough. If you love a burst of umami, try adding a handful of finely chopped sun-dried tomatoes or Kalamata olives – their briny notes work wonderfully with the herbs and cheese. You could even incorporate roasted garlic cloves into the dough for an even more intense aroma and flavor. Don’t limit yourself to just one shape either! This versatile dough can be transformed into individual rolls, a beautiful braided loaf, or even a fun pull-apart bread, perfect for sharing. Leftovers (if you’re lucky enough to have any!) can be cubed and toasted to make incredible croutons for salads, or even blitzed into flavorful breadcrumbs for coating chicken or topping casseroles. Truly, this bread is a canvas for your culinary imagination.
So, my friends, I implore you: don’t just read about this incredible bread; go forth and bake it!
Your Culinary Adventure Awaits!
I promise you, the process itself is incredibly rewarding, from the meditative kneading to watching the dough beautifully rise, and finally, experiencing the pure joy of seeing your golden-brown masterpiece emerge from the oven. There’s a unique satisfaction that comes from creating something so delicious and comforting with your own hands. This isn’t just another recipe to tick off a list; it’s an opportunity to create cherished moments, fill your home with an aroma that invites warmth and happiness, and share a truly spectacular dish with your loved ones.
Once you’ve embarked on this delicious journey, I would absolutely love to hear about your experience! Did you stick to the classic, or did you venture into exciting new variations? What did you serve it with? Please, share your stories, your tips, and especially your photos! Tag me on social media or drop a comment below. Your successes, your tweaks, and even your questions help build our wonderful community of home bakers. I am genuinely excited for each and every one of you to discover the pure delight of baking and enjoying this phenomenal bread. It’s more than just a recipe; it’s an invitation to elevate your meals, impress your guests, and treat yourself to one of life’s simple, yet profound, pleasures. This Italian Herb Cheese Bread truly is the ultimate guide to baking perfection, and I can’t wait for you to experience it!
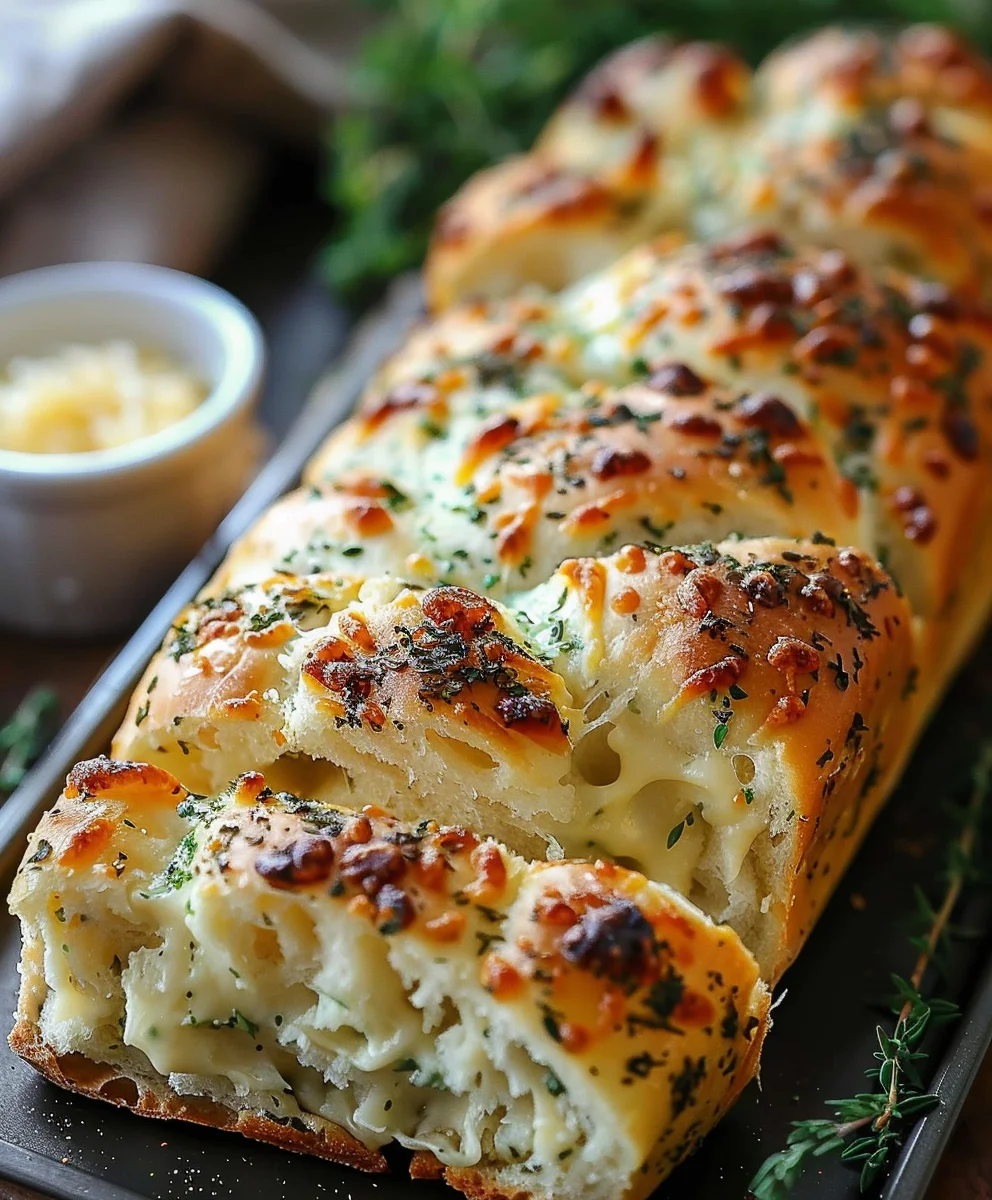
Italian Herb Cheese Bread
A guide to baking the perfect Italian Herb Cheese Bread with a golden-brown crust, melted bubbling cheese, and fragrant herbs, giving way to a soft, airy interior. This bread is a sensory experience promising warmth and comfort with every bite.
Ingredients
-
3 1/2 cups (420g) all-purpose flour, plus more for dusting
-
1 packet (2 1/4 teaspoons) active dry yeast
-
1 1/2 teaspoons granulated sugar
-
1 1/4 teaspoons salt
-
1 1/4 cups (300ml) warm water (105-115°F)
-
2 tablespoons olive oil, plus more for greasing
-
8 ounces (225g) cream cheese, softened
-
1 cup (115g) shredded mozzarella cheese
-
1/2 cup (50g) grated Parmesan cheese
-
1/4 cup chopped fresh Italian parsley
-
2 tablespoons chopped fresh basil
-
1 tablespoon chopped fresh oregano
-
2 cloves garlic, minced
-
1/4 teaspoon garlic powder
-
1/4 teaspoon onion powder
-
2 tablespoons unsalted butter, melted
-
1 clove garlic, minced (for topping)
-
1 tablespoon fresh parsley, finely chopped (for topping)
-
1 teaspoon fresh rosemary, finely chopped (optional, for topping)
Instructions
-
Step 1
Combine 1 1/4 cups warm water (105-115°F), 1 1/2 tsp sugar, and 1 packet (2 1/4 tsp) active dry yeast in a large bowl. Let sit 5-10 minutes until foamy. -
Step 2
In a separate bowl, whisk 3 1/2 cups all-purpose flour and 1 1/4 tsp salt. Add 2 tbsp olive oil to yeast mixture, then gradually add flour, mixing until a shaggy dough forms. Knead on a lightly floured surface for 8-10 minutes until smooth and elastic. -
Step 3
Lightly grease a bowl with olive oil, place dough, turn to coat, and cover. Let rise in a warm, draft-free spot for 1-1.5 hours, or until doubled in size. -
Step 4
While dough rises, combine 8 oz softened cream cheese, 1 cup shredded mozzarella, 1/2 cup grated Parmesan, 1/4 cup chopped fresh Italian parsley, 2 tbsp chopped fresh basil, 1 tbsp chopped fresh oregano, 2 minced garlic cloves, 1/4 tsp garlic powder, and 1/4 tsp onion powder in a medium bowl. Mix well. -
Step 5
Gently punch down risen dough and roll into an 18×12 inch (45×30 cm) rectangle (1/4-inch thick). Evenly spread the herb cheese filling over the dough, leaving a 1-inch border along one long edge. Tightly roll into a log, pinch seam closed, and tuck ends. -
Step 6
Cut the log into 12-14 equal slices (1-1.5 inches thick) using a sharp knife or dental floss. Lightly grease a 9×13 inch baking dish. Arrange slices cut-side up, slightly overlapping. -
Step 7
Cover loosely and let rise in a warm, draft-free spot for 30-45 minutes, or until puffy and nearly doubled. Preheat oven to 375°F (190°C) during the last 15-20 minutes of the second rise. -
Step 8
Bake for 20-25 minutes. -
Step 9
While baking, melt 2 tbsp unsalted butter. Stir in 1 minced garlic clove, 1 tbsp finely chopped fresh parsley, and 1 tsp finely chopped fresh rosemary (optional). -
Step 10
Remove bread from oven, brush generously with herb butter topping. Return to oven and bake for another 10-15 minutes, or until deeply golden brown and internal temp reaches 200-205°F (93-96°C). Tent with foil if browning too quickly. -
Step 11
Let cool in dish on a wire rack for at least 10-15 minutes before serving warm.
Important Information
Nutrition Facts (Per Serving)
It is important to consider this information as approximate and not to use it as definitive health advice.
Allergy Information
Please check ingredients for potential allergens and consult a health professional if in doubt.
Leave a Comment