
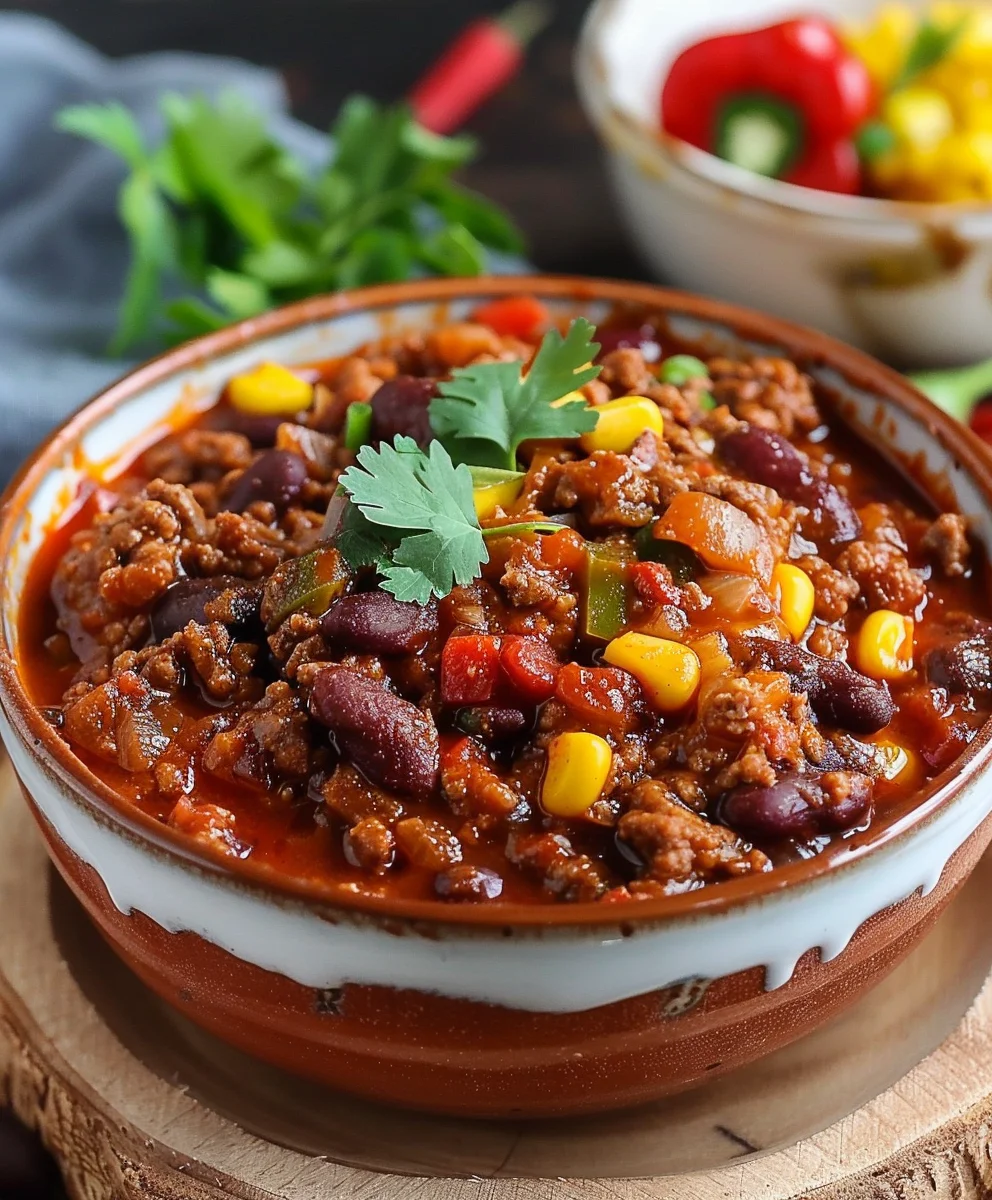
Chili Con Carne Origin extractalrezept – a phrase that immediately conjures images of a hearty, bubbling pot of rich, spicy goodness, promising warmth and satisfaction with every spoonful. I don’t know about you, but for me, a truly magnificent bowl of chili is more than just a meal; it’s an experience, a comforting hug on a chilly evening, or the star of any friendly gathering. While many variations exist, understanding the essence of the Chili Con Carne Origin extractalrezept reveals a fascinating journey from humble beginnings to a globally cherished dish.
A Culinary Journey from the American Southwest
Historically, this beloved “bowl of red” has deep roots in the American Southwest, particularly Texas, evolving from simple frontier sustenance to a culinary icon. It’s a dish celebrated for its robust flavors – the tender meat, the complex blend of chili peppers, and the subtle spices that dance on your palate. People adore chili not only for its incredible taste and satisfying texture but also for its remarkable versatility; it can be customized with an array of toppings, making each serving uniquely delightful. Join me as we explore the essence of this timeless classic, delving into its flavors and the sheer joy it brings to countless kitchens worldwide.

Ingredients:
- For the Chili Base:
- 2 tablespoons olive oil, plus more if needed
- 2.5 – 3 pounds ground beef, preferably 80/20 chuck for rich flavor. I find this fat ratio renders perfectly without making the chili greasy.
- 2 large yellow onions, finely diced. The smaller the dice, the more they melt into the sauce.
- 1 large red bell pepper, finely diced. For a touch of sweetness and color.
- 1 large green bell pepper, finely diced. For that classic bell pepper aroma.
- 6-8 cloves garlic, minced. Don’t be shy with the garlic; it’s a cornerstone of flavor.
- 1 (28-ounce) can crushed tomatoes. I prefer crushed for a smooth yet hearty consistency.
- 1 (15-ounce) can diced tomatoes, undrained. These add texture.
- 1 (6-ounce) can tomato paste. This little powerhouse concentrates the tomato flavor beautifully.
- 4 cups beef broth, low sodium. We can always adjust salt later.
- 2 (15-ounce) cans kidney beans, drained and rinsed. Or use pinto beans, or a mix of both, depending on your preference!
- 2 bay leaves. These simple leaves add an incredible subtle depth.
- For the Spice Blend:
- 4 tablespoons chili powder. This is the star of the show, so use a good quality blend. I often use a mix of ancho and New Mexico chili powders for complexity.
- 2 tablespoons ground cumin. Essential for that signature chili warmth.
- 1 tablespoon smoked paprika. This adds a wonderful smoky dimension that makes the chili incredibly appealing.
- 1 teaspoon dried oregano. Mexican oregano if you can find it, otherwise standard dried oregano works great.
- 1/2 teaspoon cayenne pepper (optional, or more to taste). For those who like a bit of a kick! Adjust this to your heat tolerance.
- 1 teaspoon unsweetened cocoa powder (optional, but highly recommended). Trust me on this one; it deepens the color and adds an almost imperceptible richness that rounds out the savory flavors.
- 1/2 teaspoon instant espresso powder or strong brewed coffee (optional). Similar to cocoa, this enhances the savory notes without making the chili taste like coffee. It’s a secret weapon!
- 1 tablespoon granulated sugar (optional, if tomatoes are too acidic). Just a touch can balance the acidity of the tomatoes.
- Salt and freshly ground black pepper to taste. Seasoning throughout the cooking process is key.
- For Serving (Optional Toppings – get creative!):
- Shredded sharp cheddar or Monterey Jack cheese
- Sour cream or plain Greek yogurt
- Fresh cilantro, chopped
- Green onions (scallions), thinly sliced
- Diced avocado
- Jalapeño slices (fresh or pickled)
- Crushed corn chips or Fritos
- Cornbread on the side, perfect for dipping!
Mise en Place and Aromatic Foundation
Alright, let’s get our chili journey started! The first step to any great recipe is gathering and prepping all your ingredients, what chefs call “mise en place.” This ensures a smooth and enjoyable cooking experience, preventing any last-minute scrambling. Trust me, it makes a huge difference.
- Prep Your Veggies: Grab your two large yellow onions and finely dice them. Aim for pieces that are roughly a quarter-inch in size – small enough to melt into the sauce but still provide a foundational texture. Next, take your red and green bell peppers and do the same. Uniformity in dicing helps them cook evenly. Finally, peel and mince your 6-8 cloves of garlic. I like to press my garlic or mince it very finely to ensure its potent flavor is distributed throughout the dish without any chunky surprises.
- Gather Your Cans: Open your cans of crushed tomatoes, diced tomatoes, tomato paste, and kidney beans. Drain and thoroughly rinse the kidney beans under cold water. This helps remove excess sodium and any starchy liquid that can affect the chili’s texture and flavor. Set all of these aside so they’re ready to go when you need them.
- Measure Your Spices: In a small bowl, combine your chili powder, ground cumin, smoked paprika, dried oregano, and cayenne pepper (if using). If you’re using the optional cocoa powder and espresso powder, add them to this blend as well. Give them a quick stir. Having this spice blend pre-mixed means you can add it all at once, ensuring even distribution and preventing anything from burning while you fumble for different containers. This is crucial for developing a balanced flavor profile.
Browning the Beef and Building Flavor
Now that everything is prepped, we’re ready to build the incredible depth of flavor that makes a chili truly spectacular. This stage is all about developing rich, savory notes through proper browning and sautéing.
- Brown the Ground Beef: Place a large, heavy-bottomed pot or Dutch oven over medium-high heat. Add 1 tablespoon of olive oil. Once shimmering, add your ground beef. Break it up with a wooden spoon or spatula. Our goal here isn’t just to cook the beef, but to get a really good, dark sear on it. This browning is where the magic happens; it develops incredible depth and umami flavor that simply boiling beef won’t achieve. Let it cook, stirring occasionally, until it’s completely browned and crispy in spots. This might take 8-10 minutes.
- Drain the Fat (Optional, but Recommended): Once the beef is beautifully browned, carefully tilt the pot and spoon out any excess fat. While some fat is good for flavor, too much can make your chili greasy. I usually leave just a tablespoon or two behind for cooking the aromatics. If your ground beef is leaner (like 90/10), you might not have much fat to drain, which is perfectly fine.
- Sauté the Aromatics: Push the browned beef to one side of the pot, or remove it temporarily to a plate if your pot is getting too crowded. Add the remaining 1 tablespoon of olive oil to the empty side of the pot (or add it back to the pot if you removed the beef). Add your finely diced onions and bell peppers. Sauté them over medium heat, stirring occasionally, for 8-10 minutes, or until they are softened and translucent. We want them tender and slightly sweet, not browned. This slow sauté brings out their natural sugars.
- Infuse with Garlic and Spices: Once the onions and peppers are soft, stir in your minced garlic. Cook for another minute, stirring constantly, until the garlic is fragrant. Be careful not to burn it, as burnt garlic can turn bitter quickly. Then, it’s time for our pre-mixed spice blend! Sprinkle the entire blend over the vegetables and stir well. Cook for 1-2 minutes, stirring constantly. This step, called “blooming” the spices, is incredibly important. Heating the spices in oil releases their essential oils and intensifies their flavors and aromas, making your chili much more robust and complex.
- Deglaze with Tomato Paste: Stir in the can of tomato paste. Cook and stir for about 2-3 minutes, allowing the tomato paste to caramelize slightly at the bottom of the pot. It will deepen in color, becoming a rich, brick-red. This caramelization adds another layer of concentrated tomato flavor and helps build that beautiful chili color. Scrape up any browned bits from the bottom of the pot – those are pure flavor!
Simmering and Deepening the Richness
With our foundation firmly laid, it’s time to bring everything together and allow the flavors to meld and deepen over a slow simmer. This is where the chili truly transforms into that hearty, comforting dish we all love.
- Combine and Simmer: Return the browned ground beef to the pot, if you removed it earlier. Pour in the crushed tomatoes, diced tomatoes (undrained), and the beef broth. Add the bay leaves. Give everything a good stir, making sure to scrape the bottom of the pot to incorporate any remaining flavorful bits. Bring the mixture to a gentle boil over medium-high heat.
- Add the Beans and Sugar: Once it reaches a boil, reduce the heat to low, cover the pot, and let it simmer. Add the drained and rinsed kidney beans now. If you’re using the optional granulated sugar to balance acidity, add it at this point too.
- The Long Simmer – Patience is a Virtue: Allow your chili to simmer gently for at least 1.5 to 2 hours, or even longer if you have the time. The longer it simmers, the more the flavors develop and marry together. Stir occasionally to prevent sticking and to ensure even cooking. The chili will thicken as it simmers, and the vegetables will completely soften. If it gets too thick for your liking, you can add a little more beef broth or water, a quarter cup at a time, until you reach your desired consistency. I often find the best chili is one that simmers for 3-4 hours; it becomes incredibly rich and velvety.
- Season to Perfection: After the simmering time, remove the bay leaves. Taste the chili and adjust the seasoning as needed. This is your chance to really make it sing! Add salt, black pepper, or a bit more cayenne if you want extra heat. Sometimes, a tiny splash of apple cider vinegar or lime juice at the end can brighten up the flavors without making it taste sour. Trust your palate here. You’re looking for a rich, balanced flavor profile that’s savory, a little sweet, and has a pleasant warmth.
Final Adjustments and Serving Suggestions
The journey is almost complete! After all that love and attention during the simmering, your chili is ready to be enjoyed. A few final touches will ensure it’s absolutely perfect for serving.
- Resting Period: While it might be tempting to dive right in, I highly recommend letting the chili rest off the heat for at least 15-20 minutes before serving. This brief resting period allows the flavors to settle and become even more harmonious, creating a richer, more cohesive taste experience. It’s like magic!
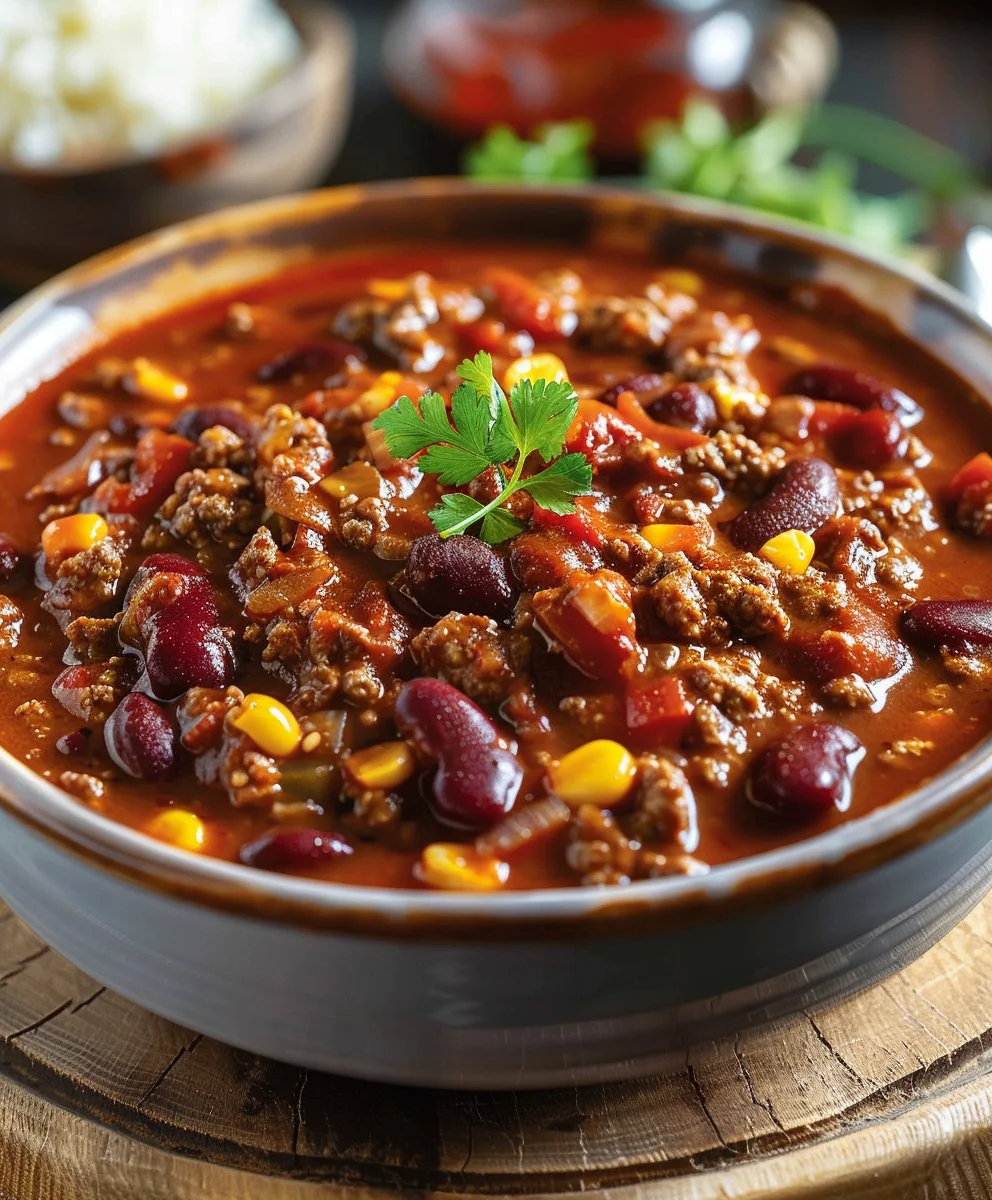
- Serving: Ladle generous portions of your incredible homemade chili into bowls. Now for the fun part – toppings! This is where everyone can customize their bowl to their heart’s content.
- Classic Cheese and Sour Cream: A sprinkle of shredded sharp cheddar or Monterey Jack cheese, along with a dollop of cool sour cream or plain Greek yogurt, is a timeless combination. The creaminess and tang perfectly complement the chili’s richness.
- Fresh Herbs and Onions: A scattering of fresh cilantro or thinly sliced green onions adds a vibrant burst of freshness and color. They cut through the richness beautifully.
- A Little Heat: For those who crave more heat, some fresh or pickled jalapeño slices are fantastic.
- Crunch Factor: Don’t forget the crunch! Crushed corn chips or Fritos add a wonderful textural contrast and an extra layer of savory goodness.
- Hearty Sides: Serve your chili with a side of warm, buttery cornbread for dipping, or even over a bed of fluffy white rice for a more substantial meal. Some people enjoy it over pasta (chili mac!) or even as a topping for hot dogs or baked potatoes.
This chili is incredibly versatile and makes fantastic leftovers. In fact, like many stews, it often tastes even better the next day, once the flavors have had more time to truly meld and deepen. So don’t hesitate to make a big batch!
Tips for the Best Chili Con Carne
- Don’t Rush the Bloom: I cannot stress enough the importance of blooming your spices in oil before adding liquids. This small step unlocks a world of flavor that you’ll truly appreciate.
- Layering Flavors: Notice how we added ingredients in stages – browning beef, sautéing aromatics, blooming spices, then adding tomatoes and broth. This layering technique is key to building complex, deep flavors. Each stage contributes something unique.
- Quality Ingredients Matter: While a good technique is essential, starting with quality ingredients (good ground beef, fresh vegetables, a robust chili powder blend) will elevate your final dish.
- Slow and Low is the Way to Go: The longer, slower simmer really allows all those wonderful flavors to come together. If you have the time, let it simmer for 3-4 hours, stirring occasionally. You won’t regret it.
- Taste, Taste, Taste: Always taste your chili throughout the cooking process and especially at the end. Your palate is your best tool for adjusting salt, heat, and overall balance.
- Make-Ahead Marvel: Chili is an absolutely fantastic make-ahead meal. Prepare it a day or two in advance, store it in an airtight container in the refrigerator, and then gently reheat it on the stovetop over low heat. The flavors deepen wonderfully overnight.
- Freezing Instructions: This chili freezes beautifully! Once completely cooled, transfer it to freezer-safe containers or heavy-duty freezer bags, leaving about an inch of headspace for expansion. It can be frozen for up to 3-4 months. Thaw overnight in the refrigerator and reheat gently on the stovetop.
- Consistency Check: If your chili ends up too thin, you can simmer it uncovered for a bit longer to allow some of the liquid to evaporate. If it’s too thick, stir in a bit more beef broth or water until it reaches your desired consistency.
- Variations for Personal Preference:
- Smokiness: For an even deeper smoky flavor, consider adding a finely chopped chipotle pepper in adobo sauce along with the tomato paste. It adds both smoke and a pleasant heat.
- Beer Option: Replace some of the beef broth with a dark beer (like a stout or porter) during the simmering stage. It adds a malty richness that pairs wonderfully with chili.
- Vegetarian Version: While this recipe is for chili con carne, you can adapt it by omitting the beef and adding extra beans, corn, and perhaps some diced zucchini or sweet potato for a hearty vegetarian chili.
I genuinely hope you enjoy making and savoring this robust, flavorful Chili Con Carne. It’s a dish that brings warmth and comfort, perfect for sharing with friends and family. Happy cooking!
Conclusion:
Well, my friends, we’ve reached the end of our culinary journey for today, and I truly hope you’re as excited to try this chili as I am to share it with you. This isn’t just another chili recipe; it’s a labor of love that transforms simple ingredients into an extraordinary feast for the senses. I can confidently say that once you taste the rich, nuanced flavors of this particular rendition, you’ll understand why it’s become a staple in my kitchen and why I believe it will quickly become one in yours too. It embodies everything you could wish for in a comforting, satisfying meal, making every spoonful a pure delight.
Why This Chili is an Absolute Must-Try:
What makes this chili stand head and shoulders above the rest? It’s the perfect harmony of robust spices, the tender, slow-cooked meat that practically melts in your mouth, and the profound depth of flavor that develops beautifully over time. It’s hearty without being heavy, incredibly satisfying, and profoundly warming – truly the quintessential comfort food. While the exact Chili Con Carne Origin extractalrezept might spark lively discussions among food historians and enthusiasts, what truly matters here is the incredible taste and the genuine satisfaction it brings. This recipe strips away any pretension, focusing purely on delivering a vibrant, deeply satisfying bowl of chili that celebrates the core elements of what makes this dish so universally beloved. It’s designed to be approachable yet yield results that taste like they came from a seasoned chef who poured their heart into every ingredient.
Imagine a cold evening, a warm bowl in your hands, and the enticing aroma filling your home – that’s the experience I’m promising you with this recipe. It’s perfect for cozy nights in, boisterous game day gatherings where you need to feed a crowd, or simply when you’re craving something profoundly delicious and soul-nourishing that feels both familiar and excitingly flavorful. This chili offers a complexity that keeps you coming back for more, without being overly complicated to prepare. It’s a testament to how simple, good ingredients, when treated with care, can create something truly spectacular.
Serving Suggestions & Creative Variations to Elevate Your Experience:
Now, let’s talk about making this chili an unforgettable meal. While it’s absolutely spectacular on its own, a few thoughtful additions can truly elevate your dining experience and turn it into a magnificent spread:
- Classic Toppings: Don’t underestimate the power of a generous dollop of cool, tangy sour cream or a healthier alternative like Greek yogurt. A sprinkle of freshly grated sharp cheddar cheese (or a vibrant Mexican blend) adds another layer of creaminess and flavor. For a fresh, herbaceous note, finely chopped fresh cilantro is a must. Diced red onions provide a lovely bit of bite and crunch, while thin slices of jalapeño (fresh for direct heat, pickled for a tangy kick) can customize the spice level. A few crushed tortilla chips on top add a delightful textural contrast that just completes the dish.
- Hearty Sides: Serve it alongside a platter of fluffy, slightly sweet cornbread – perfect for soaking up every last drop of that rich, savory sauce. Steamed white or brown rice is another excellent companion, making it a complete and incredibly filling meal. For a lighter touch and to balance the richness, a crisp green salad with a zesty vinaigrette provides a refreshing counterpoint that cleanses the palate.
- Creative Leftovers (If there are any!): This chili truly shines in its versatility and is almost better the next day. Transform leftovers into incredible chili dogs (smothered over your favorite hot dogs in buns with cheese and onions), decadent chili cheese fries (piled high with crispy fries and melted cheese), epic nachos loaded with all your favorite fixings, or even stuff it into large bell peppers and bake for a wholesome and hearty meal. It also makes a fantastic, flavorful topping for baked potatoes or a delicious base for a chili mac and cheese fusion – truly a culinary chameleon!
And if you’re feeling adventurous, don’t hesitate to put your own spin on it and make it uniquely yours! Customization is half the fun of home cooking:
- Spice Level: Easily adjust the amount of chili powder, add a pinch more cayenne pepper for an extra kick, or a dash of your favorite hot sauce to tailor the heat exactly to your preference. Don’t be afraid to taste and adjust as you go!
- Bean Medley: While my recipe might lean towards a specific type of bean, feel free to experiment with kidney beans, pinto beans, or even black beans – a mix can add fascinating new textures and flavors that will surprise and delight you.
- Meat Alternatives: For a lighter version, lean ground turkey or chicken can be substituted, though you might want to add a bit more oil for browning to prevent sticking. For a completely vegetarian or vegan twist, use your favorite plant-based mince, adding extra mushrooms, bell peppers, zucchini, or sweet potatoes to boost the vegetable content and depth of flavor.
- Slow Cooker Method: After browning the meat and sautéing the aromatics on the stovetop to build that foundational flavor, you can absolutely transfer everything to a slow cooker. Let it simmer on low for 6-8 hours or high for 3-4 hours for an even more hands-off approach, allowing the flavors to meld beautifully while you go about your day.
Your Turn: Embrace the Chili Challenge and Share Your Story!
Now, it’s over to you! I genuinely encourage you to roll up your sleeves, gather your ingredients, and dive into making this incredible chili. Don’t be intimidated by the ingredient list; the process is straightforward and incredibly rewarding, and the results are truly immense. There’s a special kind of satisfaction that comes from creating something so delicious from scratch, something that fills your home with comforting aromas and brings warmth and joy to your table. It’s more than just cooking; it’s an act of care.
Once you’ve made it, I would absolutely love to hear about your experience! Did you stick strictly to the recipe, or did you add your own creative twist? What were your favorite toppings or serving suggestions? Please share your thoughts, your successes, and even your delightful kitchen adventures in the comments section below. Even better, snap a fantastic photo of your magnificent creation and share it on social media – I’d be thrilled to see it! Your feedback and experiences not only bring a huge smile to my face but also genuinely inspire other home cooks to give it a try and discover their own love for this amazing dish.
Thank you for joining me on this flavorful journey. I truly believe this recipe will become a cherished part of your culinary repertoire, a go-to for those moments when you need a taste of pure comfort. Happy cooking, and may your kitchen always be filled with delicious aromas and happy memories!
Authentic Origin Beef Chili Con Carne: Hearty & Delicious
A truly magnificent bowl of chili, more than just a meal, but an experience. This Chili Con Carne, with deep roots in the American Southwest, delivers a comforting, robust, and versatile dish, celebrated for its tender meat, complex blend of chili peppers, and subtle spices.
Ingredients
-
2 tablespoons olive oil
-
2.5 – 3 pounds ground beef
-
2 large yellow onions, finely diced
-
1 large red bell pepper, finely diced
-
1 large green bell pepper, finely diced
-
6-8 cloves garlic, minced
-
1 (28-ounce) can crushed tomatoes
-
1 (15-ounce) can diced tomatoes, undrained
-
1 (6-ounce) can tomato paste
-
4 cups beef broth, low sodium
-
2 (15-ounce) cans kidney beans, drained and rinsed
-
2 bay leaves
-
4 tablespoons chili powder
-
2 tablespoons ground cumin
-
1 tablespoon smoked paprika
-
1 teaspoon dried oregano
-
1/2 teaspoon cayenne pepper (optional)
-
1 teaspoon unsweetened cocoa powder (optional)
-
1/2 teaspoon instant espresso powder or strong brewed coffee (optional)
-
1 tablespoon granulated sugar (optional)
-
Salt and freshly ground black pepper to taste
-
For Serving: Shredded sharp cheddar or Monterey Jack cheese (optional)
-
For Serving: Sour cream or plain Greek yogurt (optional)
-
For Serving: Fresh cilantro, chopped (optional)
-
For Serving: Green onions, thinly sliced (optional)
-
For Serving: Diced avocado (optional)
-
For Serving: Jalapeño slices (fresh or pickled) (optional)
-
For Serving: Crushed corn chips or Fritos (optional)
-
For Serving: Cornbread (optional)
Instructions
-
Step 1
Finely dice onions, red bell pepper, and green bell pepper. Mince garlic. Open cans of tomatoes, tomato paste, and drain/rinse kidney beans. In a small bowl, combine chili powder, cumin, smoked paprika, oregano, cayenne (optional), cocoa (optional), and espresso powder (optional). -
Step 2
Heat 1 tablespoon olive oil in a large pot over medium-high heat. Add ground beef, breaking it up. Cook until thoroughly browned, about 8-10 minutes. Drain excess fat, leaving 1-2 tablespoons in the pot. -
Step 3
Add remaining 1 tablespoon olive oil (if needed) to the pot. Sauté diced onions and bell peppers for 8-10 minutes until softened. Stir in minced garlic and cook for 1 minute until fragrant. Sprinkle in the pre-mixed spice blend and cook, stirring constantly, for 1-2 minutes to bloom the spices. -
Step 4
Stir in tomato paste and cook for 2-3 minutes, allowing it to caramelize. Return browned beef to the pot. Pour in crushed tomatoes, diced tomatoes (undrained), and beef broth. Add bay leaves. Stir well and bring to a gentle boil. -
Step 5
Reduce heat to low, cover, and simmer. Add drained kidney beans and optional granulated sugar. Simmer for at least 1.5-2 hours, or ideally 3-4 hours for deeper flavor, stirring occasionally until thickened. If too thick, add more beef broth; if too thin, simmer uncovered. -
Step 6
Remove bay leaves. Taste and adjust seasoning with salt, pepper, or cayenne. For brightness, add a splash of apple cider vinegar or lime juice (optional). Let chili rest off the heat for 15-20 minutes before serving to allow flavors to meld. -
Step 7
Ladle chili into bowls. Garnish with optional toppings like shredded cheese, sour cream, fresh cilantro, green onions, avocado, jalapeño, or crushed corn chips. Serve with cornbread or over rice.
Important Information
Nutrition Facts (Per Serving)
It is important to consider this information as approximate and not to use it as definitive health advice.
Allergy Information
Please check ingredients for potential allergens and consult a health professional if in doubt.
Leave a Comment