
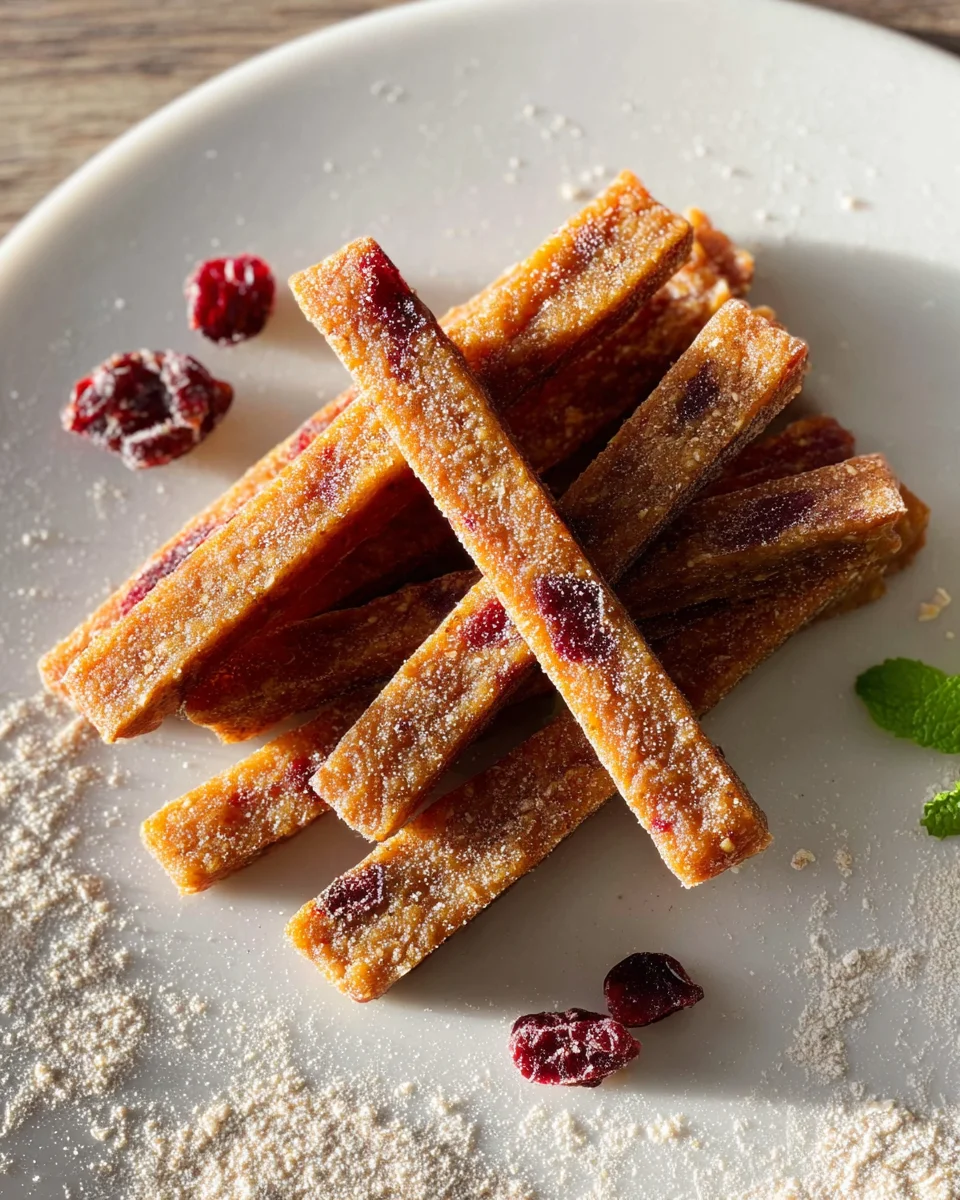
Apple Cranberry Dog Dental Sticks are about to become your dog’s new favorite obsession, and your secret weapon for maintaining their sparkling smile!
Maintaining Your Dog’s Oral Health Has Never Been So Delicious!
As devoted pet parents, we constantly seek ways to ensure our furry companions lead happy, healthy lives. Often, the challenge lies in finding treats that are not only irresistibly tasty but also genuinely beneficial. I understand the concern about commercial options filled with questionable ingredients and the desire for wholesome alternatives. This is precisely why the movement towards crafting homemade dog treats has gained such momentum, offering peace of mind and complete control over what our beloved pets consume. It’s a testament to our profound bond and our commitment to their well-being.
I am thrilled to share a recipe for a treat that expertly tackles two common pet parent dilemmas: maintaining dental hygiene and finding truly nutritious snacks. Imagine a chewy, textured delight that actively helps clean your dog’s teeth with every bite, all while delivering a burst of natural goodness. These delightful Apple Cranberry Dog Dental Sticks are crafted with ingredients like crisp apples for natural sweetness and vital fiber, and vibrant cranberries, known for their powerful antioxidant properties and potential to combat plaque buildup. It’s a true win-win! Your dog gets a satisfying chew and a delicious reward they’ll adore, and you get the immense satisfaction of knowing you’re contributing positively to their long-term health, helping to keep their breath fresh and their gums healthy. Get ready to bake a treat both you and your canine companion will cherish.

Ingredients:
- 2 ½ cups Whole Wheat Flour: I always reach for whole wheat flour because it offers more fiber and nutrients than all-purpose flour, making these Apple Cranberry Dog Dental Sticks a healthier option for your furry friend. The fiber aids digestion and provides a good structure for a chewy treat, which is essential for a proper dental stick.
- ½ cup Oat Flour (or finely ground rolled oats): Adding oat flour contributes a lovely chewiness and a slightly softer texture to the dental sticks. If you don’t have oat flour, simply blend regular rolled oats in a food processor until they reach a fine, flour-like consistency. It’s gentle on sensitive tummies too, and helps create a palatable chew for your dog’s teeth.
- 1 teaspoon Baking Powder: This acts as a leavening agent, giving our Apple Cranberry Dog Dental Sticks a slight puffiness and a more palatable, less dense texture. It helps create that ideal “stick” consistency that’s firm enough for chewing without being overly hard or brittle.
- 1 teaspoon Ground Cinnamon (optional): While entirely optional, a touch of cinnamon adds a wonderful aroma and flavor that most dogs adore. It’s also known for its anti-inflammatory properties, making it a nice bonus for these healthy Apple Cranberry Dog Dental Sticks. Just make sure to use a small amount, as too much can be irritating for some dogs.
- ½ teaspoon Dried Parsley Flakes (optional, for breath): If you’re truly aiming for effective “dental sticks,” parsley is a fantastic addition! It’s a natural breath freshener and completely safe for dogs. It won’t significantly alter the taste but will contribute to overall oral freshness, perfectly complementing the dental focus of these treats.
- 1 large Apple: I prefer using a sweet variety like Fuji or Gala, but any dog-safe apple will do. You’ll need to core it and either finely grate it or puree it. Apples are packed with vitamins A and C, and their natural sugars add sweetness without needing artificial additives. Plus, the fibrous pulp helps with cleaning teeth, which is a key benefit of these Apple Cranberry Dog Dental Sticks.
- ½ cup Fresh or Frozen Cranberries: These are the star alongside the apple! Cranberries are famous for their ability to help prevent UTIs, and they also provide beneficial antioxidants. For these dental sticks, you’ll want to finely chop them or pulse them in a food processor to ensure they distribute evenly throughout the dough and are easy for your dog to chew. Their natural tartness also adds a lovely flavor dimension.
- 1 large Egg: The egg is crucial here as a binder, helping all our ingredients come together to form a cohesive dough. It also adds a bit of protein and richness to the treats, contributing to the overall structure and texture of the Apple Cranberry Dog Dental Sticks.
- ¼ cup Unsweetened Applesauce: This provides additional moisture and reinforces that lovely apple flavor without adding extra sugar. Make sure it’s truly unsweetened and contains no xylitol, which is highly toxic to dogs. Always double-check labels – this is a non-negotiable safety point when making treats for your pets.
- 2 tablespoons Coconut Oil (melted and cooled slightly): Coconut oil is a wonderful healthy fat for dogs, known for its benefits for skin and coat, and it helps give our dental sticks a nice, pliable, and chewy texture. Melting it makes it easier to incorporate into the dough, ensuring an even distribution of its healthy fats.
- ¼ to ½ cup Water (or unsweetened apple juice/broth), as needed: The amount of liquid you’ll need can vary depending on the moisture content of your apple and cranberries, and the humidity in your kitchen. I recommend starting with ¼ cup and adding more gradually, one tablespoon at a time, until you achieve a firm but pliable dough that is perfect for rolling and shaping into Apple Cranberry Dog Dental Sticks.
Equipment You’ll Need:
Having the right tools ready before you begin will make the process of creating these delicious Apple Cranberry Dog Dental Sticks much smoother and more enjoyable. Think of it as setting yourself up for culinary success and efficiency in the kitchen.
- Large Mixing Bowl: Essential for combining all your dry and wet ingredients without making a mess. A spacious bowl ensures you have plenty of room to mix thoroughly and prevent flour from escaping onto your countertop.
- Small Mixing Bowl: Useful for whisking wet ingredients separately before adding them to the dry mix. This allows for better emulsification of liquids and ensures even distribution of flavors throughout your Apple Cranberry Dog Dental Sticks.
- Measuring Cups and Spoons: Accuracy is key in baking, even for dog treats! Precise measurements ensure the correct dough consistency and the perfect balance of flavors for your canine companion.
- Grater or Food Processor: For preparing the apple and cranberries. A food processor will make quick work of both, especially if you’re pureeing the apple or finely chopping frozen cranberries, saving you time and effort.
- Whisk or Fork: For blending dry ingredients and for whisking wet ingredients. A whisk helps to aerate the flours and evenly distribute the baking powder, ensuring light and consistent Apple Cranberry Dog Dental Sticks.
- Spatula or Wooden Spoon: For mixing the dough until it comes together. A sturdy spatula or wooden spoon can handle the thick, firm dough without bending or breaking.
- Rolling Pin: Absolutely necessary for rolling out the dough evenly to the desired thickness. An even thickness is crucial for consistent baking and for creating uniformly chewy Apple Cranberry Dog Dental Sticks.
- Sharp Knife or Pizza Cutter: For cutting your dough into neat, consistent stick shapes. A pizza cutter is often my go-to for speed and straight lines, making the shaping process quick and efficient.
- Parchment Paper or Silicone Baking Mats: To line your baking sheets. This prevents sticking and makes cleanup a breeze. I swear by parchment paper for almost all my baking, as it ensures easy release of your homemade Apple Cranberry Dog Dental Sticks.
- Two Large Baking Sheets: You’ll likely need two to bake all your dental sticks without overcrowding, ensuring even baking and proper air circulation. Overcrowding can lead to unevenly baked or soggy treats.
- Wire Cooling Rack: For letting your baked dental sticks cool completely and properly, preventing sogginess. Air circulation around all sides is vital for developing and maintaining the desired firm and chewy texture.
Prepping Your Workspace & Ingredients:
Before diving into the mixing, taking a few moments to prepare your ingredients and workspace will ensure a seamless baking experience. This is where we get everything in order for our fabulous Apple Cranberry Dog Dental Sticks, making the process stress-free and enjoyable.
- Preheat Your Oven: Start by preheating your oven to 350°F (175°C). This allows the oven to reach and stabilize at the correct temperature, which is crucial for even baking. Placing treats into a cold or inconsistently heated oven can result in a poor texture and unevenly cooked Apple Cranberry Dog Dental Sticks.
- Line Baking Sheets: Grab your two large baking sheets and line them with parchment paper or silicone baking mats. This step is vital to prevent the dental sticks from sticking to the pan and makes for easy removal and cleaning. I always find lining the sheets first helps me feel more organized and ready to bake.
- Prepare Your Apple: Wash the apple thoroughly. Core it, and then you have a choice: either finely grate it using the large holes of a box grater, or cut it into chunks and pulse it in a food processor until it forms a chunky puree. I prefer grating as it offers a nice texture and distributes well, but a puree works just as well. The apple is a key ingredient, contributing natural sweetness and fiber to our Apple Cranberry Dog Dental Sticks.
- Prepare Your Cranberries: If using fresh cranberries, wash them and chop them very finely. If using frozen, you can pulse them briefly in a food processor while they’re still partially frozen for easier chopping. The goal is small pieces that will distribute well throughout the dough and won’t be too large or hard for small dog mouths to chew. These small pieces ensure the flavor and benefits of the cranberries are in every bite of the Apple Cranberry Dog Dental Sticks.
- Melt Coconut Oil: Measure out your coconut oil and gently melt it. You can do this in a microwave in short bursts (about 15-30 seconds at a time) or in a small saucepan over low heat. Once melted, set it aside to cool slightly before adding it to other wet ingredients. You don’t want it hot enough to cook the egg or affect the overall dough temperature.
- Gather Remaining Ingredients: Measure out all your flours, baking powder, cinnamon (if using), parsley (if using), egg, applesauce, and water. Having everything pre-measured and laid out (mise en place!) is a game-changer and prevents you from scrambling mid-recipe, ensuring a smooth and efficient baking process for your Apple Cranberry Dog Dental Sticks.
Making the Dough for Your Apple Cranberry Dog Dental Sticks:
Now for the fun part – bringing all these wonderful ingredients together to form the perfect dough for our homemade Apple Cranberry Dog Dental Sticks. The consistency of this dough is key to creating sticks that are both pliable for shaping and sturdy for chewing, making them effective for dental hygiene.
- Combine Dry Ingredients: In your large mixing bowl, whisk together the whole wheat flour, oat flour, baking powder, cinnamon (if using), and dried parsley flakes (if using). Make sure they are thoroughly combined. This ensures that the leavening agent and flavors are evenly distributed throughout the dough, preventing pockets of unmixed ingredients. I usually use a whisk to really get everything light and airy and properly mixed before introducing liquids.
- Combine Wet Ingredients: In a separate, smaller bowl, whisk together the prepared apple (grated or pureed), finely chopped cranberries, the large egg, unsweetened applesauce, and the slightly cooled melted coconut oil. Whisk until all these wet ingredients are well incorporated and form a homogenous mixture. This pre-mixing step helps prevent overmixing the dough later, which can lead to tough treats, and ensures the flavors are well blended in your Apple Cranberry Dog Dental Sticks.
- Integrate Wet into Dry: Pour the wet ingredient mixture into the large bowl with the dry ingredients. Using a sturdy spatula or a wooden spoon, begin to mix the ingredients together. Start by folding the dry ingredients into the wet, gradually incorporating everything from the bottom of the bowl upwards.
- Add Water Gradually: This is an important step to achieve the right dough consistency. Start by adding ¼ cup of water (or apple juice/broth). Mix thoroughly. The dough should start to come together, forming a shaggy ball. If the dough still looks too dry and crumbly to form a cohesive ball, add additional water, one tablespoon at a time, mixing after each addition. You’re aiming for a firm but pliable dough that is not too sticky and can be rolled out without tearing. It shouldn’t be overly wet or sticky, but definitely not dry and crumbly. My personal tip: The dough for these Apple Cranberry Dog Dental Sticks should feel like a firm sugar cookie dough—it holds its shape, but isn’t dry or brittle.
- Knead Briefly: Once the dough has mostly come together in the bowl, turn it out onto a lightly floured surface. Knead it gently for about 1 to 2 minutes. This helps to fully incorporate any remaining dry bits and develops a little gluten, which will give our dental sticks their desired chewiness. Be careful not to over-knead, as this can make the treats too tough, losing that ideal “dental stick” texture.
Shaping the Apple Cranberry Dog Dental Sticks:
Now comes the creative part – transforming our lovely dough into individual Apple Cranberry Dog Dental Sticks! Consistency in thickness is important here for even baking and for creating a treat that’s easy for your dog to chew and effective for their dental health.
- Divide and Roll: Divide your dough in half. This makes it much easier to work with, especially if you’re using a standard-sized countertop. On your lightly floured surface, take one half of the dough and begin to roll it out using your rolling pin. Ensure you apply even pressure to avoid thin spots and thick spots.
- Achieve Desired Thickness: Roll the dough to approximately ¼ inch to ⅜ inch thick. This thickness is crucial for creating effective dental sticks. If they are too thin, they might become overly crispy and brittle, losing their “chew” factor and potentially breaking too easily. If they are too thick, they might be too hard for some dogs to manage or take too long to bake through evenly, leading to a softer interior. I personally aim for just under ½ inch for a substantial, long-lasting chew that really works those teeth.
- Cut into Sticks: Using a sharp knife or, my preferred tool for speed and precision, a pizza cutter, cut the rolled-out dough into individual sticks. I usually aim for sticks that are about 3 to 4 inches long and ½ inch wide. The size can be adjusted based on the size of your dog; smaller dogs might prefer shorter, thinner sticks, while larger dogs can handle bigger ones. Try to make them as uniform as possible so they bake evenly and provide a consistent chewing experience.
- Arrange on Baking Sheets: Carefully transfer the cut dental sticks to your prepared baking sheets, leaving a little space (about ½ inch) between each one. They won’t spread much during baking, but a little airflow helps them bake consistently and dry out properly. Repeat the rolling and cutting process with the second half of your dough. If you have any scraps, you can gently re-form them and roll them out again, but try not to re-work the dough too many times, as it can get tough.
Baking Your Homemade Dental Sticks:
The baking process is where these simple ingredients truly transform into delightful and beneficial Apple Cranberry Dog Dental Sticks. Pay close attention to your oven, as baking times can vary significantly depending on your specific appliance and the thickness of your treats!
- Bake in Preheated Oven: Place your baking sheets into the preheated 350°F (175°C) oven. If you’re baking two sheets at once, place one on the upper rack and one on the lower rack. Ensure there’s sufficient space for air circulation around both sheets.
- Initial Bake Time: Bake for 25 to 35 minutes. The exact timing will depend on your oven’s calibration and the precise thickness of your sticks. You’re looking for the dental sticks to be golden brown around the edges and firm to the touch when gently pressed. They should feel solid, not squishy in the middle.
- Rotate Baking Sheets: If you are baking two sheets simultaneously, halfway through the baking time (around 12-15 minutes), rotate the sheets from front to back and switch their positions (top to bottom). This crucial step helps ensure even baking and browning across all the Apple Cranberry Dog Dental Sticks, preventing some from being under-baked while others are over-baked.
- Check for Doneness: The treats should feel firm when pressed. If they still feel soft in the middle, especially at the thickest part, continue baking for another 5-10 minutes, checking frequently every few minutes to prevent burning. Remember, a slightly chewier stick is usually preferred for dental benefits over a super-hard, crunchy one, as it provides more resistance for cleaning.
- Optional Dehydrating for Extra Firmness: If you want your Apple Cranberry Dog Dental Sticks to be extra firm and chewy, which can contribute even more effectively to dental cleaning, you can optionally turn off your oven after the initial baking time. Prop the oven door open slightly with a wooden spoon (to allow moisture to escape) and leave the treats inside for an additional 1-2 hours as the oven gradually cools. This slow drying process helps to remove more moisture without further cooking, resulting in a firmer, longer-lasting stick. I often do this for maximum chewiness and dental efficacy!
Cooling and Storage Instructions:
Proper cooling and storage are essential for maintaining the freshness, texture, and shelf life of your homemade Apple Cranberry Dog Dental Sticks. Don’t let all your hard work go to waste by improper handling after baking!
- Cool Completely: Once baked (and optionally dehydrated, if you chose that step), remove the baking sheets from the oven. Immediately transfer the Apple Cranberry Dog Dental Sticks to a wire cooling rack. It is absolutely crucial that they cool completely to room temperature. This can take several hours, or even overnight, especially if you opted for the optional dehydration step. Cooling on a rack allows air to circulate around all sides, preventing condensation and sogginess, which can lead to mold and a less desirable texture.
- Storage for Freshness: Once completely cool, you have a few options for storing your delightful treats. The best method depends on how quickly your dog will devour these delicious Apple Cranberry Dog Dental Sticks:
- Room Temperature (Short-Term): For up to 5-7 days, you can store the dental sticks in an airtight container at room temperature. Ensure they are truly cool and dry before sealing them to prevent any moisture buildup, which is the enemy of fresh treats.
- Refrigerator (Medium-Term): To extend their freshness, place the airtight container in the refrigerator for up to 2-3 weeks. This is my preferred method for these Apple Cranberry Dog Dental Sticks, as the natural fruit ingredients are best kept cool to inhibit spoilage.
- Freezer (Long-Term): For longer storage, up to 2-3 months, you can freeze the dental sticks. Arrange them in a single layer on a baking sheet and freeze until solid (this prevents them from sticking together in a large clump). Once frozen, transfer them to a freezer-safe bag or container, removing as much air as possible. Thaw them at room temperature or in the refrigerator before serving. This is perfect if you’ve made a big batch!
- Always Check for Mold: Since these treats are made with fresh, natural ingredients and no artificial preservatives, it’s important to periodically check them for any signs of mold, especially if stored at room temperature for longer periods or in humid conditions. Any greenish, whitish, or fuzzy spots mean they should be immediately discarded. When in doubt, it’s always better to discard them and make a fresh batch.
Tips for Perfect Apple Cranberry Dog Dental Sticks:
Here are some additional insights and pro-tips I’ve gathered over time to help you make the absolute best Apple Cranberry Dog Dental Sticks for your beloved canine companion. These little nuances can make a big difference in the final product!
- Dough Consistency is Key: Pay close attention when adding the liquid. The dough should be firm enough to roll out without being too sticky, but not so dry that it cracks and crumbles. If it’s too sticky, add a little more whole wheat flour, one tablespoon at a time, until it’s manageable. If too dry, add more water or applesauce, one teaspoon at a time. This fine-tuning makes all the difference in handling and the final texture of your Apple Cranberry Dog Dental Sticks.
- Don’t Over-Process Cranberries: While you want them finely chopped, avoid pureeing the cranberries entirely unless you specifically prefer a very smooth texture. Small bits of cranberry add visual appeal, a burst of flavor, and a slight textural variation that I find appealing and adds to the natural feel of the treats.
- Adjust Thickness for Chewiness: As mentioned, ¼ to ⅜ inch thick is ideal. For a chewier stick that provides more dental abrasion, lean towards the thicker side. For a crunchier, more biscuit-like stick, you can roll them a bit thinner, but remember, the “dental stick” aspect often benefits more from a good, resilient chew!
- Experiment with Flavors: While these are delicious Apple Cranberry Dog Dental Sticks, you can try variations. A tiny pinch of ginger or turmeric could be a beneficial addition, known for their anti-inflammatory properties, but always research dog-safe quantities. You could even swap some apple for pumpkin puree in the fall for a seasonal twist!
- Consider Your Dog’s Chewing Habits: If your dog is a very aggressive chewer, these treats might not last as long as some extremely hardened, commercial dental sticks. However, the natural abrasiveness of the ingredients and the act of chewing them still contribute significantly to dental hygiene in a healthy, natural way. For a softer-mouthed or senior dog, or even puppies, these are absolutely perfect.
- Natural is Best: Resist the urge to add sugar or artificial sweeteners. The natural sweetness from the apples and cranberries is more than enough to entice most dogs. Always ensure any applesauce or other fruit products are 100% xylitol-free, as xylitol is highly toxic to dogs and even small amounts can be dangerous.
- Batch Baking: These Apple Cranberry Dog Dental Sticks freeze beautifully, so consider making a double or triple batch if your equipment allows. It saves time in the long run and ensures you always have a stash of healthy, homemade treats on hand, ready for your furry friend.
Why These Apple Cranberry Dog Dental Sticks Are Great:
Beyond being a delicious reward, these homemade Apple Cranberry Dog Dental Sticks offer a host of benefits that make them a fantastic choice for your dog’s health and happiness. I feel good about giving these to my dog, and you will too, knowing you’re providing something truly beneficial!
- Natural Dental Support: The slightly coarse texture from the whole wheat flour and the act of chewing helps to gently scrape away plaque and tartar buildup on your dog’s teeth. While not a replacement for professional veterinary dental care, consistent use of these sticks can contribute positively to their daily oral hygiene routine.
- Nutrient-Rich Ingredients: Each component of these Apple Cranberry Dog Dental Sticks is chosen for its health benefits:
- Apples: Full of essential vitamins A and C, and beneficial fiber. They’re also a great source of natural sweetness that dogs love.
- Cranberries: Known for their powerful antioxidant properties and their ability to support urinary tract health, helping to prevent UTIs.
- Whole Wheat & Oat Flour: Provide beneficial dietary fiber for healthy digestion and sustained energy, unlike refined white flours that offer little nutritional value.
- Coconut Oil: Supports a healthy, shiny coat, supple skin, and can aid in digestion and metabolism, contributing to overall vitality.
- Parsley: A natural breath freshener, helping to combat doggy breath and contributing to overall oral health, which is a wonderful bonus in a dental stick.
- No Nasty Additives: You control every single ingredient! This means no artificial colors, flavors, preservatives, or questionable fillers often found in commercial dog treats. You know exactly what wholesome ingredients your dog is consuming, giving you peace of mind.
- Customizable Size: You can easily cut the Apple Cranberry Dog Dental Sticks to perfectly suit your dog’s size, breed, and chewing preference, ensuring they get the most effective and enjoyable treat experience.
- Cost-Effective: Making your own treats is often much more economical than buying premium dental sticks from the store, especially when you’re making large batches. It’s a budget-friendly way to provide high-quality treats.
- Love in Every Bite: There’s something truly special and heartwarming about giving your dog a homemade treat made with your own hands and with love. It’s a wonderful bonding experience and a tangible way to show them how much you care about their well-being. These Apple Cranberry Dog Dental Sticks are not just food; they’re a gesture of affection and care.
Conclusion:
So, there you have it! We’ve journeyed together through the simple, rewarding process of creating these truly special treats for our beloved canine companions. I genuinely believe that whipping up a batch of these isn’t just about making snacks; it’s about showing an extra layer of love and care. Why are these an absolute must-try?
A Treat That Truly Cares for Their Teeth and Tummy!
First and foremost, it’s about the benefits. We’re talking about a treat that goes beyond just taste. These aren’t just delicious; they’re designed with your dog’s oral health in mind. The texture, once baked to perfection, offers a gentle yet effective scrubbing action on their teeth, helping to reduce plaque and tartar buildup. Think of it as a delicious, natural toothbrush! Beyond the dental advantages, the wholesome ingredients – crisp apples, antioxidant-rich cranberries, and natural binders – provide a nutritious boost, supporting overall health from the inside out. You’re giving your furry friend something packed with goodness, free from the artificial colors, preservatives, and mystery ingredients often found in commercial alternatives. Each bite of these homemade Apple Cranberry Dog Dental Sticks contributes to their well-being in multiple ways.
There’s also the sheer joy and satisfaction you’ll feel knowing exactly what your dog is consuming. No more guessing games or scrutinizing tiny ingredient labels. You’ve personally selected each component, mixed it with love, and baked it to perfection. That peace of mind is invaluable, especially for dogs with sensitivities or allergies. Plus, let’s be honest, watching their excited tail wags and happy chomps is a reward in itself! It’s an opportunity to connect with your pet in a meaningful way, providing them with nourishment and a little bit of homemade luxury.
Serving Suggestions & Creative Variations to Delight Your Pup
Once your batch of fantastic homemade treats is ready and cooled, you might be wondering about the best way to serve them. I usually give my dog one stick a day as part of his treat routine, sometimes every other day, depending on his activity level and other snacks he might have. They’re wonderful for a post-walk reward, a little bedtime snack, or just an anytime “I love you” moment. For storage, I recommend keeping them in an airtight container at room temperature for up to a week. If you’ve made a larger batch, they freeze beautifully for up to three months! Just thaw them out at room temperature for a few hours or overnight before serving. This makes them incredibly convenient for busy pet parents.
But don’t stop there! The beauty of homemade treats lies in the endless possibilities for customization. Want to get creative and tailor these Apple Cranberry Dog Dental Sticks even further to your pup’s preferences? Here are some ideas:
- Fruit Swaps: While apple and cranberry are a stellar combination for both taste and health benefits, feel free to experiment! Mashed banana, pureed pumpkin, or even a handful of safe-for-dogs blueberries can be wonderful additions. Always ensure any fruit you choose is safe for canine consumption.
- Flour Alternatives: If your dog has grain sensitivities or you simply prefer a different option, try swapping out some or all of the all-purpose flour for oat flour or chickpea flour for a gluten-free option. The consistency might change slightly, so adjust liquid as needed to achieve a workable dough.
- Herbaceous Boosts: A tiny sprinkle of fresh chopped parsley (about a teaspoon for a full batch) can be a fantastic natural breath freshener, adding an extra layer of care to these dental sticks. Just a little goes a long way!
- Shape Shifters: While “sticks” are great for dental benefits, don’t feel limited. Use a bone-shaped cookie cutter, small circles, or even tiny squares for training treats. The cooking time might vary slightly for different shapes and thicknesses, so keep an eye on them.
- Texture Play: For a harder, more “scrubby” stick that offers maximum dental cleaning, bake them for a little longer until they are quite firm and dry. For older dogs or those with sensitive teeth, you might bake them for a slightly shorter period to keep them a bit chewier and easier to manage.
Remember, always introduce new ingredients slowly and in moderation to ensure they agree with your dog’s digestive system. Our furry friends can sometimes be sensitive to changes, so a gradual approach is best.
Your Turn: Bake, Share, and Spread the Love!
Now, it’s over to you! I genuinely hope you feel inspired and excited to try this recipe for yourself. There’s something incredibly fulfilling about seeing your dog enjoy a treat you’ve made with your own hands, especially one that offers so many health benefits. Imagine the satisfaction of knowing you’re contributing to their dental hygiene and overall well-being, all while giving them something they truly adore. It’s a small act with a big impact on their happiness and health.
I absolutely can’t wait to hear about your experiences! Did your dog do a happy dance? Did they beg for more? What variations did you try? Please, share your stories, your triumphs, and even your funny baking mishaps in the comments below. Your feedback and photos truly make my day and inspire others to try their hand at healthy homemade treats too. Give these incredible Apple Cranberry Dog Dental Sticks a try; your dog (and their pearly whites!) will thank you for it!
Apple Cranberry Dog Dental Sticks
Delicious and nutritious homemade Apple Cranberry Dog Dental Sticks designed to help maintain your dog’s oral health while providing a satisfying chew and fresh breath. Made with wholesome ingredients like whole wheat flour, apples, cranberries, and coconut oil.
Ingredients
Instructions
Important Information
Nutrition Facts (Per Serving)
It is important to consider this information as approximate and not to use it as definitive health advice.
Allergy Information
Please check ingredients for potential allergens and consult a health professional if in doubt.
Leave a Comment