
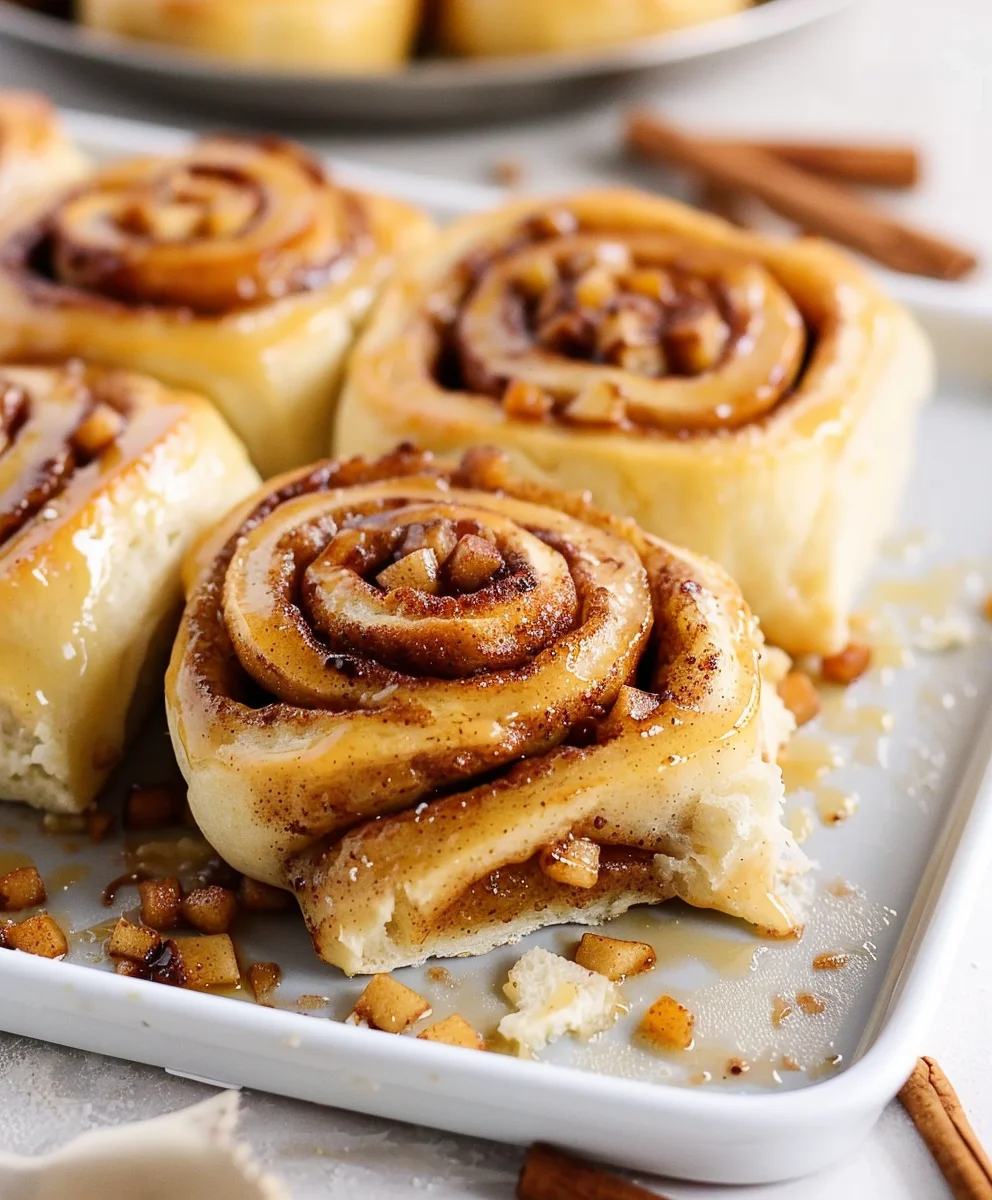
Apple Cinnamon Rolls; the very name evokes images of cozy mornings, crisp autumn air, and the intoxicating aroma of freshly baked goods wafting through the kitchen. Is there anything more comforting than a warm, gooey roll, swirls of cinnamon sugar, and tender pieces of baked apple nestled within a soft, pillowy dough? I believe not.
While the classic cinnamon roll boasts a rich heritage, tracing its roots back to Sweden’s delightful kanelbullar, the addition of apples elevates this beloved treat to a new level of seasonal bliss. It’s a harmonious marriage of the familiar comforting spice with the vibrant, slightly tart sweetness of fruit, making it an irresistible choice for any occasion, from a leisurely weekend breakfast to a festive holiday brunch. People universally adore this dish for its incredible balance of textures and flavors: the gentle chewiness of the enriched dough, the sweet, sticky glaze, the aromatic burst of cinnamon, and the delightful surprise of soft, caramelized apple pieces that add both moisture and a subtle tang. These Apple Cinnamon Rolls are more than just a pastry; they are a celebration of home, warmth, and the simple joys of sharing something truly delicious.

Ingredients:
For the Dough:
- 1 cup (240ml) warm milk (around 105-115°F or 40-46°C)
- 2 ½ teaspoons (7g) active dry yeast (one standard packet)
- ¼ cup (50g) granulated sugar, plus a pinch for the yeast
- 1 large egg, at room temperature
- ¼ cup (57g) unsalted butter, melted and slightly cooled
- ½ teaspoon salt
- 3 ½ to 4 cups (420-480g) all-purpose flour, plus more for dusting
For the Apple Cinnamon Filling:
- 4 medium-sized apples (about 3 cups diced), such as Fuji, Gala, Honeycrisp, or Granny Smith, peeled, cored, and finely diced
- ½ cup (113g) unsalted butter, melted
- ½ cup (100g) packed light brown sugar
- 1 tablespoon ground cinnamon
- ¼ teaspoon ground nutmeg (optional, but highly recommended for depth of flavor)
- 1 tablespoon all-purpose flour (to thicken the filling slightly)
For the Cream Cheese Frosting:
- 4 ounces (113g) cream cheese, softened to room temperature
- ¼ cup (57g) unsalted butter, softened to room temperature
- 1 ½ to 2 cups (180-240g) powdered sugar (confectioners’ sugar), sifted
- ½ teaspoon vanilla extract
- 1-2 tablespoons milk or heavy cream, as needed for desired consistency
- A tiny pinch of salt (enhances sweetness)
Preparing the Dough
- First, let’s get our yeast active and happy. In a large bowl or the bowl of your stand mixer, pour in the warm milk. It should feel warm to the touch, like a baby’s bath, but not scalding hot. If it’s too hot, it will kill the yeast; too cold, and the yeast won’t activate properly. Sprinkle the 2 ½ teaspoons of active dry yeast over the milk, along with a pinch of the granulated sugar. Gently stir it once or twice with a spoon. Now, let it sit undisturbed for about 5-10 minutes. You’ll know the yeast is active and ready when it becomes visibly foamy and bubbly on top, indicating it’s alive and ready to work its magic. This foamy layer is crucial; it’s a sign that your yeast is viable. If it doesn’t foam, your yeast might be old or the milk temperature was off, and it’s best to start over with fresh yeast to ensure your rolls rise beautifully and achieve that wonderfully soft texture we’re aiming for.
- Once your yeast is bubbling with enthusiasm, it’s time to add the remaining wet and flavoring ingredients. To the yeast mixture, add the remaining ¼ cup of granulated sugar, the room temperature large egg, the ¼ cup of melted and slightly cooled unsalted butter, and the ½ teaspoon of salt. Whisk everything together thoroughly until it’s well combined and homogenous. Using a room temperature egg is important because it incorporates more easily into the mixture and doesn’t chill the dough, which could slow down the yeast’s activity and extend the rising time unnecessarily. The melted butter adds richness and moisture, while the salt balances the sweetness and enhances the overall flavor profile of the dough.
- Now, we begin to form our dough. Gradually add the all-purpose flour, starting with 3 ½ cups, mixing on low speed with a dough hook (if you’re fortunate enough to be using a stand mixer) or with a sturdy wooden spoon or spatula until a shaggy, somewhat sticky dough forms. If you’re mixing by hand, switch to kneading once the dough becomes too stiff to stir comfortably. Continue adding the remaining flour, a little at a time (about ¼ cup at a time), only if the dough is excessively sticky and difficult to handle. You’re aiming for a dough that is soft, slightly tacky to the touch, but not sticking excessively to your hands or the sides of the bowl. The exact amount of flour can vary depending on factors like the humidity in your kitchen, the brand of flour you’re using, and how accurately you measured your other ingredients, so trust your instincts and the feel of the dough here. It’s always better to err on the side of a slightly softer dough than to add too much flour, as an overly floured dough can result in tough, dense, and dry cinnamon rolls, which is the opposite of what we want for these delicious Apple Cinnamon Rolls.
- This next step is where we develop the structure of our rolls: kneading! If you’re using a stand mixer, attach the dough hook and knead on medium-low speed for 6-8 minutes. If you’re kneading by hand, turn the dough out onto a lightly floured surface and knead vigorously for 8-10 minutes. The objective here is to develop the gluten, which is the protein network that gives the dough its elasticity, strength, and ability to trap the gases produced by the yeast, resulting in a light and airy texture. You’ll know the dough is perfectly kneaded when it becomes smooth, elastic, and springs back slowly when lightly poked with your finger. It should no longer be sticky and will feel wonderfully soft and pliable. This step is absolutely crucial for achieving that wonderfully fluffy, pull-apart texture in your finished Apple Cinnamon Rolls, so don’t skimp on the kneading time.
- Once kneaded to perfection, it’s time for the first rise. Lightly grease a large, clean bowl with a little neutral oil or non-stick cooking spray. Place the kneaded dough into the bowl, and turn it over once to ensure the entire surface is coated with a thin layer of oil. This thin oil barrier prevents the dough from drying out and forming a crust as it rises. Cover the bowl tightly with plastic wrap or a clean, damp kitchen towel. Find a warm, draft-free spot in your kitchen for the dough to rise. This could be near a sunny window, in a slightly warm (but turned off) oven (preheated to about 150°F then turned off), or just on your kitchen counter if your kitchen is adequately warm. Allow the dough to rise for 1 to 1 ½ hours, or until it has visibly doubled in size. The rising time can vary based on the temperature of your kitchen and the specific activity of your yeast; a warmer environment will typically shorten the rising time. A properly risen dough will feel airy and soft, ready for its delicious filling.
Making the Apple Cinnamon Filling
- While your dough is on its first rise, taking its sweet time to puff up, it’s the perfect opportunity to prepare the star of our show: the luscious apple cinnamon filling. First things first, take your 4 medium-sized apples. I personally find that a mix of sweet and tart apples, such as Honeycrisp for sweetness and Granny Smith for a bit of tangy zest, offers the best balance of flavors, but feel free to use your absolute favorite variety. Thoroughly peel them using a reliable vegetable peeler, then core them using an apple corer or carefully with a knife. Once cored, finely dice the apples into small, roughly ¼-inch pieces. Smaller pieces are key here as they ensure the apples cook evenly, soften beautifully, and spread nicely throughout the layers of your rolls, providing a delightful burst of apple in every single bite. You should aim to end up with approximately 3 cups of finely diced apples.
- Next, we’re going to give those apples a head start. In a medium-sized skillet or saucepan, melt the ½ cup of unsalted butter over medium heat. Once the butter is fully melted and shimmering invitingly, add your finely diced apples to the pan. Cook the apples, stirring occasionally with a spatula or wooden spoon, for about 5-7 minutes. You want them to soften slightly but still retain a little bit of their original bite and structure; we are definitely not trying to make applesauce here. This crucial pre-cooking step serves several important purposes: it helps prevent the apples from releasing too much moisture during the final baking process, which could potentially make your cinnamon rolls soggy, and it ensures that the apples are wonderfully tender within the finished product, not crunchy or raw.
- Once the apples are perfectly softened, remove the skillet from the heat. This prevents the sugar from burning and allows the spices to be incorporated without losing their potency. Add the ½ cup of packed light brown sugar (which contributes a lovely molasses note and deep sweetness), the 1 tablespoon of ground cinnamon (the defining flavor of cinnamon rolls), the ¼ teaspoon of ground nutmeg (if you’re using it, and I highly recommend it for an added layer of warmth and complexity), and the 1 tablespoon of all-purpose flour to the warm, softened apples. Stir everything together thoroughly until the apples are evenly coated with this aromatic, spicy, and sugary mixture. The small amount of flour in the filling acts as a thickener, helping to absorb any additional moisture that might be released by the apples during baking and preventing the filling from becoming overly runny. This ensures your filling stays beautifully contained within the rolls. Set this fragrant mixture aside to cool slightly while you move on to the next exciting phase: preparing the dough for assembly.
Assembling and Baking the Rolls
- Now that your dough has proudly doubled in size, swelling with anticipation, gently punch it down to release the accumulated air. This vital step helps to redistribute the yeast and create a more even texture in the finished rolls, and equally importantly, it makes the dough much easier to handle and roll out smoothly. Turn the dough out onto a lightly floured surface. Using a rolling pin, roll the dough into a large, even rectangle, aiming for dimensions of approximately 12 inches by 18 inches. Strive for a consistent thickness of about ¼ to ⅓ inch across the entire rectangle. Try your best to keep the edges as straight and uniform as possible, as this will significantly aid in the rolling process and ultimately result in more uniformly shaped and attractive cinnamon rolls. If you find the dough is resisting and springing back too much during rolling, simply let it rest for 5-10 minutes; this allows the gluten to relax, making it more pliable and easier to work with, then continue rolling until you reach the desired dimensions.
- With your beautifully rolled-out dough ready, it’s time for the star filling! Evenly spread the completely cooled apple cinnamon filling over the entire surface of the rolled-out dough. Make sure to leave a clean border of about ½-inch along one of the 18-inch long edges of the dough. This clean edge is crucial; it will act as the sealing point for your roll later. Use an offset spatula or the back of a spoon to spread the filling right up to the other three edges, ensuring even distribution. Take your time to make sure the diced apples and the cinnamon-sugar mixture are spread as uniformly as possible so that every single bite of your Apple Cinnamon Rolls gets a generous, consistent amount of that delicious, aromatic filling. An even spread means even flavor in every spiral!
- Now for the exciting part: the rolling! Starting from one of the 18-inch long edges (the one without the clean border), carefully and tightly roll the dough into a snug log. The tighter you roll, the more distinct and beautiful spirals your rolls will have, and the less likely they are to unravel or lose their shape during baking. Apply gentle, even pressure as you roll, ensuring the log remains consistent in thickness from one end to the other. Once you reach that clean, unfloured edge, pinch the seam closed firmly to seal the log. You can also gently tuck the ends under to tidy up the log and make it perfectly cylindrical.
- Next, we’ll slice our log into individual rolls. For the neatest, most perfect cuts that avoid squashing your beautifully formed spirals, I highly recommend using a piece of unflavored dental floss or a very sharp, un-serrated knife. If using dental floss, slide it under the log to the desired cutting point, cross the ends over the top, and pull them firmly to slice cleanly through the dough. This method preserves the round shape much better than a knife, which can sometimes flatten the rolls. Cut the log into 12 equal pieces. Each slice should be approximately 1 ½ inches thick, ensuring they are all roughly the same size for even baking.
- Lightly grease a 9×13 inch baking dish with butter or non-stick spray. Arrange the cut cinnamon rolls in the prepared baking dish, making sure to leave a little space between each one. This spacing is important because they will expand significantly during their second rise and again even more so during baking. They’ll snuggle up together as they bake, creating that classic pull-apart cinnamon roll experience.
- Cover the baking dish loosely with plastic wrap or a clean kitchen towel. Place the dish back in that warm, draft-free spot for the second rise. Allow the rolls to rise for another 45-60 minutes, or until they look visibly puffy and have nearly doubled in size again, filling out the baking dish. This second rise, often called “proofing,” is absolutely crucial for achieving light and airy rolls with a soft, tender crumb. While they are rising gracefully, preheat your oven to 375°F (190°C) during the last 15-20 minutes of the rising time, allowing the oven to come to full temperature and stabilize.
- Once the rolls have beautifully puffed up and look ready for their oven spa treatment, remove the cover from the baking dish and carefully place the dish into your preheated oven. Bake for 20-25 minutes, or until the tops are gloriously golden brown and the rolls are cooked through to the center. Keep an eye on them; if you notice the tops are browning too quickly before the centers are fully baked, you can loosely tent the dish with aluminum foil for the last 5-10 minutes of baking to prevent over-browning. The internal temperature of a fully baked roll should be around 200-205°F (93-96°C) if you’re using an instant-read thermometer, but typically the rich golden-brown color and a visibly fluffy, set appearance are excellent indicators of doneness.
- Remove the aromatic Apple Cinnamon Rolls from the oven and let them cool in the baking dish for about 5-10 minutes before applying the frosting. This brief cooling period allows the rolls to set slightly and makes them easier to handle without falling apart, but the goal is to still have them wonderfully warm when you apply the frosting. Applying frosting to warm rolls is the secret to that irresistible gooey texture, as the warmth slightly melts the frosting, allowing it to seep into every nook and cranny, permeating the layers with creamy, sweet goodness.
Whipping Up the Cream Cheese Frosting
- While our freshly baked Apple Cinnamon Rolls are cooling ever-so-slightly, it’s the perfect moment to prepare the decadent, tangy-sweet cream cheese frosting that will take them over the top. In a medium mixing bowl, or using your stand mixer fitted with the paddle attachment, combine the 4 ounces of softened cream cheese and the ¼ cup of softened unsalted butter. It is absolutely paramount that both of these ingredients are at true room temperature. If they are cold, you will end up with lumps in your frosting that are difficult to smooth out. Beat them together on medium speed until they are light, fluffy, and completely smooth, taking care to scrape down the sides of the bowl as needed to ensure everything is evenly incorporated. This usually takes about 2-3 minutes of beating.
- Now, we’ll add the sweetness. Gradually add the 1 ½ to 2 cups of sifted powdered sugar (also known as confectioners’ sugar). Start with one cup, mixing it in, and then add more as needed to reach your desired level of sweetness and frosting consistency. Sifting the powdered sugar beforehand is a non-negotiable step; it is the key to preventing any unsightly or unpleasant lumps in your frosting, ensuring a perfectly smooth finish. Begin mixing on low speed until the sugar is just incorporated into the cream cheese mixture, preventing a cloud of sugar from erupting in your kitchen. Then, increase the speed to medium-high and beat until everything is wonderfully combined, light, and fluffy.
- Next, stir in the ½ teaspoon of pure vanilla extract. Vanilla adds a beautiful warmth and depth of flavor that complements both the cream cheese and the apples. Don’t forget the tiny pinch of salt. While it might seem counterintuitive to add salt to a sweet frosting, it’s a secret weapon here; it doesn’t make the frosting salty at all, but rather enhances all the sweet flavors, balances the richness, and provides a wonderful, nuanced taste that makes the frosting truly irresistible.
- Finally, we’ll achieve that perfect consistency. If you find your frosting is too thick, or if you prefer a slightly more drizzly frosting rather than a spreadable one, add the 1-2 tablespoons of milk or heavy cream, one tablespoon at a time, until you reach your desired consistency. Beat again until everything is perfectly smooth, creamy, and ready to be lavished upon your rolls. You want a frosting that is easy to spread or drizzle but not so thin that it just runs off the rolls completely. Taste the frosting and adjust for sweetness if necessary, adding a little more powdered sugar if you prefer it sweeter, or a tiny splash more milk if it’s too thick.
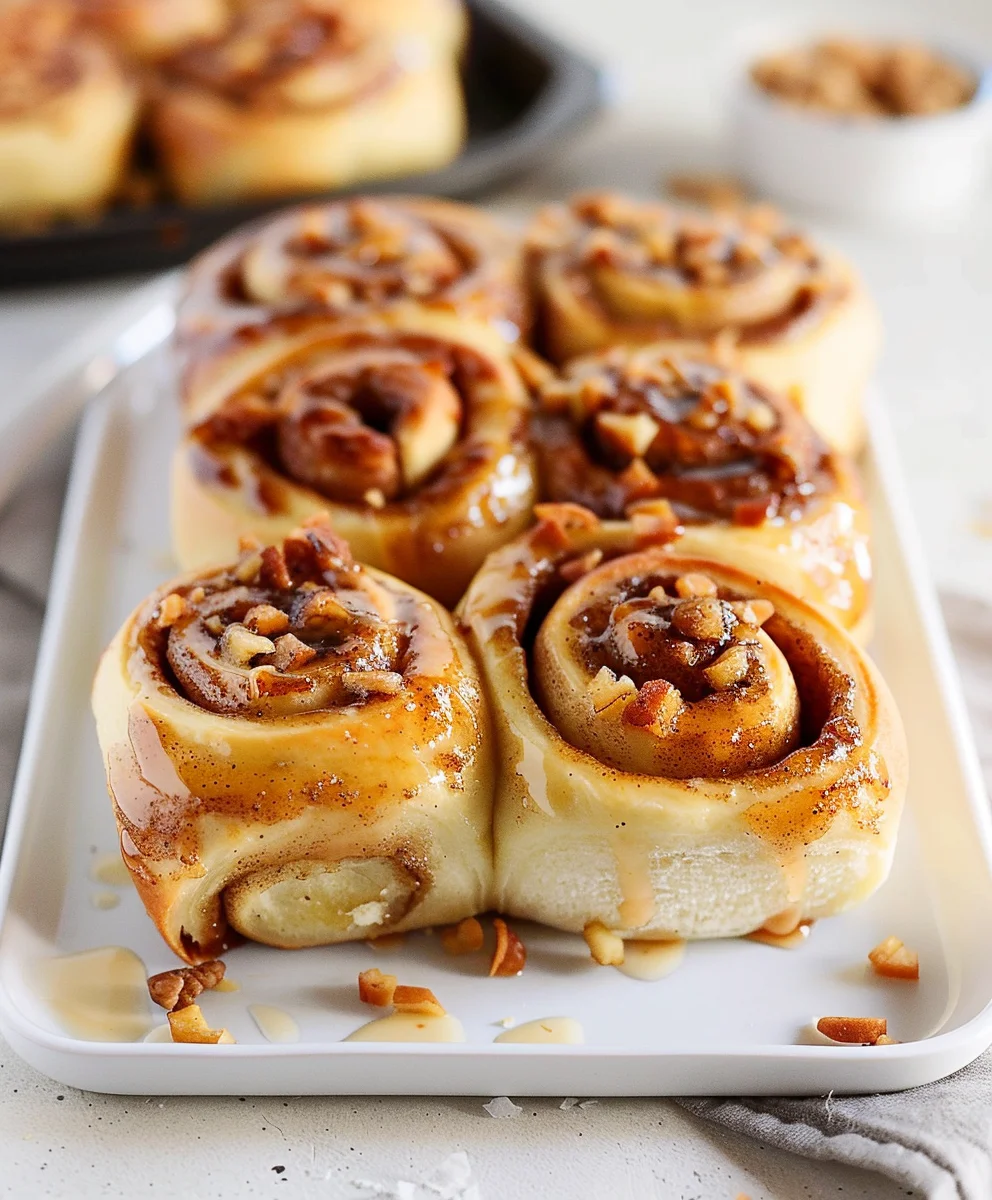
- Generously spread or drizzle the finished cream cheese frosting over the still-warm Apple Cinnamon Rolls. The residual warmth of the rolls will work its magic, causing the frosting to slightly melt and seep into the layers, creating an even more moist, tender, and intensely flavorful experience. Serve them immediately to enjoy them at their absolute best – gooey, warm, and utterly delightful! These Apple Cinnamon Rolls are truly a taste of pure comfort.
Conclusion:
The moment you pull these beauties from the oven, your kitchen will be enveloped in an intoxicating aroma – a comforting blend of warm spices, sweet apples, and freshly baked dough. This isn’t just another recipe; it’s an invitation to experience pure culinary bliss. We’ve taken the classic cinnamon roll and elevated it with the delightful addition of tender, spiced apples, transforming a beloved treat into something truly extraordinary. Imagine biting into that soft, pillowy dough, discovering pockets of caramelized apple goodness mingling perfectly with the classic cinnamon swirl, all crowned with a luscious, tangy cream cheese glaze. It’s a symphony of textures and flavors that promises to awaken your senses and leave a lasting impression of homemade warmth and indulgence. Every bite is a testament to the simple joy that comes from baking something with love and care.
What makes this recipe a true must-try is the unparalleled satisfaction it delivers, both in the making and the eating. From the joyous kneading of the dough to the careful rolling and slicing, each step is a therapeutic journey that culminates in a masterpiece. Forget those dry, flavorless store-bought imitations; these Apple Cinnamon Rolls boast an irresistible freshness and depth of flavor that only a homemade touch can achieve. They are soft, moist, and bursting with the vibrant essence of autumn, making them a perfect pick-me-up on a chilly morning or a delightful centerpiece for any gathering. The subtle tang of the apples cuts through the sweetness beautifully, ensuring each bite is perfectly balanced. Trust me, the effort is minimal compared to the immense reward you’ll feel when you share these with loved ones, or simply savor one yourself with a quiet cup of coffee, enjoying a moment of pure, unadulterated comfort.
While these Apple Cinnamon Rolls are utterly divine straight from the oven, still warm and gooey, there are countless ways to enjoy them. They make an absolutely splendid breakfast or brunch item, perhaps alongside a fresh fruit salad and a strong cup of coffee or a comforting mug of hot apple cider. For a more decadent dessert experience, try serving them slightly warm with a scoop of vanilla bean ice cream melting gently over the top, creating a delightful contrast of temperatures and textures. A dollop of fresh whipped cream could also elevate them further, adding a touch of airy richness. Don’t limit them to morning hours; they are equally perfect as an afternoon treat, bringing a moment of sweet solace to your day. You could even serve them with a light drizzle of caramel sauce for an extra layer of indulgence, transforming a simple roll into a gourmet delight.
One of the most exciting aspects of baking is the freedom to customize, and this recipe lends itself beautifully to creative variations. While the core “Apple Cinnamon Rolls” are perfect as is, feel free to experiment. You could introduce a handful of chopped toasted walnuts or pecans into the apple filling for an added layer of crunch and nutty flavor, enhancing the autumnal feel. For a different spice profile, consider adding a pinch of nutmeg or cardamom alongside the cinnamon, adding even more depth and warmth. If you’re not a fan of cream cheese glaze, a simple powdered sugar and milk glaze, perhaps infused with a hint of maple syrup or vanilla, would also be wonderfully delicious. Or, for an even richer finish, a drizzle of homemade caramel sauce could transform them into an even more luxurious treat. You could even try different apple varieties – Granny Smith for a tarter bite that truly balances the sweetness, or Honeycrisp for extra sweetness and crispness in the cooked fruit. The possibilities are truly endless, allowing you to tailor this recipe to your precise preferences and make it uniquely yours.
Now that you’ve journeyed with me through the delightful process of creating these incredible Apple Cinnamon Rolls, I implore you: don’t just dream about them, make them! Take that leap into your kitchen, gather your ingredients, and immerse yourself in the joy of baking. There’s an undeniable satisfaction that comes from transforming simple ingredients into something truly spectacular with your own hands. This recipe is designed to be accessible, rewarding, and utterly delicious, proving that homemade doesn’t have to mean complicated. You will not only fill your home with an intoxicating aroma but also create memories and moments of pure indulgence for yourself and those you share them with. The act of baking itself is a gift, a chance to slow down and create something beautiful from scratch.
I genuinely believe these Apple Cinnamon Rolls are going to become a staple in your recipe repertoire, a cherished treat you’ll return to again and again. Once you’ve baked your batch, I would absolutely love to hear about your experience! Did you stick to the recipe, or did you put your own creative spin on it? What was your favorite part of the process, or the most satisfying bite? Please share your stories, your triumphs, and especially your photos with us. There’s nothing more rewarding than seeing our community come alive with shared culinary passion, exchanging tips and celebrating successes. So, go forth, bake those amazing Apple Cinnamon Rolls, and prepare to delight everyone who tries them. Happy baking, my friends; I can’t wait to see what you create!
Irresistible Apple Cinnamon Rolls
Warm, gooey, and utterly comforting, these Apple Cinnamon Rolls feature tender pieces of baked apple nestled within a soft, pillowy dough, swirled with aromatic cinnamon sugar. Topped with a luscious cream cheese frosting, they are an irresistible choice for any occasion, from a leisurely weekend breakfast to a festive holiday brunch, offering a harmonious marriage of comforting spice and vibrant, slightly tart fruit.
Ingredients
-
1 cup (240ml) warm milk (105-115°F/40-46°C)
-
2 ½ tsp (7g) active dry yeast (1 packet)
-
¼ cup (50g) granulated sugar, plus a pinch
-
1 large egg, room temperature
-
¼ cup (57g) unsalted butter, melted & cooled (for dough)
-
½ tsp salt (for dough)
-
3 ½ to 4 cups (420-480g) all-purpose flour, plus more for dusting
-
4 medium apples (approx. 3 cups diced), peeled, cored, finely diced
-
½ cup (113g) unsalted butter, melted (for filling)
-
½ cup (100g) packed light brown sugar
-
1 tbsp ground cinnamon
-
¼ tsp ground nutmeg (optional)
-
1 tbsp all-purpose flour (for filling)
-
½ cup toasted pecans, chopped (optional)
-
4 oz (113g) cream cheese, softened
-
¼ cup (57g) unsalted butter, softened (for frosting)
-
1 ½ to 2 cups (180-240g) powdered sugar, sifted
-
½ tsp vanilla extract
-
1-2 tbsp milk or heavy cream
-
Pinch of salt (for frosting)
Instructions
-
Step 1
In a large bowl, combine warm milk, yeast, and a pinch of granulated sugar. Let sit 5-10 minutes until foamy. -
Step 2
To the yeast mixture, add remaining granulated sugar, egg, melted butter, and ½ tsp salt. Whisk until combined. -
Step 3
Gradually add 3 ½ to 4 cups all-purpose flour, mixing until a soft, slightly tacky dough forms. Knead for 6-10 minutes until smooth and elastic. -
Step 4
Lightly grease a bowl, place dough, turn once to coat, and cover. Let rise in a warm, draft-free spot for 1 to 1 ½ hours, or until doubled in size. -
Step 5
Peel, core, and finely dice 4 medium apples (approx. 3 cups). Melt ½ cup butter in a skillet over medium heat, add diced apples, and cook for 5-7 minutes until slightly softened. Remove from heat. Stir in ½ cup brown sugar, 1 tbsp cinnamon, ¼ tsp nutmeg (optional), and 1 tbsp flour until apples are evenly coated. Set aside to cool. -
Step 6
Gently punch down the risen dough and turn onto a lightly floured surface. Roll into a 12×18 inch rectangle, about ¼ to ⅓ inch thick, keeping edges as straight as possible. -
Step 7
Evenly spread the cooled apple cinnamon filling over the dough, leaving a ½-inch clean border along one 18-inch long edge. If using, sprinkle ½ cup chopped toasted pecans over the filling. -
Step 8
Starting from the opposite 18-inch long edge, tightly roll the dough into a log. Pinch the seam closed. Using dental floss or a sharp knife, cut the log into 12 equal 1 ½-inch thick pieces. -
Step 9
Lightly grease a 9×13 inch baking dish. Arrange rolls, spaced apart. Cover loosely and let rise in a warm spot for 45-60 minutes until puffy and nearly doubled. Preheat oven to 375°F (190°C) during the last 15-20 minutes of rising. -
Step 10
Bake for 20-25 minutes, or until gloriously golden brown. If browning too quickly, loosely tent with aluminum foil. Remove from oven and cool in the dish for 5-10 minutes. -
Step 11
While rolls cool, beat softened cream cheese and ¼ cup softened unsalted butter until light and fluffy. Gradually add 1 ½ to 2 cups sifted powdered sugar on low speed, then beat on medium-high. Stir in ½ tsp vanilla extract and a pinch of salt. Add 1-2 tbsp milk or heavy cream, one at a time, until desired smooth consistency is reached. -
Step 12
Generously spread or drizzle frosting over the still-warm Apple Cinnamon Rolls. Serve immediately to enjoy them at their gooey, warm, and utterly delightful best.
Important Information
Nutrition Facts (Per Serving)
It is important to consider this information as approximate and not to use it as definitive health advice.
Allergy Information
Please check ingredients for potential allergens and consult a health professional if in doubt.
Leave a Comment