
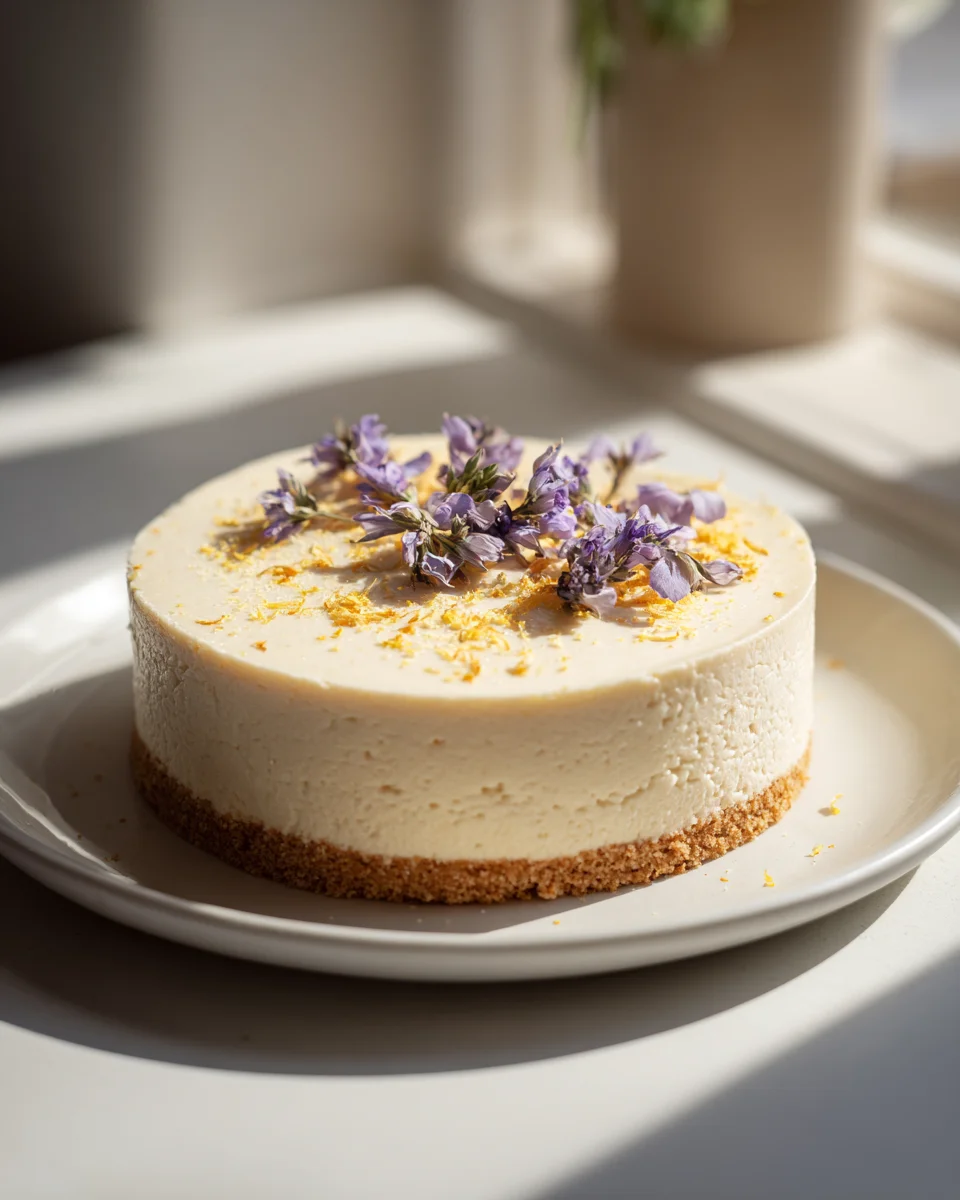
Creamy Earl Grey Tea Cheesecake
Oh, prepare yourselves for a dessert experience that’s truly out of this world! I’m so excited to share my absolute favorite, the Creamy Earl Grey Tea Cheesecake. If you’re anything like me, you appreciate a classic with a delightful twist, and this recipe delivers exactly that. We’re taking the beloved, smooth, and rich texture of cheesecake and infusing it with the sophisticated, aromatic charm of Earl Grey tea.
What makes this cheesecake so special, you ask? It’s the harmonious marriage of the familiar, comforting creaminess of a perfectly baked cheesecake with the delicate, bergamot-kissed notes of Earl Grey. It’s not just a cheesecake; it’s an elevated indulgence, a dessert that whispers elegance with every single forkful. You’re going to absolutely adore how the bright, floral tea flavor cuts through the richness of the cream cheese, creating a perfectly balanced symphony for your taste buds.
Get ready to impress your friends and family, or simply treat yourself to something truly extraordinary. This dish offers a velvety smooth filling, brimming with that distinctive Earl Grey essence, all nestled atop a buttery biscuit crust. It’s a truly memorable dessert that will have everyone asking for the recipe, blending the best of both worlds: the comforting decadence of cheesecake and the subtle, fragrant allure of your favorite cuppa. Let’s get baking!

Ingredient Notes
Oh, this Creamy Earl Grey Tea Cheesecake is a true delight, and getting the ingredients right is the first step to perfection! Here’s what you’ll need and a few notes on why they matter:
- Full-Fat Cream Cheese: This is the heart of our cheesecake! I always insist on full-fat block cream cheese, not the spreadable kind in a tub. It provides the essential richness and creamy texture we’re after. Crucially, make sure it’s at room temperature before you start mixing. Cold cream cheese will give you a lumpy batter, and nobody wants that!
- Granulated Sugar: For sweetness and to help create that smooth, luscious texture.
- Large Eggs: Like the cream cheese, room temperature eggs are your best friend here. They emulsify better into the batter, preventing overmixing and potential cracks in your finished cheesecake.
- Earl Grey Tea: This is where the magic happens! I recommend using a good quality loose leaf Earl Grey tea for the best flavor. You’ll want about 2-3 tablespoons, depending on how intensely you like the bergamot flavor. If you only have tea bags, use 4-6 bags, making sure they’re strong enough to infuse effectively.
- Heavy Cream (Double Cream): This adds an extra layer of richness and helps achieve that incredibly creamy consistency.
- Sour Cream (or Full-Fat Greek Yogurt): A touch of sour cream is key for balance. It adds a lovely tang that cuts through the richness of the cream cheese, making the cheesecake feel lighter and incredibly smooth. If you don’t have sour cream, full-fat Greek yogurt works wonderfully as a substitute, offering a similar tang and richness.
- Vanilla Extract: Just a touch enhances all the other flavors beautifully.
- Lemon Zest: A little zest from a fresh lemon brightens the entire profile of the cheesecake without making it taste lemony. It’s like a secret ingredient that wakes up the flavors.
- Graham Cracker Crust Ingredients: For the crust, you’ll need Graham cracker crumbs, melted unsalted butter, and a tablespoon or two of sugar. You can make your own crumbs by pulsing Graham crackers in a food processor, or buy them pre-crushed.
- Substitutions for Crust: If Graham crackers aren’t available, digestive biscuits, shortbread cookies, or even vanilla wafers make excellent crust alternatives. Just make sure to adjust the butter if your chosen biscuit is already quite buttery.
- Decaf Earl Grey: For those who prefer to avoid caffeine, feel free to use decaffeinated Earl Grey tea; the flavor will be just as wonderful!
Step-by-Step Instructions
Let’s get baking! Don’t be intimidated by cheesecake; it’s quite straightforward when you follow these steps. The key is patience and gentle handling.
- Prepare Your Pan: First, preheat your oven to 325°F (160°C). Grab a 9-inch springform pan. If you’re using a dark pan, you might reduce the oven temperature slightly to prevent over-browning. To prepare for a water bath, wrap the outside of your springform pan tightly with two layers of heavy-duty aluminum foil. This is crucial to prevent water from seeping in during baking.
- Make the Crust: In a medium bowl, combine the Graham cracker crumbs, granulated sugar, and melted butter. Mix well until the crumbs are evenly moistened. Press this mixture firmly into the bottom of the prepared springform pan. You can use the bottom of a glass or your knuckles to get an even, compact layer. I like to bake my crust for about 8-10 minutes until lightly golden. This helps it set and prevents it from getting soggy. Remove from the oven and let it cool slightly while you prepare the filling.
- Infuse the Earl Grey: In a small saucepan, gently heat about ½ cup of heavy cream over medium-low heat until it’s warm but not boiling. Remove from heat and stir in your loose leaf Earl Grey tea (or tea bags). Cover the pan and let it steep for at least 15-20 minutes, or even longer if you desire a stronger tea flavor. Once steeped, strain the cream through a fine-mesh sieve to remove all tea leaves. Press down on the leaves to extract all the liquid. Let the infused cream cool completely to room temperature.
- Prepare the Filling Base: In a large mixing bowl (or the bowl of a stand mixer fitted with the paddle attachment), beat the softened cream cheese on medium speed until it’s completely smooth and creamy, about 2-3 minutes. Scrape down the sides of the bowl frequently to ensure no lumps remain.
- Add Sweetness and Flavor: Gradually add the granulated sugar to the cream cheese, beating on medium-low speed until just combined and smooth. Don’t overmix. Then, add the sour cream, the cooled Earl Grey infused cream, vanilla extract, and lemon zest. Beat on low speed until everything is well incorporated and the mixture is smooth.
- Incorporate the Eggs: This is a critical step! Add the eggs one at a time, mixing on the lowest speed possible just until each egg is incorporated. Overmixing the eggs can incorporate too much air, which can cause the cheesecake to puff up and then crack as it cools. Scrape down the bowl after each addition to ensure uniformity. The batter should be smooth and silky.
- Bake with a Water Bath: Pour the cheesecake batter over the cooled crust in the springform pan. Place the foil-wrapped springform pan into a larger roasting pan. Carefully pour hot water into the roasting pan until it comes about halfway up the sides of the springform pan. This water bath creates a humid environment, which helps the cheesecake bake gently and evenly, preventing cracks and ensuring that famous creamy texture.
- Bake the Cheesecake: Carefully transfer the roasting pan with the cheesecake to the preheated oven. Bake for 60-75 minutes. The cheesecake is done when the edges are set, but the center (about a 2-inch circle) still has a slight jiggle when you gently shake the pan. Do not overbake!
- Cool Gradually: Turn off the oven, but leave the cheesecake inside with the oven door ajar for about 1 hour. This slow cooling process is vital for preventing cracks.
- Chill Thoroughly: Remove the cheesecake from the oven and the water bath. Carefully unwrap the foil. Let it cool completely on a wire rack at room temperature for another 1-2 hours. Once fully cooled, cover the cheesecake with plastic wrap and refrigerate for at least 6-8 hours, or preferably overnight. Chilling is absolutely essential for the cheesecake to firm up and for the flavors to fully develop.
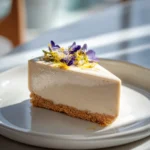
- Serve: When you’re ready to serve, carefully run a thin knife around the edge of the pan before releasing the springform sides. Slice with a hot, clean knife for neat portions. Enjoy!
Tips & Suggestions
- Room Temperature Ingredients are Key: I can’t stress this enough! Make sure your cream cheese and eggs are at room temperature. This ensures a smooth, lump-free batter and helps prevent overmixing, which in turn reduces the risk of cracks.
- Don’t Overmix the Batter: Especially after adding the eggs. Overmixing incorporates too much air, which causes the cheesecake to rise too much during baking and then collapse and crack as it cools. Mix on low speed, just until ingredients are combined.
- The Importance of the Water Bath: A water bath (bain-marie) is your best friend for a perfect cheesecake. It provides gentle, even heat, prevents the cheesecake from drying out, and creates a humid environment that helps prevent cracking. Make sure your springform pan is wrapped very securely with heavy-duty foil to prevent any water from seeping in!
- Cool, Cool, Cool: Patience is a virtue, especially with cheesecake. The gradual cooling process – first in the turned-off oven, then at room temperature, and finally in the refrigerator – is crucial for preventing cracks and achieving that perfectly dense, creamy texture. Don’t rush it!
- Adjust Earl Grey Intensity: The amount of tea and steeping time I’ve suggested is a guideline. If you prefer a stronger bergamot kick, use a little more tea or steep it for a longer duration. Taste the infused cream before adding it to the batter if you’re unsure.
- Serving Suggestions: This Creamy Earl Grey Tea Cheesecake is delightful on its own, but you can elevate it further! A dollop of lightly sweetened whipped cream, a sprinkle of fresh berries (raspberries or blueberries pair wonderfully), or even a few candied orange peels can add a beautiful touch. For a more dramatic presentation, you could even sprinkle a few finely crushed dried Earl Grey tea leaves over the top just before serving.
- Clean Slices: For perfect, clean slices, dip your knife in hot water and wipe it clean between each cut.
Storage
Proper storage ensures your delicious Creamy Earl Grey Tea Cheesecake stays fresh and delightful for as long as possible!
- Refrigeration: This cheesecake needs to be kept refrigerated due to its dairy content. Store any leftover slices or the whole cheesecake (if not yet cut) in an airtight container or tightly wrapped in plastic wrap. It will stay fresh and delicious in the refrigerator for up to 5-7 days.
- Freezing: Yes, you can freeze cheesecake! For best results, freeze individual slices or the whole cheesecake (uncut).
- Freezing slices: Place slices on a baking sheet and freeze until firm. Once firm, wrap each slice tightly in plastic wrap, then again in aluminum foil.
- Freezing a whole cheesecake: Freeze the whole cheesecake (preferably after it’s fully chilled and unmolded from the springform pan) uncovered on a plate or cutting board until firm. Then, wrap it tightly in several layers of plastic wrap, followed by a layer of aluminum foil.
- Frozen cheesecake will keep well for up to 1-2 months.
- Thawing: To thaw, transfer the frozen cheesecake (or individual slices) to the refrigerator and let it thaw overnight, or for at least 6-8 hours. Do not thaw at room temperature, as this can affect the texture. It’s best served chilled.
Final Thoughts
And there you have it, my dear friends! We’ve just crafted something truly special together. The Creamy Earl Grey Tea Cheesecake isn’t just another dessert; it’s an elegant, comforting, and utterly delightful experience waiting to happen in your kitchen.
I genuinely believe this recipe is a must-try because it masterfully blends the classic richness of a perfect cheesecake with the sophisticated, aromatic notes of Earl Grey tea. Each bite offers a harmonious balance that’s both familiar and excitingly new. It’s the kind of treat that elevates any gathering, makes a regular evening feel extraordinary, and most importantly, brings a smile to everyone’s face.
So, gather your ingredients, set aside some time, and prepare to fall in love with the unique charm of this Creamy Earl Grey Tea Cheesecake. I promise you, the reward of that first creamy, fragrant spoonful is absolutely worth it. Happy baking!
Indulgent Creamy Earl Grey Tea Cheesecake Recipe
- Total Time: 1 hour 45 minutes
- Yield: 8 servings 1x
Description
Experience the luxurious blend of rich cheesecake and the aromatic charm of Earl Grey tea with this indulgent dessert. Perfect for impressing guests or treating yourself, this cheesecake is a delightful twist on a classic favorite.
Ingredients
- 16 oz Full-Fat Cream Cheese, at room temperature
- 1 cup Granulated Sugar
- 3 Large Eggs, at room temperature
- 2–3 tablespoons Earl Grey Tea (or 4–6 tea bags)
- 1 cup Heavy Cream (Double Cream)
- 1/2 cup Sour Cream (or Full-Fat Greek Yogurt)
- 1 teaspoon Vanilla Extract
- 1 tablespoon Lemon Zest
- 1 1/2 cups Graham Cracker Crumbs
- 1/2 cup Melted Unsalted Butter
- 1–2 tablespoons Sugar for the crust
Instructions
- Preheat your oven to 325°F (160°C). Wrap the outside of a 9-inch springform pan tightly with two layers of heavy-duty aluminum foil.
- In a medium bowl, combine the Graham cracker crumbs, granulated sugar, and melted butter. Press this mixture firmly into the bottom of the prepared springform pan. Bake for about 8-10 minutes until lightly golden, then let it cool slightly.
- In a small saucepan, gently heat about ½ cup of heavy cream over medium-low heat until warm. Remove from heat, stir in the Earl Grey tea, cover, and let steep for at least 15-20 minutes. Strain the cream through a fine-mesh sieve and let it cool to room temperature.
- In a large mixing bowl, beat the softened cream cheese on medium speed until smooth and creamy, about 2-3 minutes.
- Gradually add the granulated sugar to the cream cheese, beating until just combined. Then add the sour cream, cooled Earl Grey infused cream, vanilla extract, and lemon zest. Beat on low speed until smooth.
- Add the eggs one at a time, mixing on the lowest speed until each egg is incorporated. Scrape down the bowl after each addition.
- Pour the cheesecake batter over the cooled crust in the springform pan. Place the foil-wrapped springform pan into a larger roasting pan and pour hot water into the roasting pan until halfway up the sides of the springform pan.
- Bake for 60-75 minutes until the edges are set but the center has a slight jiggle. Do not overbake.
- Turn off the oven and leave the cheesecake inside with the door ajar for about 1 hour.
- Remove the cheesecake from the oven and water bath, let it cool completely on a wire rack for 1-2 hours. Cover with plastic wrap and refrigerate for at least 6-8 hours or overnight.
- Run a thin knife around the edge of the pan before releasing the springform sides. Slice with a hot, clean knife and enjoy!
- Prep Time: 30 mins
- Cook Time: 75 mins
- Category: Dessert
- Method: Baking
- Cuisine: American
Nutrition
- Serving Size: 1 slice
- Calories: 450
- Sugar: 30 g
- Sodium: 300 mg
- Fat: 30 g
- Saturated Fat: 15 g
- Unsaturated Fat: 10 g
- Trans Fat: 0 g
- Carbohydrates: 35 g
- Fiber: 1 g
- Protein: 6 g
- Cholesterol: 100 mg
Keywords: Ensure all ingredients are at room temperature for a smooth batter. Don't overmix after adding the eggs to prevent cracks. A water bath is essential for even baking and preventing dryness.
Leave a Comment