
Chicken Caesar Pitas
Hey everyone! I am so excited to share one of my absolute favorite go-to recipes with you today: Chicken Caesar Pitas. If you, like me, are a massive fan of a classic Caesar salad but sometimes wish it came in a more convenient, handheld, and utterly satisfying package, then this dish is about to become your new best friend.
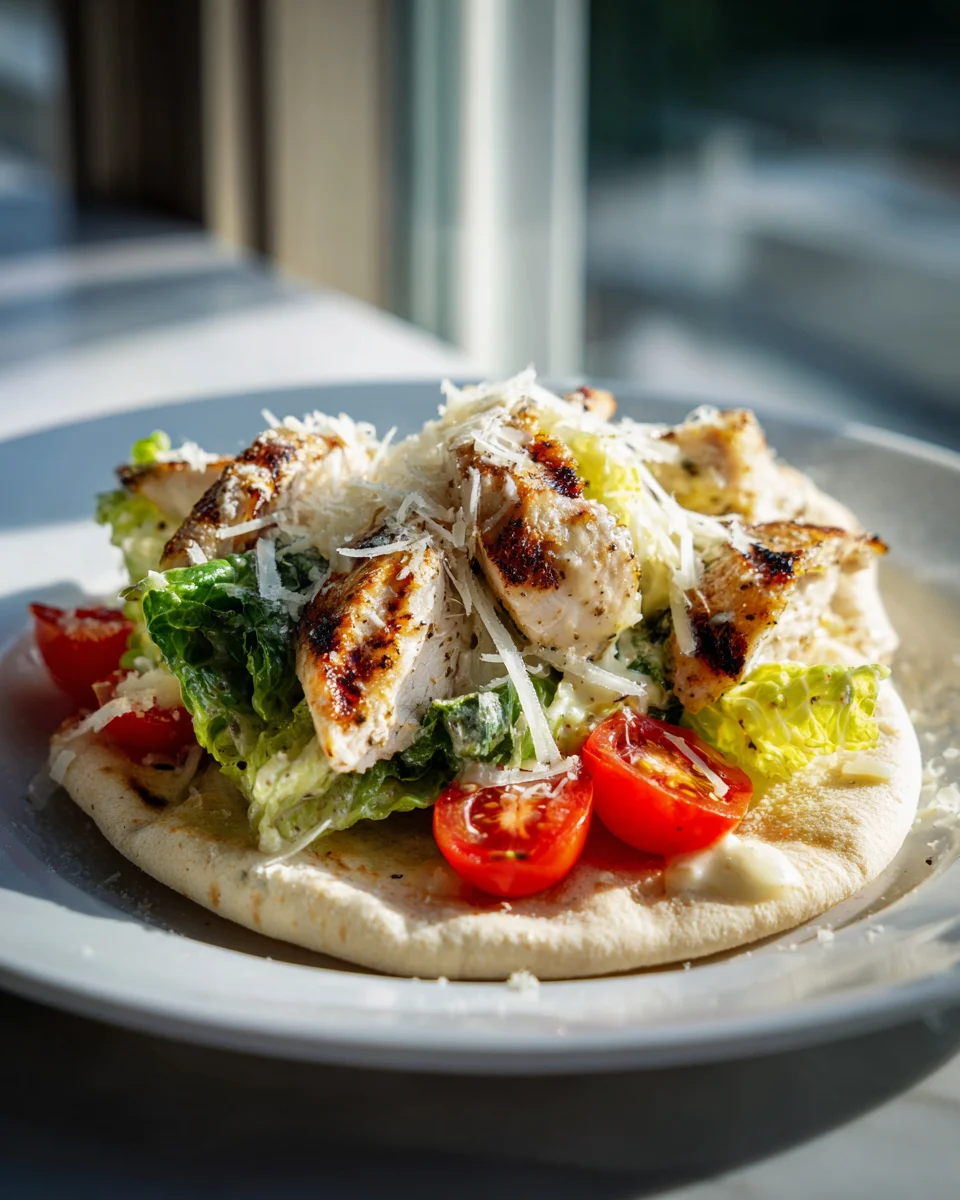
What makes these Chicken Caesar Pitas so special, you ask? Well, it’s the brilliant marriage of all those beloved Caesar flavors – the creamy, tangy dressing, the crisp romaine, the savory Parmesan, and tender chicken – all snuggled perfectly inside a warm, soft pita pocket. It’s like your favorite salad got a delicious, portable upgrade, transforming from a fork-and-knife affair into the ultimate grab-and-go meal.
You’re going to adore this recipe because it truly ticks all the boxes. It’s incredibly quick to assemble, making it perfect for those busy weeknights or a super speedy lunch. Plus, it’s a fantastic way to enjoy a substantial, flavor-packed meal without feeling heavy. I promise you, each bite is a delightful burst of fresh, zesty goodness that’s both familiar and exciting. Get ready to ditch the salad bowl and embrace the pita pocket!

Ingredient Notes
Crafting delicious Chicken Caesar Pitas starts with selecting the right ingredients. This dish is all about fresh flavors and satisfying textures, and I’m so excited to share my go-to choices and some fantastic substitutions that make it truly your own.
- Cooked Chicken: The star of our show! I usually opt for boneless, skinless chicken breasts or thighs that I’ve grilled, baked, or pan-fried and then diced or shredded. This is a brilliant recipe for using up leftover chicken from another meal, making weeknight dinners a breeze. If you’re short on time, a store-bought rotisserie chicken is an absolute lifesaver – just remove the skin and bones, then shred or dice the meat. You could even use canned chicken, drained well, for an ultra-speedy option.
- Pita Breads: These soft, pocketed breads are what make our “Caesar salad” truly a pita! I prefer the larger, thicker pita breads that are easy to cut open and stuff without tearing. Whole wheat pitas are a great nutritious alternative, or if you can only find smaller ones, you might need to use two per serving. Flatbreads or even larger tortillas can work in a pinch if you fold them like a wrap instead of creating a pocket.
- Romaine Lettuce: Crisp and refreshing, romaine is the classic choice for Caesar salad. Its sturdy texture stands up well to dressing and holds up nicely in the pita. Feel free to use other sturdy greens like butter lettuce or even a spring mix if you prefer, but romaine really delivers that authentic Caesar crunch.
- Caesar Dressing: This is where the magic happens! A good quality Caesar dressing brings all the flavors together. Whether you prefer a creamy, tangy store-bought variety or a homemade version, choose one you love. There are many fantastic options available, including lighter versions or those specifically made without animal products. Just pick your favorite!
- Parmesan Cheese: Freshly grated Parmesan (or Parmigiano-Reggiano) adds a wonderful salty, nutty punch. I always recommend grating it fresh from a block for the best flavor, but pre-grated works perfectly fine too. Pecorino Romano is a fantastic substitution if you like a slightly sharper, saltier cheese.
- Croutons (Optional but Recommended): While technically optional when stuffing into a pita, I find that a handful of crushed Caesar croutons tossed into the mix adds an irresistible textural contrast. You can make your own or use store-bought. If you’re looking to keep it gluten-free, omit them or use gluten-free croutons.
- Optional Add-ins: Don’t be shy about customizing! I sometimes like to add thinly sliced red onion for a bit of bite, some halved cherry tomatoes for a burst of freshness, or even a sprinkle of cooked and crumbled beef bacon bits for extra savory goodness. Avocado chunks are also a delightful addition for creamy richness.
Step-by-Step Instructions
Get ready to assemble these incredibly satisfying Chicken Caesar Pitas! The beauty of this dish is how quickly it comes together, especially if you have your chicken pre-cooked. Let’s dive in:
- Prepare Your Chicken: First things first, ensure your chicken is ready to go. If you’re using raw chicken, cook it now. I usually season boneless, skinless chicken breasts with salt, pepper, garlic powder, and a little paprika, then grill or pan-fry them until cooked through. Once cooked, let the chicken rest for a few minutes before dicing it into bite-sized pieces or shredding it. If you’re using leftover or rotisserie chicken, simply dice or shred it to your liking.
- Chop the Lettuce: Wash your romaine lettuce thoroughly and pat it dry. Then, chop it into small, manageable pieces. I aim for pieces that are easy to mix and will fit comfortably inside a pita pocket without creating too much bulk.
- Grate the Cheese: If you’re using a block of Parmesan, grate it now. I love the texture and flavor of fresh Parmesan, so I usually grate about 1/4 to 1/2 cup, depending on how cheesy I’m feeling!
- Combine Ingredients for the Filling: In a large mixing bowl, combine your diced or shredded chicken, the chopped romaine lettuce, and about half of your grated Parmesan cheese. If you’re adding any optional ingredients like red onion, cherry tomatoes, or beef bacon bits, toss them in now too.
- Dress the Filling: Pour your desired amount of Caesar dressing over the chicken and lettuce mixture. Start with about 1/4 to 1/3 cup and toss everything together gently but thoroughly until all the ingredients are well coated. You want it nicely dressed but not swimming in dressing. You can always add a little more if needed. If you’re using croutons, I suggest adding them right before filling the pitas to maintain their crunch.
- Prepare the Pitas: Take your pita breads. I like to warm them slightly to make them more pliable and easier to open. You can do this in a dry skillet over medium heat for 30 seconds per side, in the microwave for 10-15 seconds, or even toast them lightly in a toaster oven. Once warm, carefully cut each pita bread in half along the edge to create two pockets. Alternatively, you can slice off just the top edge of a whole pita to make one large pocket.
- Fill the Pitas: Using a spoon or small tongs, carefully fill each pita pocket with the Caesar chicken mixture. Don’t be afraid to gently pack it in! This recipe is hearty, so load them up generously.
- Serve Immediately: Arrange your filled Chicken Caesar Pitas on a platter and serve them right away. Garnish with a little extra grated Parmesan cheese or a sprinkle of fresh black pepper if you like. Enjoy your deliciously satisfying meal!
Tips & Suggestions
Making Chicken Caesar Pitas is straightforward, but with a few clever tips, you can elevate your experience and make them truly unforgettable. Here are some of my favorite suggestions:
- Meal Prep Perfection: This recipe is fantastic for meal prepping! To keep everything fresh and prevent soggy pitas, I recommend preparing the chicken Caesar mixture (chicken, lettuce, cheese, and any other veggies) and storing it separately from the dressing and the pitas. When you’re ready to eat, simply dress a portion of the mixture, warm a pita, and fill it. This way, your pitas stay soft and your salad stays crisp.
- Preventing Soggy Pitas: The key to a great pita sandwich is avoiding sogginess. As mentioned above, always dress your chicken and lettuce mixture right before filling the pitas. If you’re packing these for lunch, carry the dressing in a small container and add it just before you eat. Another trick is to toast your pitas lightly before filling, as a slightly firmer pita can better withstand the moisture from the filling.
- Amp Up the Flavor:
- Garlic Lover’s Delight: If you adore garlic, try rubbing the inside of your warmed pita pockets with a cut garlic clove before filling. It adds a wonderful subtle garlic essence.
- Extra Crunch: Don’t forget those croutons! If you’re omitting them from the filling, consider serving a small side of croutons for an extra crunch.
- Herbal Freshness: A sprinkle of fresh parsley or chives stirred into the chicken mixture can add a beautiful burst of fresh flavor and color.
- Customizing Your Filling: This is a versatile recipe! Feel free to experiment with other additions. Sliced black olives, roasted red peppers, or even a spoonful of sun-dried tomatoes can add unique dimensions. If you like a little heat, a dash of hot sauce in the dressing or a pinch of red pepper flakes with the chicken can be fantastic.
- Serving Suggestions: Chicken Caesar Pitas are hearty enough to be a complete meal on their own, but they also pair wonderfully with a simple side. A light fruit salad, a bowl of tomato soup, or even some crunchy vegetable sticks (like carrots and celery) would complement them perfectly.
- Chicken Variation: Don’t limit yourself to plain cooked chicken. Sometimes I’ll marinate the chicken in a little lemon juice, olive oil, garlic, and dried oregano before cooking for an extra layer of flavor that complements the Caesar dressing beautifully.
Storage
Chicken Caesar Pitas are definitely at their best when enjoyed fresh, right after assembly. The crispness of the lettuce, the warmth of the pita, and the vibrancy of the dressing are all paramount to the optimal experience. However, I understand that sometimes you need to plan ahead or store leftovers. Here’s how I handle storage to maintain as much quality as possible:
- Separate Components for Best Results: If you’re making these for meal prep or anticipate having leftovers, your best strategy is to store the components separately.
- The Chicken Caesar Mixture (undressed): Store your cooked and diced chicken, chopped romaine, and any other vegetables (like tomatoes or red onion) in an airtight container in the refrigerator. This mixture should stay fresh for up to 3-4 days. Do not add the dressing yet!
- Caesar Dressing: Keep your Caesar dressing in a separate, sealed container in the refrigerator. Store-bought dressings have their own expiration dates, while homemade dressings are typically good for 3-5 days.
- Pita Breads: Unused pita breads can be kept at room temperature in their original packaging, or frozen for longer storage. If frozen, thaw them before using.
- Parmesan Cheese: Store grated Parmesan in an airtight container in the refrigerator.
- Croutons: Keep croutons in an airtight container at room temperature to maintain their crunch.
- Reassembly for Eating: When you’re ready to enjoy a Chicken Caesar Pita later, simply warm a pita if desired, toss a portion of the chicken and lettuce mixture with the dressing, and fill your pita. This method ensures that the lettuce remains crisp and the pita doesn’t become soggy.
- Already Assembled Pitas: If you have an already assembled and dressed Chicken Caesar Pita that needs storing, I recommend eating it within a few hours. The lettuce will start to wilt, and the pita will absorb moisture from the dressing, becoming soft and potentially a bit gummy. While safe to eat the next day if refrigerated, the texture and freshness will have significantly diminished. If you must store an assembled pita, wrap it tightly in plastic wrap and refrigerate. Try to consume it within 12-24 hours for the best (though compromised) quality.
Final Thoughts
There you have it! I genuinely hope you’re inspired to whip up these incredible Chicken Caesar Pitas. I absolutely love how they take all the beloved flavors of a classic Caesar salad – the creamy dressing, crisp lettuce, tender chicken, and savory Parmesan – and transform them into a convenient, delightful meal perfect for any occasion. These Chicken Caesar Pitas aren’t just easy to make; they’re a truly satisfying, fuss-free option for a quick lunch, a casual dinner, or even a delightful snack on the go. Trust me, once you try them, you’ll want to add them to your regular rotation. They truly are a must-try!

Quick Chicken Caesar Pitas Recipe: Healthy & Flavorful
- Total Time: 30 minutes
- Yield: 4 servings
Description
Enjoy a delightful twist on a classic Caesar salad with these Chicken Caesar Pitas. Perfect for a quick lunch or dinner, they combine fresh ingredients into a convenient handheld meal.
Ingredients
- Cooked Chicken (boneless, skinless chicken breasts or thighs)
- Pita Breads (larger, thicker ones preferred)
- Romaine Lettuce
- Caesar Dressing
- Parmesan Cheese (freshly grated)
- Croutons (Optional but Recommended)
- Optional Add-ins (thinly sliced red onion, halved cherry tomatoes, cooked and crumbled beef bacon bits, avocado chunks)
Instructions
- Prepare Your Chicken: Ensure your chicken is ready. If using raw chicken, season with salt, pepper, garlic powder, and paprika, then grill or pan-fry until cooked through. Let it rest before dicing or shredding.
- Chop the Lettuce: Wash and pat dry the romaine lettuce, then chop it into small pieces.
- Grate the Cheese: Grate about 1/4 to 1/2 cup of Parmesan cheese.
- Combine Ingredients for the Filling: In a large mixing bowl, combine diced or shredded chicken, chopped romaine, and half of the grated Parmesan. Add any optional ingredients if desired.
- Dress the Filling: Pour Caesar dressing over the mixture, starting with 1/4 to 1/3 cup, and toss gently until well coated.
- Prepare the Pitas: Warm pita breads slightly, then cut each in half to create pockets.
- Fill the Pitas: Fill each pita pocket with the Caesar chicken mixture, packing it in generously.
- Serve Immediately: Arrange filled pitas on a platter, garnish with extra Parmesan or black pepper, and enjoy!
- Prep Time: 15 mins
- Cook Time: 15 mins
- Category: Lunch
- Method: Grilling/Pan-frying
- Cuisine: American
Nutrition
- Serving Size: 1 pita
- Calories: 350
- Sugar: 2 g
- Sodium: 800 mg
- Fat: 15 g
- Saturated Fat: 5 g
- Unsaturated Fat: 8 g
- Trans Fat: 0 g
- Carbohydrates: 35 g
- Fiber: 4 g
- Protein: 25 g
- Cholesterol: 70 mg
Keywords: For meal prep, store the chicken Caesar mixture separately from the dressing and pitas to keep them fresh. Customize your filling with additional ingredients like olives or roasted peppers for extra flavor.
Leave a Comment