
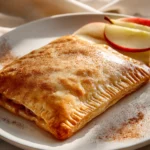
Apple Cinnamon Breakfast Pop Tarts
Oh, friends, get ready to ditch those cardboard-tasting store-bought versions because I’m about to introduce you to a game-changer: homemade Apple Cinnamon Breakfast Pop Tarts! If you, like me, have a soft spot for that iconic breakfast pastry but dream of something made with real ingredients and bursting with genuine flavor, then this recipe is your new best friend. What makes these so incredibly special, you ask? Well, imagine a golden, flaky pastry, baked to perfection, encasing a warm, tender filling of spiced apples and fragrant cinnamon that practically screams “cozy morning.”
You are going to absolutely adore these because they take a beloved childhood treat and elevate it into something truly gourmet, yet completely approachable for the home baker. No more bland fillings or artificial sweetness; here, we celebrate the natural sweetness of apples married with the comforting kick of cinnamon, all enveloped in a tender, buttery crust and finished with a simple, sweet glaze. It’s not just a breakfast; it’s an experience – a little pocket of warmth and joy perfect for easing into your day, or even as a delightful afternoon pick-me-up. Trust me, once you try these homemade beauties, there’s no going back to the box!

Ingredient Notes
Crafting the perfect Apple Cinnamon Breakfast Pop Tart starts with understanding a few key ingredients. While the essence is simple, selecting and preparing these components makes all the difference in achieving that nostalgic, comforting flavor and flaky texture we all adore. I always recommend using quality ingredients to truly elevate your homemade treats.
- For the Dough: My go-to shortcut is usually a good quality store-bought refrigerated pie crust. It saves a ton of time and still bakes up beautifully flaky. You’ll need two rolls, which typically come in a box. If you’re feeling ambitious and want to make your own dough from scratch, a classic butter pie dough recipe works wonderfully. You could also experiment with puff pastry for an even flakier, lighter texture, though it will change the overall feel slightly.
- For the Apple Filling: The star of the show! I love using a mix of apples for depth of flavor – something sweet like Fuji or Honeycrisp, and something a bit tart like Granny Smith. This combination gives you a lovely balance. You’ll need about 2-3 medium apples, peeled, cored, and finely diced. Smaller dice ensure they cook down quickly and fit nicely into the pop tart.
- Sweetener & Spice: Granulated sugar is perfect for the filling, balanced with a generous amount of ground cinnamon. A pinch of nutmeg can also be a lovely addition for that extra layer of warmth. For a richer, deeper flavor, you could swap out half the granulated sugar for light brown sugar.
- Thickener: A little cornstarch or all-purpose flour is essential to thicken the apple filling, preventing it from becoming too watery and making your pop tarts soggy. Just a tablespoon or so does the trick.
- Acid: A squeeze of fresh lemon juice not only brightens the apple flavor but also helps prevent the apples from browning too quickly as you prepare them.
- For the Icing: This simple glaze pulls everything together. You’ll need powdered sugar (confectioners’ sugar) for a smooth, lump-free consistency, a splash of milk (any kind works, dairy or non-dairy if you prefer), and a touch of vanilla extract. Sometimes I add a tiny pinch of cinnamon to the icing too, just to echo the filling.
As for substitutions, feel free to play around! If you don’t have fresh apples, canned apple pie filling can work in a pinch (though I’d reduce the added sugar and spices). For the dairy in the icing, any non-dairy milk alternative like almond or oat milk works perfectly. The beauty of these pop tarts is their adaptability!
Step-by-Step Instructions
Making these Apple Cinnamon Breakfast Pop Tarts is such a rewarding experience, and I promise, it’s easier than you might think! Just follow these steps, and you’ll be enjoying warm, homemade goodness in no time.
- Prepare the Apple Filling: First, let’s get that delicious apple filling ready. Peel, core, and finely dice your apples into small, uniform pieces – about 1/4-inch cubes work best. In a medium saucepan, combine the diced apples, granulated sugar, ground cinnamon, lemon juice, and cornstarch (or flour). Give it a good stir to coat the apples.
- Cook the Filling: Place the saucepan over medium heat. Cook, stirring occasionally, for about 8-10 minutes, or until the apples have softened but still retain a bit of their shape, and the liquid has thickened to a syrupy consistency. It’s important not to overcook them into mush. Once done, remove from heat and let the filling cool completely. This step is crucial to prevent steam from making your pastry soggy during baking. I often make the filling an hour or two ahead, or even the night before, and chill it in the refrigerator.
- Preheat Oven & Prep Baking Sheet: While the filling cools, preheat your oven to 375°F (190°C). Line a large baking sheet with parchment paper or a silicone baking mat.
- Roll Out the Dough: On a lightly floured surface, unroll one of your pie crusts. Using a sharp knife or a pizza cutter, trim the edges to form a neat rectangle. Then, cut the large rectangle into 4 smaller, equal-sized rectangles. Repeat this process with the second pie crust, so you have 8 dough rectangles in total.
- Assemble the Pop Tarts: Arrange 4 of the dough rectangles on your prepared baking sheet. Spoon about 1-2 tablespoons of the cooled apple filling onto the center of each rectangle, leaving a clear border around the edges. Be careful not to overfill, as this can lead to leakage during baking.
- Seal the Pop Tarts: Lightly moisten the edges of the dough around the filling with a little water using your fingertip or a pastry brush. Carefully place the remaining 4 dough rectangles on top of the filling-covered rectangles, lining up the edges. Gently press down around the filling to seal the top and bottom dough layers together.
- Crimp and Vent: Use the tines of a fork to firmly crimp all around the edges of each pop tart. This not only creates a pretty border but also helps to seal the edges securely, preventing the filling from oozing out. Finally, use a small knife to cut two or three small slits on the top of each pop tart. These vents allow steam to escape, preventing the pastry from puffing up too much and bursting.
- Bake: Transfer the baking sheet to your preheated oven. Bake for 15-20 minutes, or until the pop tarts are golden brown and puffed. Keep an eye on them, as oven temperatures can vary.
- Cool & Ice: Once baked, carefully remove the pop tarts from the oven and transfer them to a wire rack to cool completely. This is important before icing, otherwise, your icing will melt right off!
- Prepare & Apply Icing: In a small bowl, whisk together the powdered sugar, milk, and vanilla extract until smooth and free of lumps. If you want a thicker icing, add less milk; for a thinner glaze, add a tiny bit more. Drizzle or spread the icing generously over the cooled pop tarts. Let the icing set for a few minutes before serving.
Tips & Suggestions
Making these Apple Cinnamon Breakfast Pop Tarts is a joy, and over time, I’ve picked up a few tricks that I think really help make them perfect. Here are some of my favorite tips to ensure your pop tarts are a flaky, fruity success!
- Don’t Overfill: This is probably my number one tip! It’s tempting to pack in as much apple filling as possible, but overfilling is the primary cause of leaky pop tarts. A tablespoon or two per tart is usually plenty to give you that great flavor without bursting the seams.
- Cool Your Filling Completely: I mentioned this in the steps, but it bears repeating. Hot or even warm filling will steam inside your pastry, making it soggy and difficult to seal properly. Always ensure your apple mixture is fully cooled before assembly.
- Proper Sealing is Key: Take your time when pressing and crimping the edges. A good, tight seal is essential to keep all that delicious apple filling inside where it belongs. I like to use a fork, pressing down firmly all around the perimeter.
- Ventilation Matters: Those little slits on top aren’t just for show! They allow steam to escape during baking, preventing your pop tarts from puffing up uncontrollably and potentially bursting.
- Keep Dough Cold: Work quickly when handling the pie crusts. If the dough gets too warm, it becomes sticky and harder to manage, and your pastry might not be as flaky. If your kitchen is warm, you can pop the assembled tarts into the fridge for 10-15 minutes before baking.
- Experiment with Spices: While cinnamon is classic, feel free to add a tiny pinch of ground nutmeg, allspice, or even a very small amount of ground ginger to your apple filling for an extra layer of flavor complexity.
- Vary the Glaze: Beyond the basic vanilla glaze, you can get creative! A sprinkle of turbinado sugar on top before baking gives a nice crunchy texture, or you can add a tiny bit of maple extract to your icing for a maple-cinnamon twist.
- Serving Warm: While they are delicious at room temperature, a quick zap in the microwave for 10-15 seconds brings them back to that warm, fresh-from-the-oven comfort.
Storage
Once you’ve made a batch of these delightful Apple Cinnamon Breakfast Pop Tarts, you’ll want to know how to keep them fresh and delicious for as long as possible. Here’s how I store mine:
- At Room Temperature: If your pop tarts are iced, make sure the icing has fully set before storing. Place the cooled, iced pop tarts in an airtight container. They will stay fresh at room temperature for up to 2-3 days. This is my preferred method if I know we’ll devour them quickly!
- In the Refrigerator: For slightly longer storage, you can store your pop tarts in an airtight container in the refrigerator for up to 5 days. If you’ve made a larger batch, or your kitchen runs warm, refrigeration is a good option.
- Freezing for Later: These pop tarts freeze beautifully! Once completely cooled and the icing is fully set (or you can freeze them un-iced and glaze them after reheating), wrap each pop tart individually in plastic wrap, then place them in a freezer-safe bag or airtight container. They can be frozen for up to 1-2 months. This is perfect for having a quick breakfast on hand!
- Reheating:
- From Room Temperature or Refrigerator: My favorite way to reheat them is in a toaster oven or conventional oven at 300-325°F (150-160°C) for about 5-10 minutes, or until warmed through and the crust is slightly crispy again. You can also microwave them for 10-20 seconds if you’re in a hurry, but they won’t have the same crispness.
- From Frozen: If reheating from frozen, you can place them directly into a preheated oven (350°F / 175°C) for about 15-20 minutes, or until heated through. Alternatively, microwave for 30-60 seconds, then finish in a toaster oven for crispness. If you froze them un-iced, you can add the fresh glaze after reheating.
Enjoy your homemade Apple Cinnamon Breakfast Pop Tarts whenever the craving strikes!

Final Thoughts
There’s something truly special about starting your day with a warm, homemade treat, and these Apple Cinnamon Breakfast Pop Tarts deliver on every front. Forget the store-bought versions; the aroma of apples and cinnamon baking in your kitchen is an experience in itself, promising a delightful bite even before you take it. I truly believe that making these Apple Cinnamon Breakfast Pop Tarts is more than just baking; it’s creating a moment of cozy comfort, a little burst of joy that brightens any morning or afternoon snack time.
The combination of tender pastry, perfectly spiced apple filling, and that sweet glaze makes these a truly irresistible choice. I encourage you to set aside some time and give these a try. You’ll be so glad you did when you bite into your very own, warm, and utterly delicious Apple Cinnamon Breakfast Pop Tarts. They’re not just a breakfast item; they’re a little taste of happiness, baked with love!
Best Apple Cinnamon Breakfast Pop Tarts Recipe Ever!
- Total Time: 50 minutes
- Yield: 8 pop tarts 1x
Description
Ditch the store-bought versions and indulge in these homemade Apple Cinnamon Breakfast Pop Tarts, featuring a flaky pastry and a warm, spiced apple filling. Perfect for breakfast or an afternoon treat, these pop tarts are a delightful experience you won’t forget.
Ingredients
- 2 rolls of refrigerated pie crust
- 2–3 medium apples (Fuji, Honeycrisp, and Granny Smith recommended), peeled, cored, and finely diced
- Granulated sugar (for filling)
- Ground cinnamon (for filling)
- A pinch of nutmeg (optional)
- Light brown sugar (optional, to replace half of the granulated sugar)
- Cornstarch or all-purpose flour (1 tablespoon, for thickening)
- Fresh lemon juice (for acid)
- Powdered sugar (for icing)
- Milk (any kind, for icing)
- Vanilla extract (for icing)
- A tiny pinch of cinnamon (optional, for icing)
Instructions
- Prepare the Apple Filling: Peel, core, and finely dice your apples into small, uniform pieces. In a medium saucepan, combine the diced apples, granulated sugar, ground cinnamon, lemon juice, and cornstarch (or flour). Stir to coat the apples.
- Cook the Filling: Place the saucepan over medium heat. Cook, stirring occasionally, for about 8-10 minutes, or until the apples have softened but still retain a bit of their shape, and the liquid has thickened to a syrupy consistency. Remove from heat and let the filling cool completely.
- Preheat Oven & Prep Baking Sheet: Preheat your oven to 375°F (190°C). Line a large baking sheet with parchment paper or a silicone baking mat.
- Roll Out the Dough: On a lightly floured surface, unroll one of your pie crusts. Trim the edges to form a neat rectangle, then cut into 4 smaller rectangles. Repeat with the second pie crust for a total of 8 rectangles.
- Assemble the Pop Tarts: Arrange 4 dough rectangles on your prepared baking sheet. Spoon about 1-2 tablespoons of the cooled apple filling onto the center of each rectangle, leaving a clear border around the edges.
- Seal the Pop Tarts: Lightly moisten the edges of the dough around the filling with a little water. Place the remaining 4 dough rectangles on top and gently press down around the filling to seal.
- Crimp and Vent: Use the tines of a fork to crimp the edges of each pop tart. Cut two or three small slits on the top of each pop tart to allow steam to escape.
- Bake: Transfer the baking sheet to your preheated oven. Bake for 15-20 minutes, or until golden brown and puffed.
- Cool & Ice: Remove the pop tarts from the oven and transfer to a wire rack to cool completely.
- Prepare & Apply Icing: In a small bowl, whisk together the powdered sugar, milk, and vanilla extract until smooth. Drizzle or spread the icing over the cooled pop tarts and let it set before serving.
- Prep Time: 30 mins
- Cook Time: 20 mins
- Category: Breakfast
- Method: Baking
- Cuisine: American
Nutrition
- Serving Size: 1 pop tart
- Calories: 250
- Sugar: 15 g
- Sodium: 150 mg
- Fat: 10 g
- Saturated Fat: 5 g
- Unsaturated Fat: 3 g
- Trans Fat: 0 g
- Carbohydrates: 35 g
- Fiber: 2 g
- Protein: 2 g
- Cholesterol: 15 mg
Keywords: Don't overfill the pop tarts to prevent leakage. Ensure the apple filling is completely cooled before assembly. Proper sealing is key to keeping the filling inside. Ventilation matters for steam escape during baking. Keep dough cold for best results.
Leave a Comment