
Garlic Cheesy Chicken Wraps are a delightful fusion of flavors that never fail to impress. As someone who loves experimenting in the kitchen, I can confidently say that these wraps are a crowd-pleaser, perfect for any occasion. The combination of tender chicken, gooey cheese, and the aromatic punch of garlic creates a taste sensation that is simply irresistible. Historically, wraps have been a staple in various cultures, offering a convenient way to enjoy a meal on the go. People adore Garlic Cheesy Chicken Wraps not only for their incredible taste and texture but also for their ease of preparation. Whether you’re hosting a casual gathering or looking for a quick weeknight dinner, these wraps are sure to become a favorite in your household.

Ingredients:
- 2 large chicken breasts, boneless and skinless
- 1 tablespoon olive oil
- 4 cloves garlic, minced
- 1 teaspoon paprika
- Salt and pepper, to taste
- 1 cup shredded mozzarella cheese
- 1 cup shredded cheddar cheese
- 1/2 cup cream cheese, softened
- 1 tablespoon fresh parsley, chopped (optional)
- 4 large flour tortillas
- 1 cup fresh spinach leaves
- 1/2 cup diced tomatoes
- 1/4 cup ranch dressing (optional)
Preparing the Chicken
1. Start by preheating your oven to 375°F (190°C). This will ensure that it’s hot and ready for the chicken once we’re done preparing it. 2. While the oven is heating, take the chicken breasts and place them on a cutting board. Using a sharp knife, slice them into thin strips. This will help them cook faster and make it easier to wrap later. 3. In a large mixing bowl, combine the sliced chicken with olive oil, minced garlic, paprika, salt, and pepper. Make sure to coat the chicken evenly with the mixture. I like to use my hands for this part; it’s the best way to ensure everything is well mixed. 4. Once the chicken is well coated, transfer it to a baking dish. Spread the chicken out in a single layer to ensure even cooking. 5. Place the baking dish in the preheated oven and bake for about 20-25 minutes, or until the chicken is cooked through and no longer pink in the center. You can check this by cutting into a piece or using a meat thermometer; it should read 165°F (75°C).Preparing the Cheese Mixture
6. While the chicken is baking, let’s prepare the cheesy filling. In a medium-sized bowl, combine the shredded mozzarella cheese, shredded cheddar cheese, and softened cream cheese. 7. Mix the cheeses together until they are well combined. If you want to add a little freshness, toss in the chopped parsley at this stage. It adds a nice touch of color and flavor!Assembling the Wraps
8. Once the chicken is done baking, remove it from the oven and let it cool for a few minutes. This will make it easier to handle. 9. Take a large flour tortilla and lay it flat on a clean surface. Start by placing a handful of fresh spinach leaves in the center of the tortilla. This will add a nice crunch and freshness to the wrap. 10. Next, add a generous portion of the baked chicken strips on top of the spinach. 11. Spoon a few tablespoons of the cheese mixture over the chicken. Don’t be shy with the cheese; it’s what makes these wraps so delicious! 12. If you’re using diced tomatoes, sprinkle them on top of the cheese mixture. This adds a burst of flavor and a bit of juiciness to the wraps. 13. If you like a little extra creaminess, drizzle some ranch dressing over the top. This is optional, but it really enhances the flavor. 14. Now, it’s time to wrap it all up! Fold the sides of the tortilla inwards, then roll it up from the bottom to the top, making sure to tuck in the sides as you go. This will help keep all the delicious fillings inside. 15. Repeat the assembly process for the remaining tortillas and filling.Cooking the Wraps
16. In a large skillet, heat a little olive oil over medium heat. You want just enough to coat the bottom of the pan. 17. Once the oil is hot, place the wrapped tortillas seam-side down in the skillet. This will help seal the wraps and give them a nice golden color. 18. Cook the wraps for about 3-4 minutes on each side, or until they are golden brown and crispy. You may need to do this in batches, depending on the size of your skillet. 19. Once they are cooked, remove the wraps from the skillet and place them on a cutting board. Let them cool for a minute before slicing them in half.Serving Suggestions
20. Serve the garlic cheesy chicken wraps warm, with extra ranch dressing or your favorite dipping sauce on the side. They’re perfect for a quick lunch, a satisfying dinner, or even a fun party appetizer. 21. If you want to elevate the presentation, you can garnish the wraps with a sprinkle of fresh parsley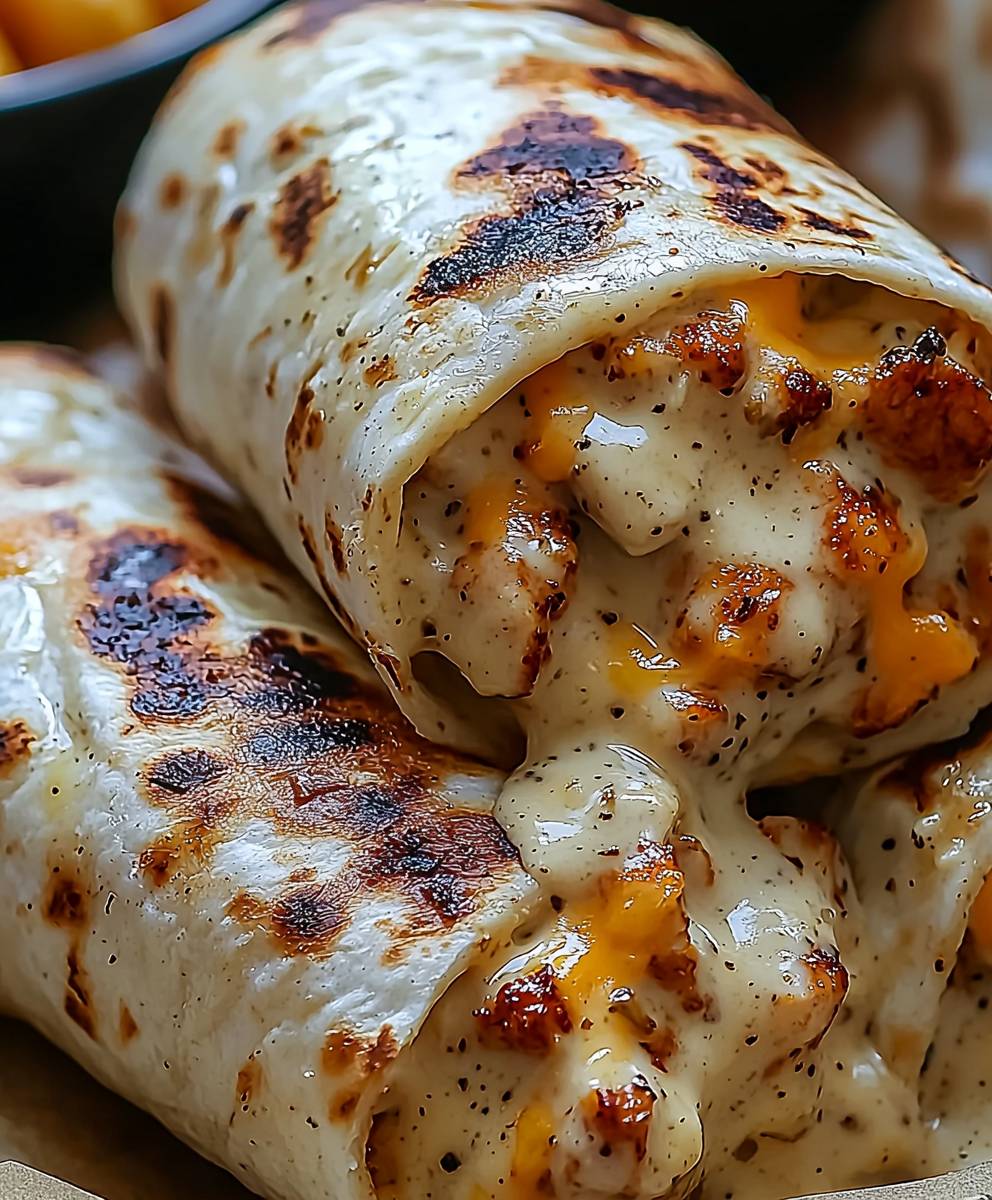
Conclusion:
In summary, these Garlic Cheesy Chicken Wraps are an absolute must-try for anyone looking to elevate their meal game with minimal effort. The combination of tender chicken, gooey cheese, and the aromatic kick of garlic creates a flavor explosion that is sure to please even the pickiest eaters. Plus, they are incredibly versatile! You can easily swap out the chicken for grilled veggies or even shrimp for a delightful twist. For a fun serving suggestion, consider pairing these wraps with a side of crispy sweet potato fries or a fresh garden salad to balance the richness of the cheese. You could also experiment with different types of cheese—think pepper jack for a spicy kick or feta for a Mediterranean flair. I encourage you to give this recipe a try and make it your own! Once you’ve whipped up these delicious Garlic Cheesy Chicken Wraps, I’d love to hear about your experience. Share your thoughts, any variations you tried, or even a photo of your creation! Let’s spread the love for this easy and satisfying dish together. Happy cooking! Print
Garlic Cheesy Chicken Wraps: A Delicious and Easy Recipe to Try Today
- Total Time: 45 minutes
- Yield: 4 wraps 1x
Description
These Garlic Cheesy Chicken Wraps feature tender chicken, creamy cheeses, and fresh veggies wrapped in warm tortillas, making them a perfect choice for a quick lunch or satisfying dinner. Enjoy a delicious blend of flavors that everyone will love!
Ingredients
- 2 large chicken breasts, boneless and skinless
- 1 tablespoon olive oil
- 4 cloves garlic, minced
- 1 teaspoon paprika
- Salt and pepper, to taste
- 1 cup shredded mozzarella cheese
- 1 cup shredded cheddar cheese
- 1/2 cup cream cheese, softened
- 1 tablespoon fresh parsley, chopped (optional)
- 4 large flour tortillas
- 1 cup fresh spinach leaves
- 1/2 cup diced tomatoes
- 1/4 cup ranch dressing (optional)
Instructions
- Preheat your oven to 375°F (190°C).
- Slice the chicken breasts into thin strips on a cutting board.
- In a large mixing bowl, combine the sliced chicken with olive oil, minced garlic, paprika, salt, and pepper. Mix well to coat the chicken evenly.
- Transfer the chicken to a baking dish, spreading it out in a single layer.
- Bake for 20-25 minutes, or until the chicken is cooked through (165°F/75°C).
- In a medium bowl, combine shredded mozzarella, shredded cheddar, and softened cream cheese.
- Mix until well combined. Optionally, add chopped parsley for extra flavor.
- Once the chicken is done, let it cool for a few minutes.
- Lay a flour tortilla flat on a clean surface. Place a handful of fresh spinach in the center.
- Add a portion of the baked chicken strips on top of the spinach.
- Spoon a few tablespoons of the cheese mixture over the chicken.
- Sprinkle diced tomatoes on top, if using, and drizzle with ranch dressing, if desired.
- Fold the sides of the tortilla inwards, then roll it up from the bottom to the top, tucking in the sides as you go.
- Repeat the assembly for the remaining tortillas and filling.
- Heat a little olive oil in a large skillet over medium heat.
- Place the wrapped tortillas seam-side down in the skillet and cook for 3-4 minutes on each side until golden brown and crispy.
- Remove the wraps from the skillet and let them cool for a minute before slicing in half.
- Serve warm with extra ranch dressing or your favorite dipping sauce. Garnish with fresh parsley if desired.
Notes
- Feel free to customize the fillings with your favorite vegetables or additional spices.
- These wraps can be made ahead of time and stored in the refrigerator for a quick meal later.
- Prep Time: 15 minutes
- Cook Time: 30 minutes
Leave a Comment